
Authenticate to PI and AF, Level 1: Driver Service
To connect to the PI Data Archive, the AF-Driver supports the following authentication methods:
- Windows Authentication (strongly recommended)
- PI Trust
- Explicit login via PI username and password
To connect to PI Asset Framework, only Windows Authentication is supported.
Step 1: Configure the Driver Service's Account
By default, the AF-Driver service runs as LocalSystem, which is a built-in machine account with Administrator privileges. We recommend provisioning a domain account for the service to use instead. If that isn't possible, configure the service to run using a virtual service account.
To change the account that the service uses:
- Open the Services app (open the Start menu -> start typing "services" -> click Services).
- Scroll down to the driver service, whose name is
Iota AF-Driver <region> <site>. - Right click the service, select Properties, and then click the Log On tab.
- Click the radio button labeled "This Account". If you have configured a domain account (preferred), enter the account and password here. Otherwise, you can use a virtual service account by entering
NT SERVICE\<service name>, where<service_name>is the name shown in the Services app, i.e.,Iota AF-Driver <region> <site>.
When you make this change, please make sure the account you choose has permission to read from and write to the driver's directory in ProgramData:
- Open File Explorer and navigate to
C:\ProgramData\IOTA\Drivers(note that this is ProgramData, not Program Files). - Right-click the subdirectory for the driver, which should be named
AF-Driver_<region>_<site>, and click Properties. - Click the Security tab, then click the Edit button.
- Add the account you configured above to run the service. If you used a virtual service account, you can refer to it here as
NT SERVICE\<service name>. - Allow the account at least Read and Write permission on this directory.
Step 2: Configure PI and AF Mappings
Next, create mappings in the PI Data Archive and PI Asset Framework to map the driver service's account to appropriate PI and AF identities.
Use PI System Management Tools (SMT) to create a PI mapping as follows:
- Click Security -> Identities, Users & Groups and create a new identity for the driver to use, if desired. You can skip this step if you'd like to map the driver to a preexisting identity.
- Click Mappings & Trusts, then click the New... icon at the top of the pane to create a new mapping.
- Enter the account you configured for the driver service. If you're using a virtual service account, specify the name of the driver machine using the format
<domain>\<host name>$(including the dollar sign). - Choose an identity to map the account to. The driver will have whatever permissions you've granted to this identity, plus the permissions granted to PIWorld (by default, read-only access to all tags), unless you've disabled PIWorld.
Use PI System Explorer (PSE) to create an AF mapping as follows:
- Click File -> Connections -> Properties to open the AF Server Properties dialog.
- Click the Identities tab, then right-click in the table of identities and select New Identity to create a new identity for the driver, if desired. As before, you can skip this step if you'd like to use a preexisting identity.
- Click the Mappings tab, then right-click in the table of mappings and select New Mapping.
- Enter the name of the account you've configured the driver service to use. As before, if you've configured a virtual service account, specify the name of the driver machine using the syntax
<domain>\<host name>$. - Select the identity to map the account to. The driver will have whatever permissions you've granted to this identity, plus the permissions granted to the built-in World identity.
Step 3: (Optional) Configure Additional Authorizations
The previous steps are sufficient for PI and AF to authenticate the driver process. By default, those servers assign the mapped identity and the PIWorld or World identity, respectively, to the driver. PIWorld and World grant the driver read-only access to all tags, elements, and event frames, and if the mapped identity is new, it doesn't yet grant any additional privileges.
If you want to grant the driver permissions beyond PIWorld and World (or if you've disabled PIWorld and World), make sure to update the PI and AF objects you'd like the driver to access.
In PI/SMT:
- Click Security -> Database Security, right-click the PIPOINT database, and select Properties. Add the driver's identity here and grant it Read permission, which the driver uses to discover and validate tags.
- For each tag that you'd like to authorize the driver to read or write, use Point Builder to add the driver's identity to the Point Security and Data Security access-control lists (ACLs):
- Point Security; Read. Lets the driver discover the tag and read its configuration and security definitions. Read is sufficient even when the driver must write values.
- Data Security; Read, and Write if the tag is writeable. Writing values is governed entirely by Data Security.
- Remember, it isn't necessary to grant read access this way unless you've disabled PIWorld, since PIWorld already grants the driver read access to all tags. In contrast, this step is required to grant the driver write access to a tag.
- Because the driver performs every operation under its own account and never impersonates users, its identity must hold a superset of everything any IOTA user is permitted to do. See User Permissions and Write-Back.
- If you need to update more than a handful of points, consider using the Point Builder add-on for Excel.
In AF/PSE:
- For elements, right-click the element and click Security to open the Security Configuration dialog. Here you can add the driver's identity and grant it read or write access to the element. Optionally, you can also apply this change to all descendants of this element, recursively.
- For element templates, right-click the template and click Security to open the same dialog.
- Likewise, for event frame templates, right-click the template and click Security. If you would like IOTA users to be able to acknowledge and/or annotate an event frame, make sure to grant the driver's identity "Annotate" permission.
Authenticate to PI and AF, Level 2: Individual Users
In some scenarios different users ought to have different permissions in PI and AF. This is especially common when only a subset of users should be able to write data back, since it is rarely desirable for every IOTA user to have write permission.
The AF-Driver supports user- and tag-level access control by mapping user groups defined in your identity provider (IdP) to PI and AF identities. For each request a user triggers from IOTA, two checks must both pass: PI or AF verifies that the driver is authorized to make the request (the previous section), and the driver verifies that at least one of the user's mapped identities authorizes it.
Configuring this is covered in full on User Permissions and Write-Back: the permissions the driver identity requires, the two supported identity designs, the groupMappings syntax, worked examples, and how to validate the result.
Two prerequisites for this live outside this page:
- A groups claim in the access token. Your identity provider must include the user's group memberships, and most do not by default. See Verifying the Groups Claim.
- The driver-side configuration. The permissions the driver identity requires, the two supported identity designs, the
groupMappingssyntax, worked examples, and validation are all covered on User Permissions and Write-Back.
IOTA Vue Data Source Configuration
IOTA Vue drivers are architected to support the often multiple and distributed PI System and PI Data Archives (PI Servers). The IOTA PAF-Driver is deployed on a network with access to the required PI Systems and PI Data Archives.
You can install multiple AF-Drivers to accommodate deployment of PI Systems on different subnets. IOTA Vue uses distributed "mesh-like" data source topology to support any deployment topology of your PI Systems. The hierarchical topology is as follows:
There are no limits to the number of Regions, Sites, and instances. IOTA Software recommends naming the topologies to reflect the PI Server deployment topology; however, there are no restrictions on the names. Here is a simple example:
| Name | Example | Description |
|---|---|---|
| Region | us-east-1 | geographical territory, similar to availability regions |
| Site | siteB | specific plant or a building. It can also be a proxy to another AF-Driver instance serving the same PI Data Archives |
To simplify the installation process, the IOTA Software provides an automated driver installer generation.
The user is only required to select/create a region and site. Then for selected driver type, download the installer.
The installer will contain all necessary AF-Driver configuration with public and private keys for secure communication with
the company's IOTA Vue NATs message bus.
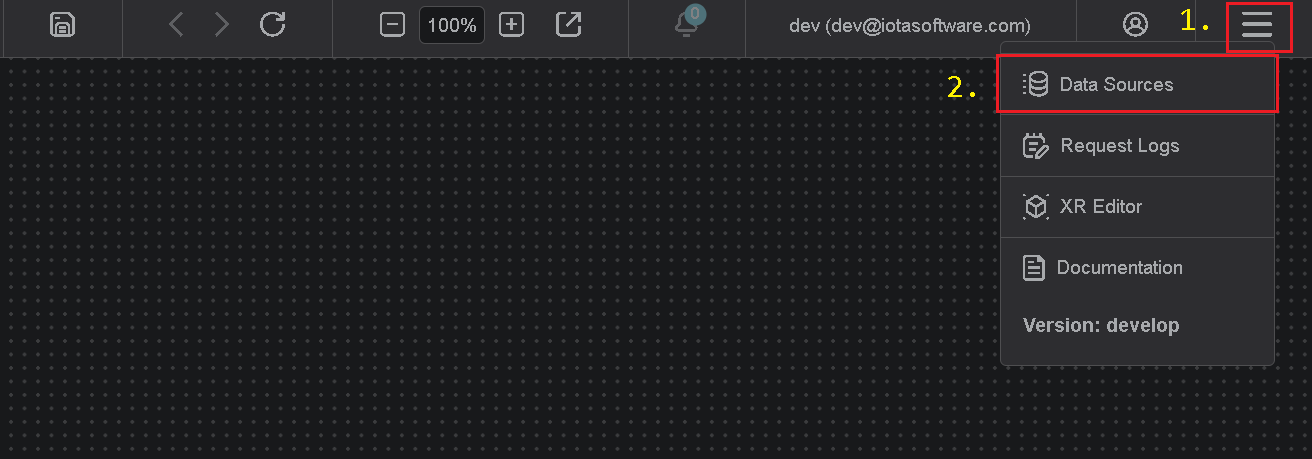
To access the Data Sources menu, click at the top right corner on "hamburger" icon, then select "Data Sources".
Add Region
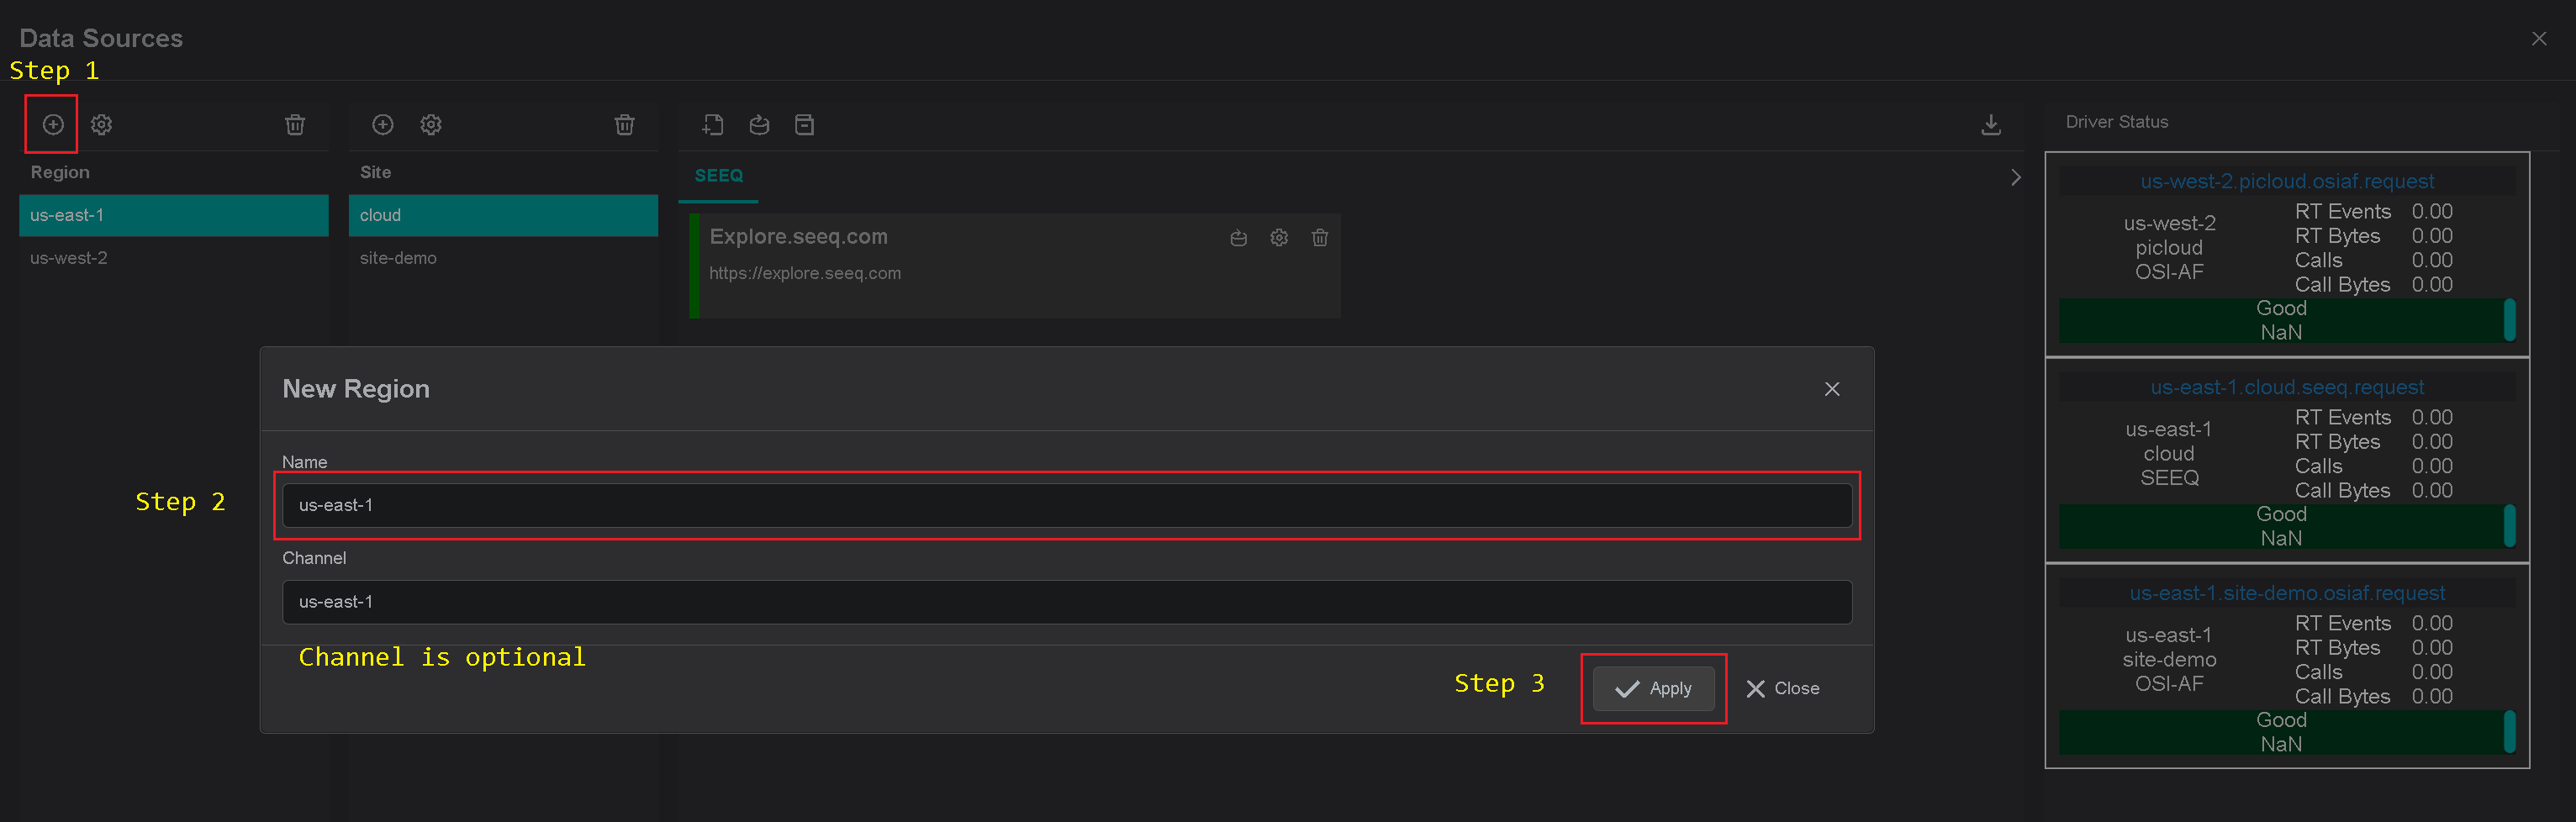
Click on the "Add" icon to add a new region, then in popup dialog enter the region name.
Note, there are 2 input fields:
- Region name
- Channel name (optional)
Where region name is a user-friendly name and channel name can contain abbreviations.
If the channel name is not provided, it is automatically assigned to the region name on "Apply" button click.
Add Site
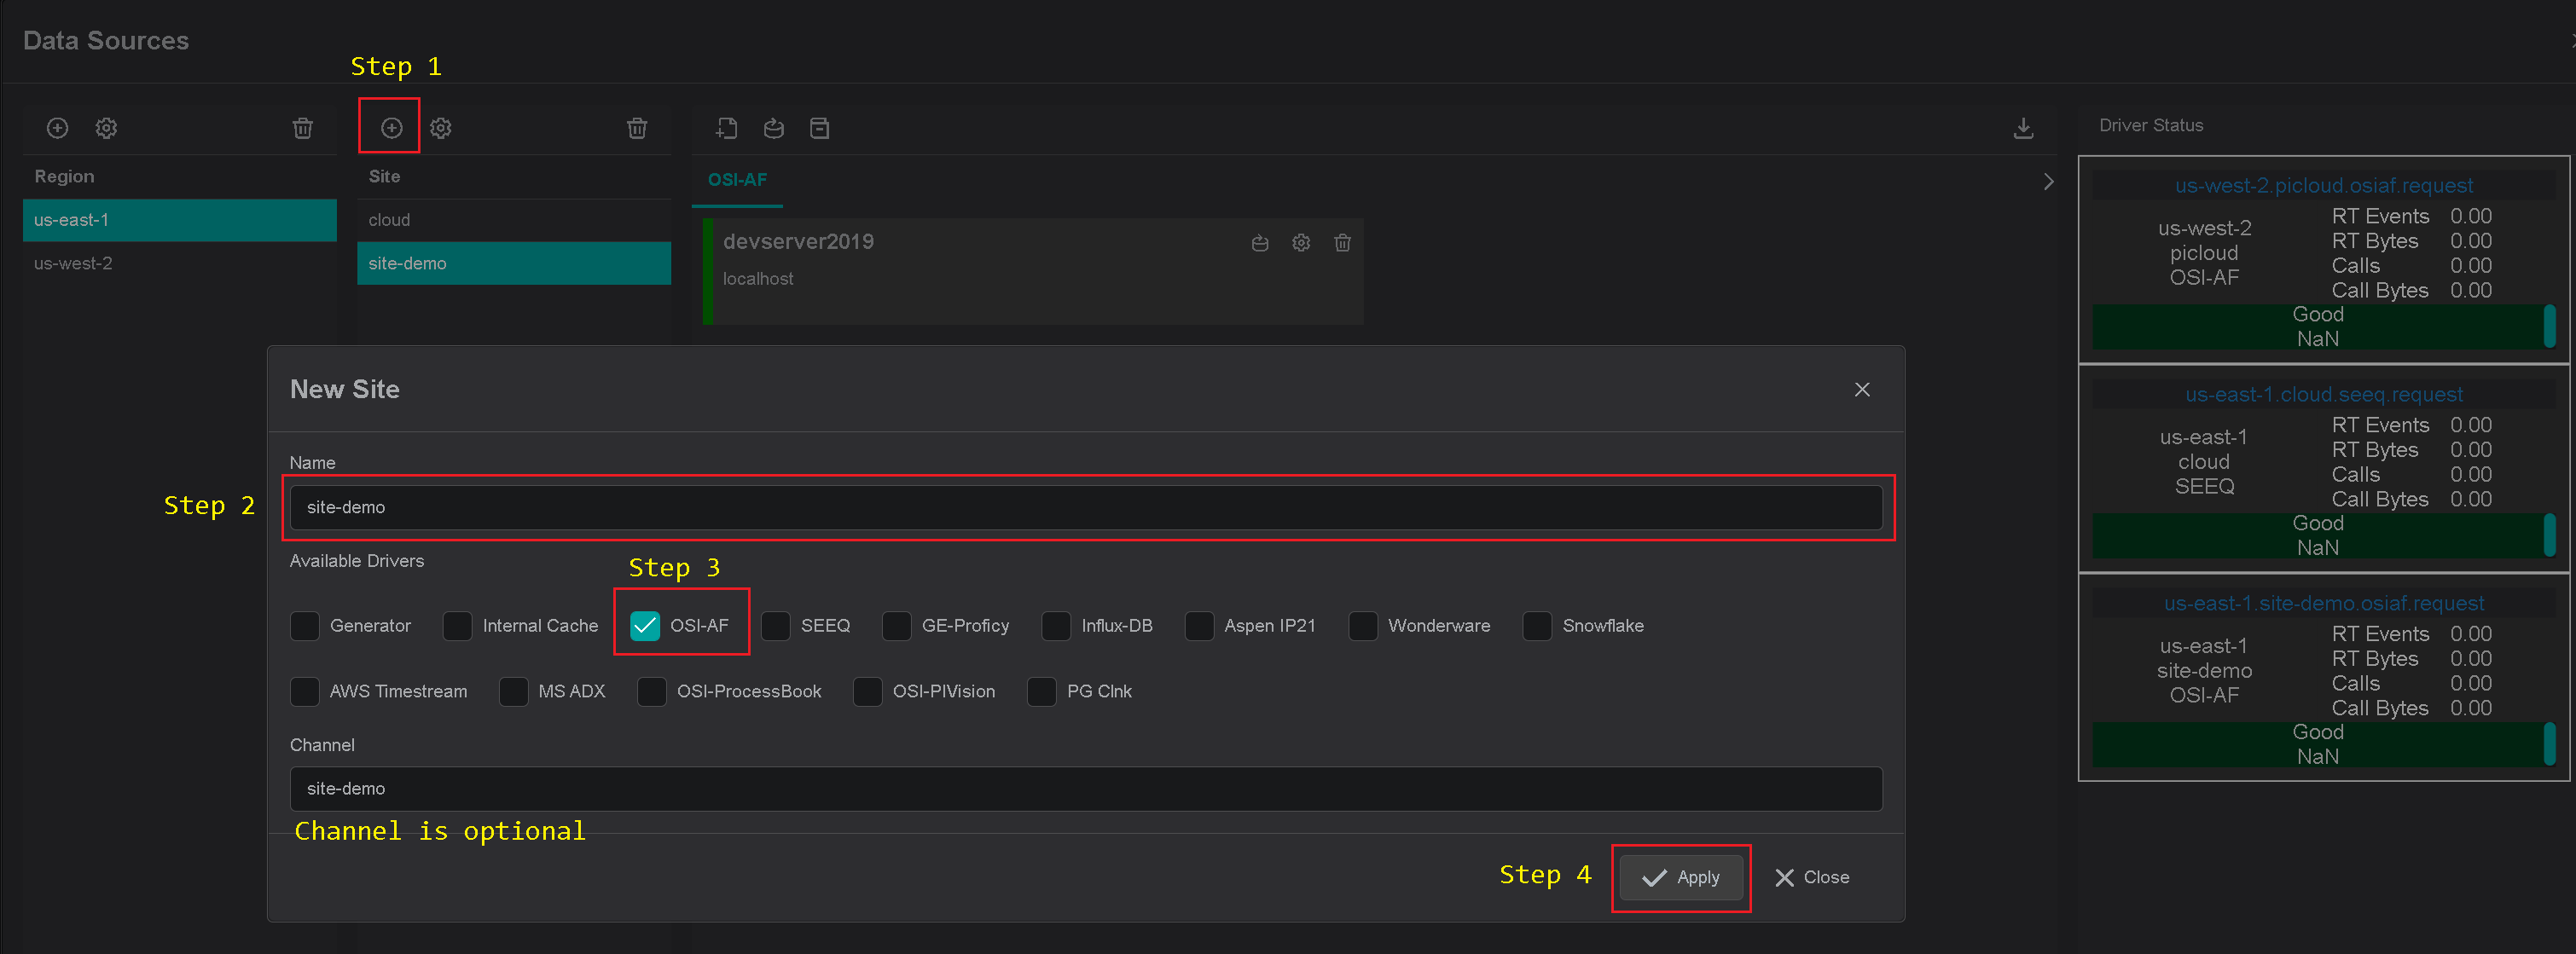
Click on the "Add" icon to add a new site, then in the popup dialog enter the site name.
Make sure the OSI-AF checkbox is checked. Each site can contain multiple driver types.
For each checked driver type the instance pane will contain selected driver tabs to which connection instances can be added.
Note, there are 2 input fields:
- Site name
- Channel name (optional)
Where site name is a user-friendly name and channel name can contain abbreviations.
If channel name is not provided, it is automatically assigned to the site name on "Apply" button click.
Add IOTA Vue Connection
In order for AF-Driver to be used in Tag/Asset/TimeFrame searches - specific PI connections must be configured from within IOTA Vue UI.
Warning
AF-Driver for specific region and site must be downloaded and installed prior to creating a new connection instance.
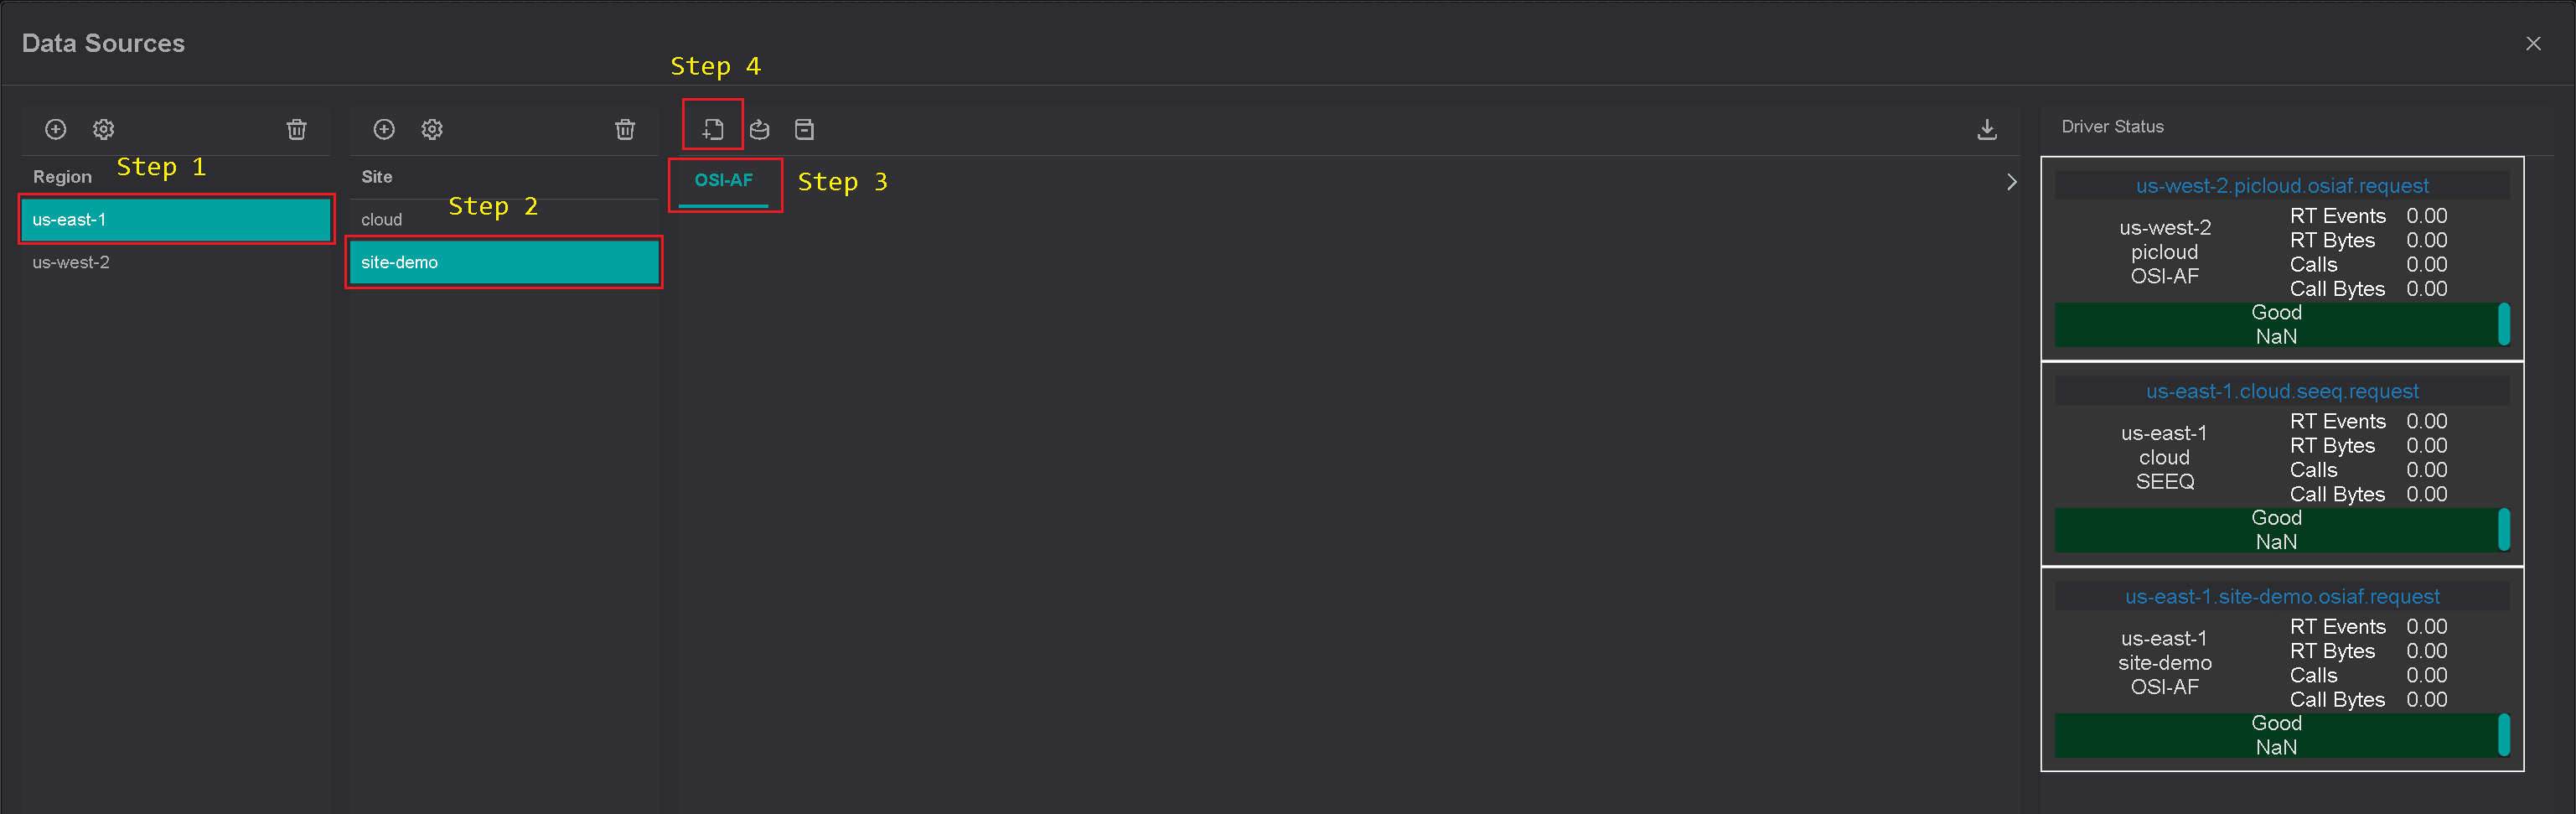
To add a new connection instance, navigate to data sources menu, then:
- Select region of interest
- Select site of interest
- Select AF Driver tab named as "OSI-AF" within selected site.
- At the top right corner - click on "Add" icon.
The AF-Driver's connection instance dialog will appear.
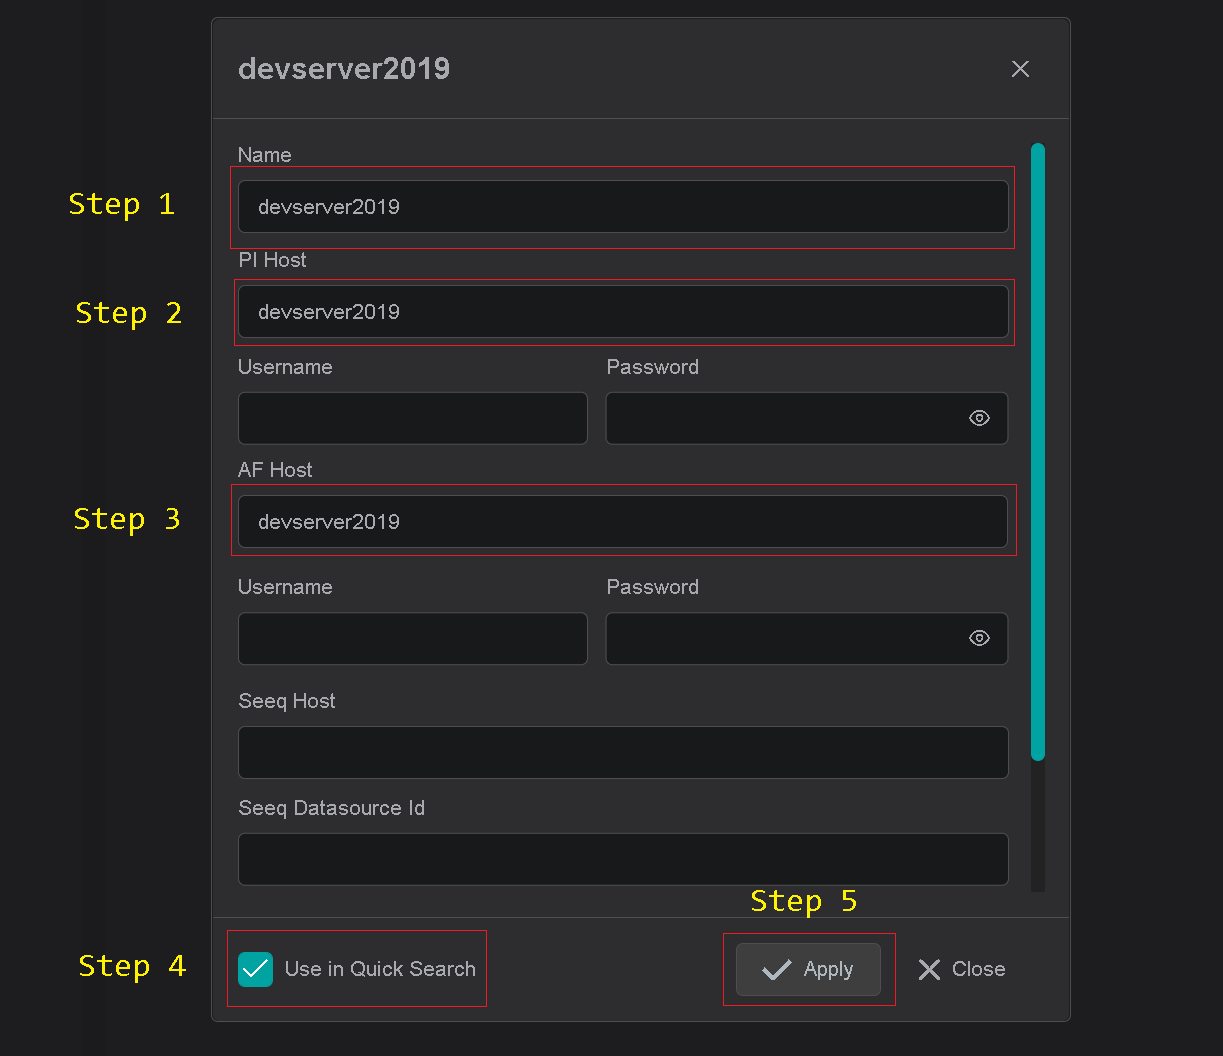
- Provide a name for PI Connection. All search results will be prefixed with this name
- Specify PI Data Archive (PI Server) name or IP address. Note, the name or IP must be known server list on the AF-Driver node
- Specify PI System (AF Host) name or IP address.
- Please check "Use in Quick Search" checkbox if PI Connection should be used in quick search side bar. If not checked,
the configured connection will be available in Advanced search only. - Click on "Apply" to save changes.
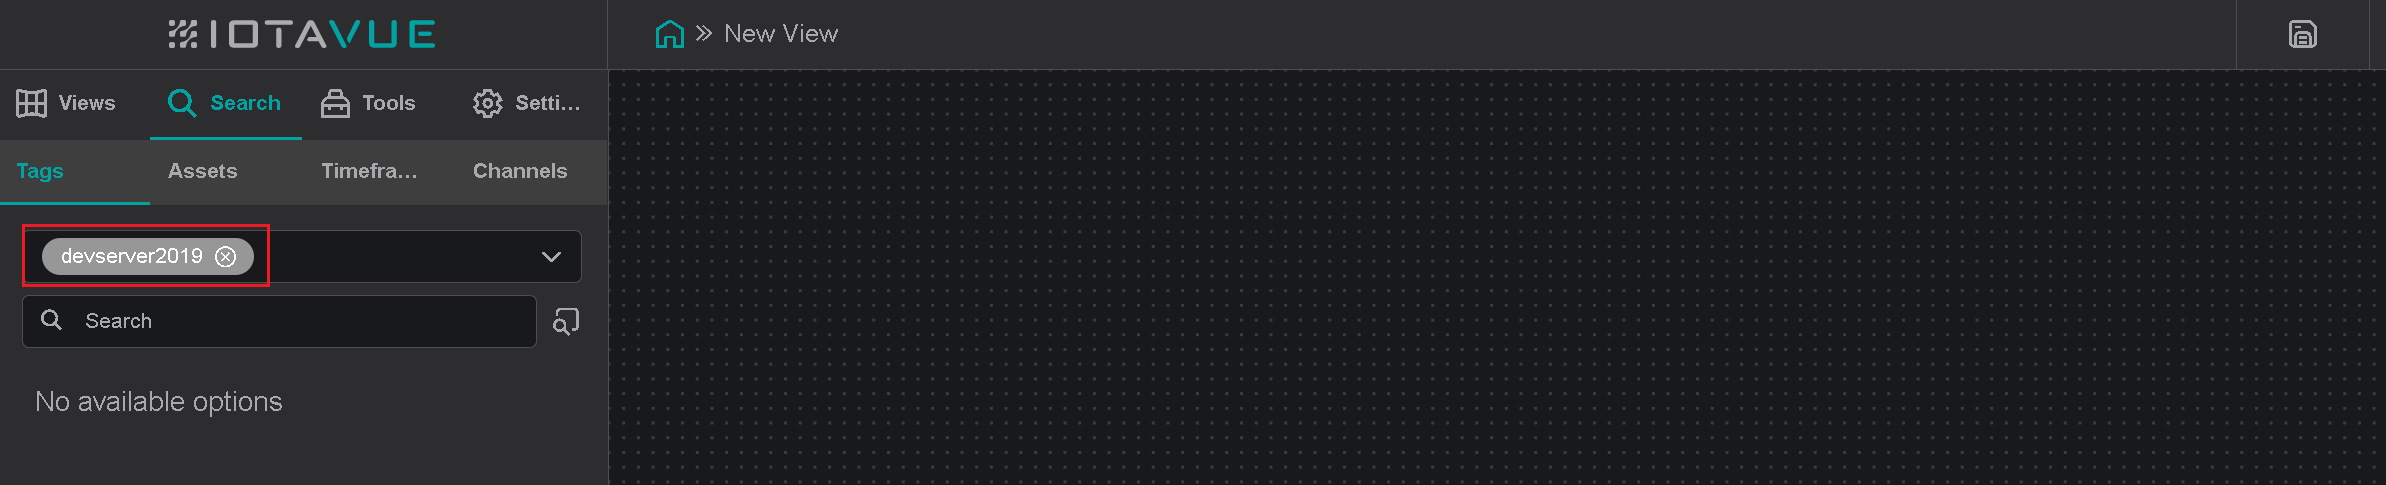
If PI Connection has "Use in Quick Search" checkbox checked, then it becomes available in side bar quick search.
Seeq Integration
The IOTA Vue provides seamless integration with Seeq Workbench.
Every single object in IOTA views can be used to push its data channels to Seeq for advanced analytics.
Since Seeq and IOTA Vue use different data querying approaches, the mapping is required
to bind IOTA Vue PI Data Archive tags to Seeq signals.
This binding is performed within connection configuration.
For each PI Data Archive/PI System the following information is required:
- Seeq Url with port number.
- Seeq data source Id which corresponds to our PI Data Archive/PI System
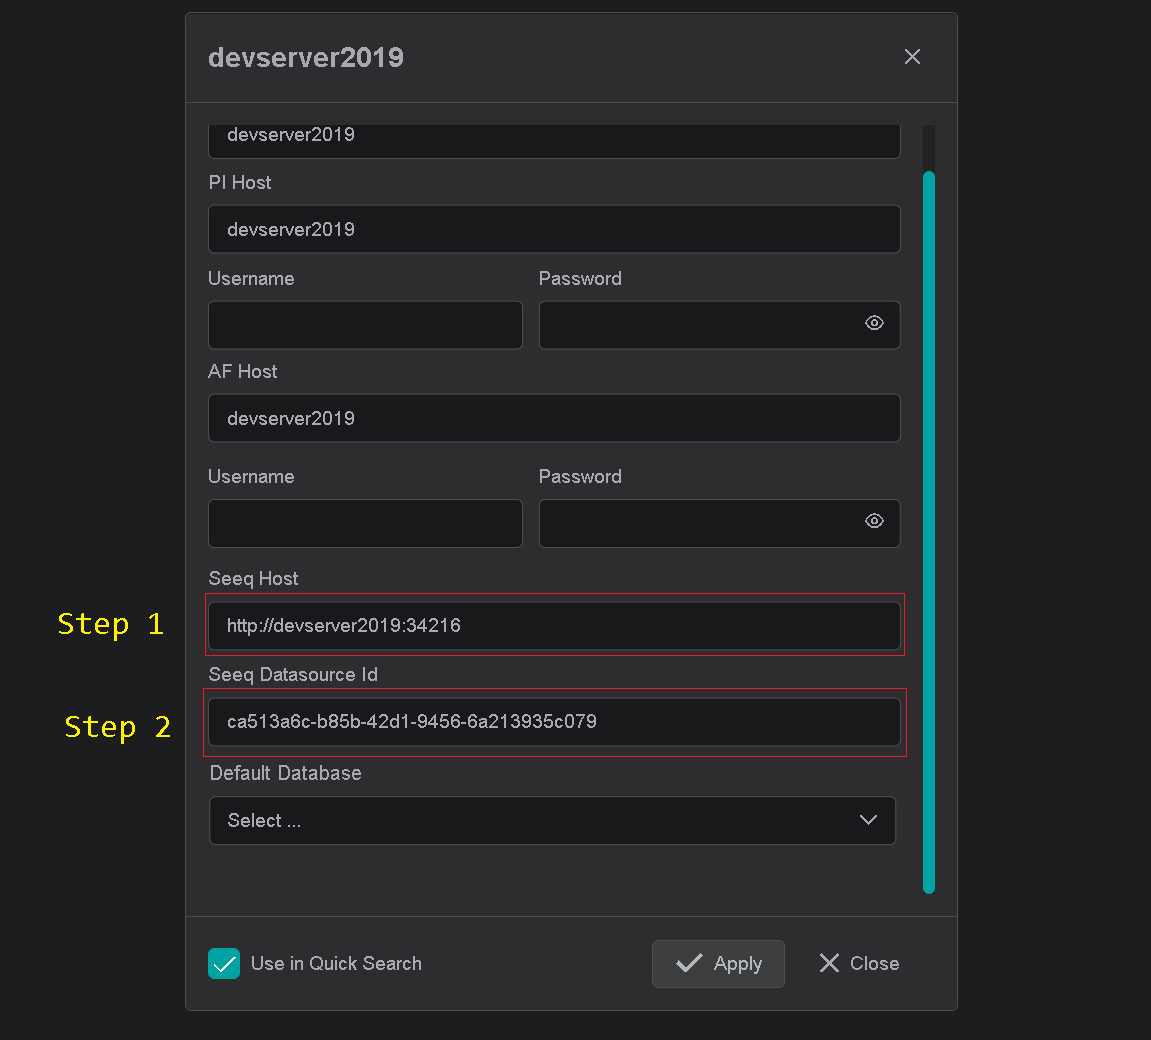
The data source Id can be found by 2 methods:
- Using Seeq Administration page
- PI Connector json configuration file.
Seeq Administration Page
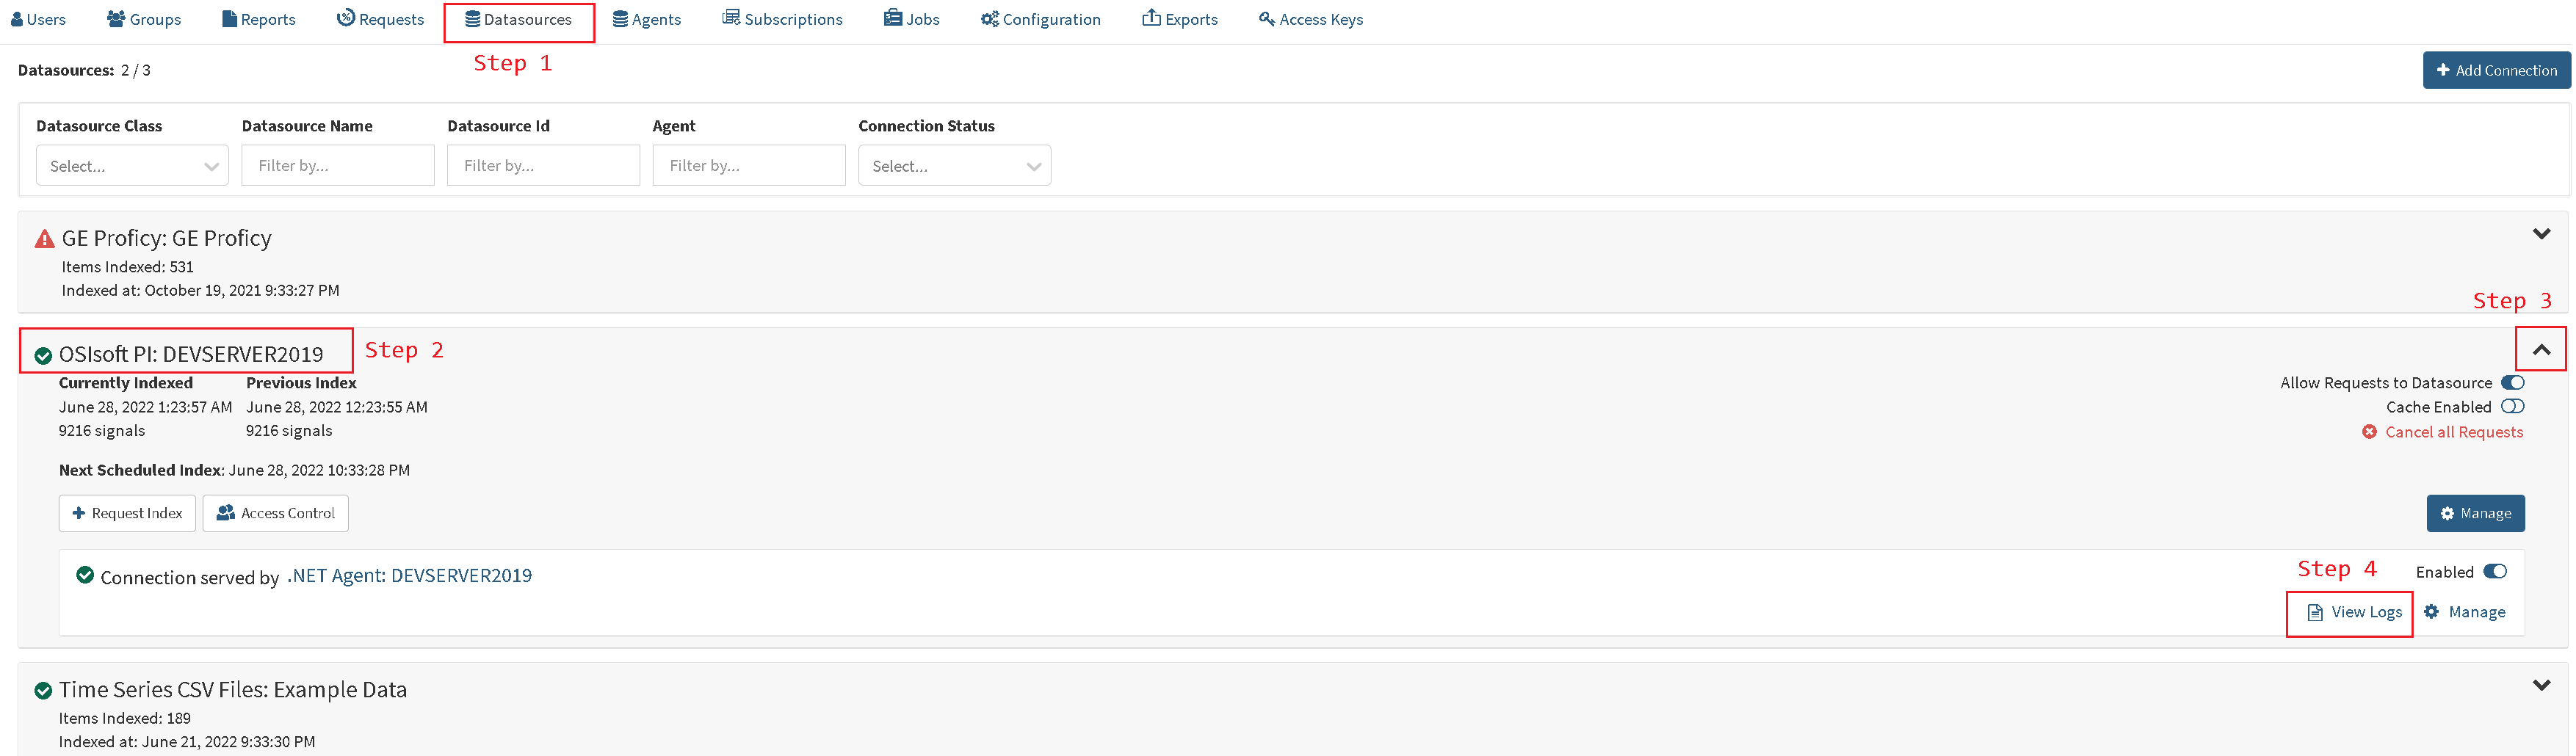
Open Seeq Administration panel.
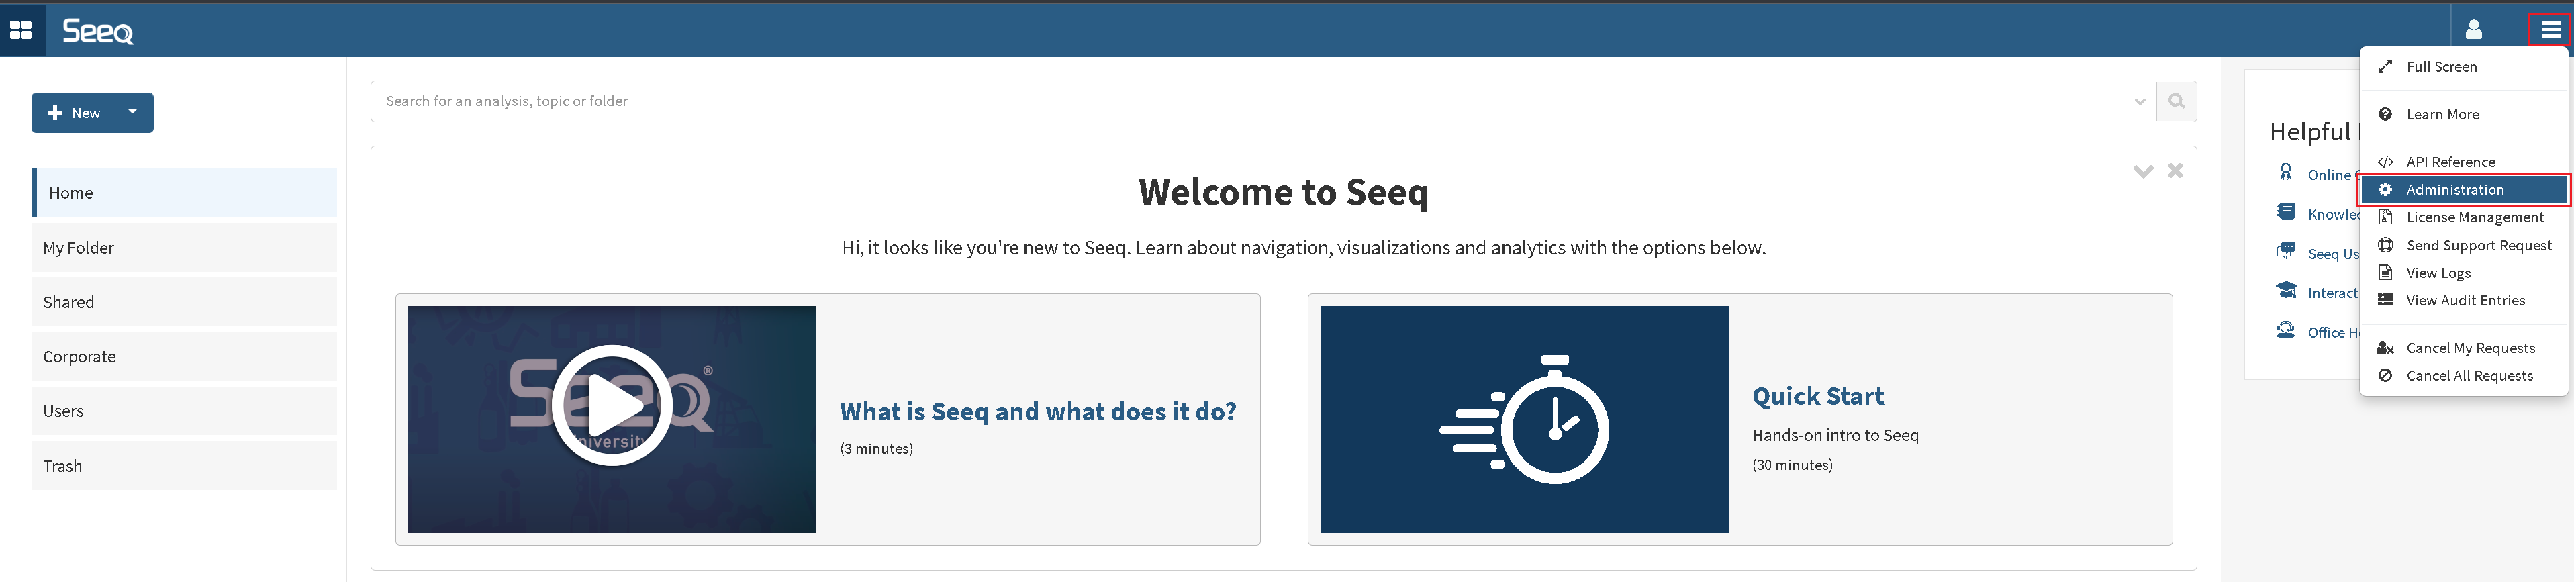
In Administration panel:
- Select "Data Sources" tab
- Locate the PI Data Archive which corresponds to our PI Data Archive name or IP.
- Expand PIConnector configuration by clicking on expand icon
- Open PIConnector logs dialog
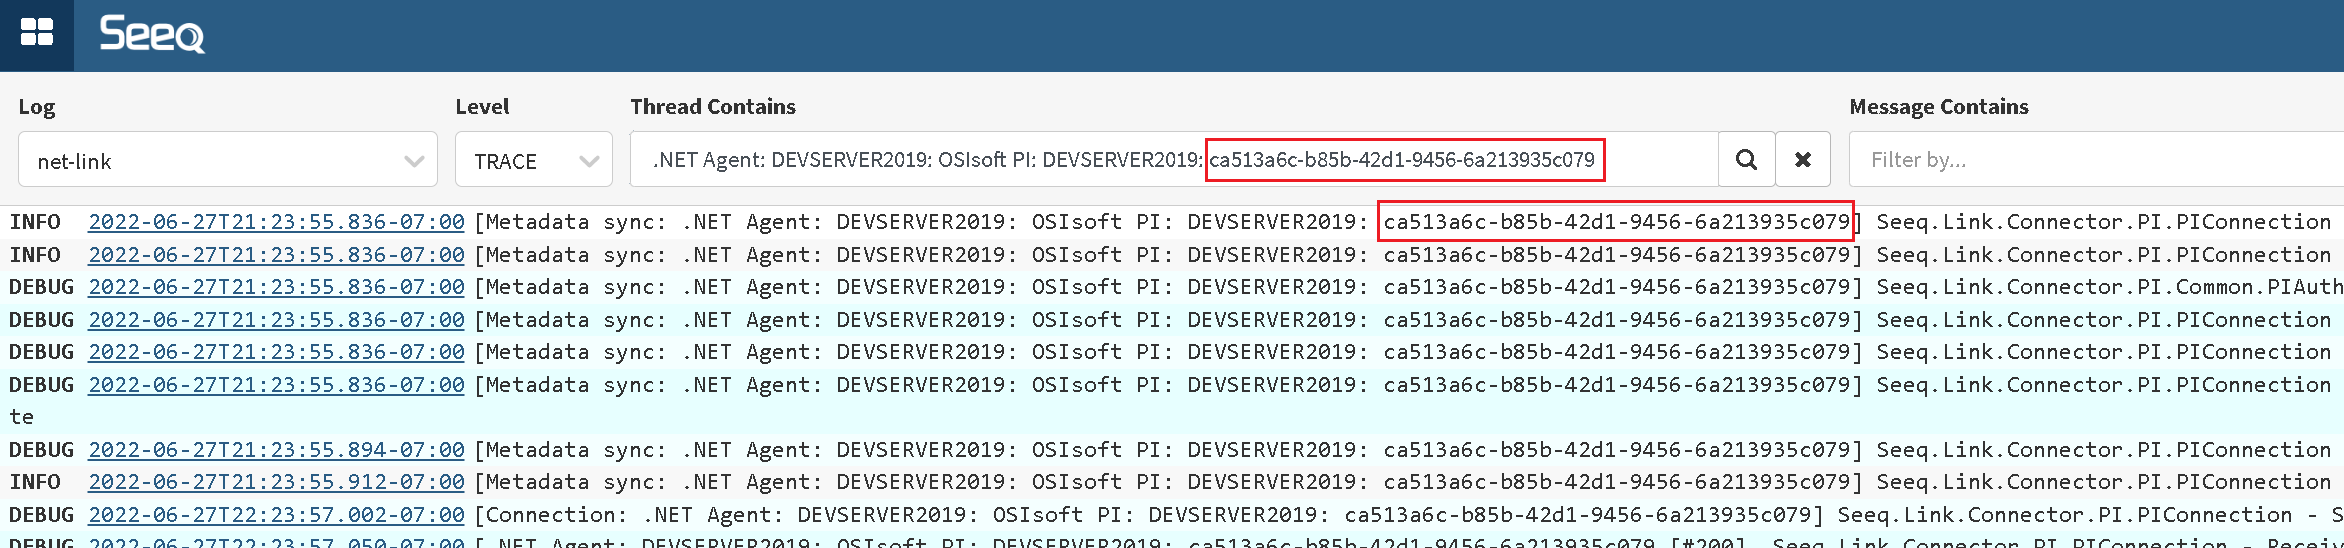
On the Logs page the data source Id can be taken from
- Filter box
- Any message on the screen
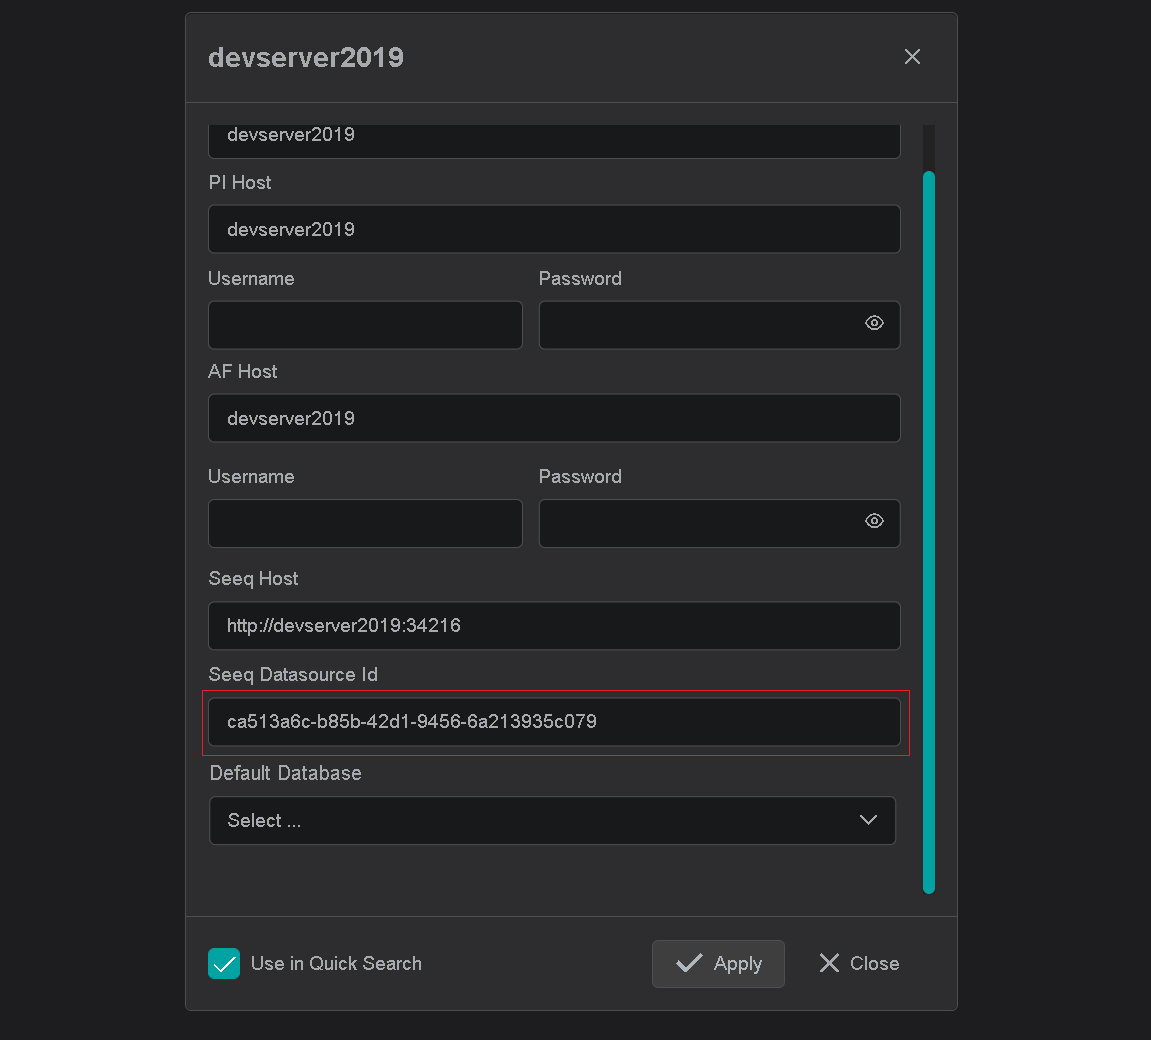
Copy and assign the guid in connection instance dialog:
Seeq PIConnector configuration file
Seeq PIConnector configuration file is normally located in ProgramData folder.
{ProgramData}\Seeq\data\configuration\link\OSIsoft PI Connector.json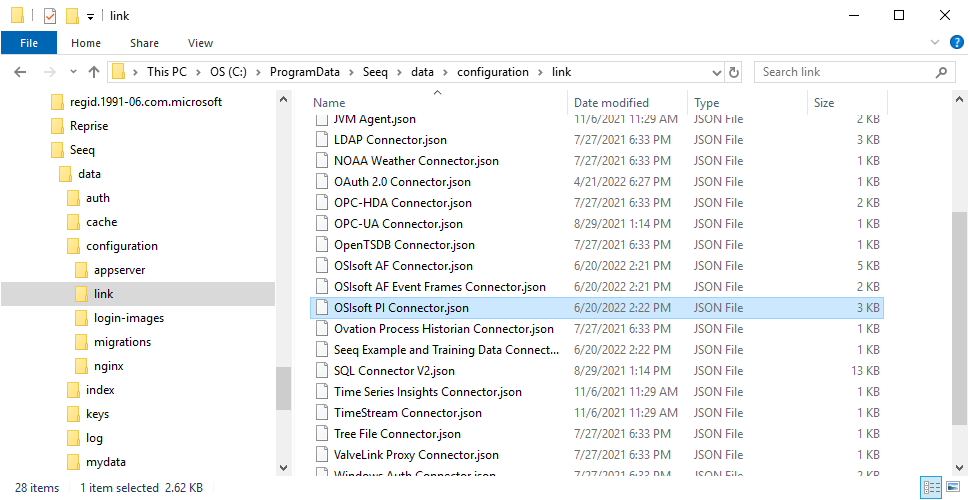
Open the configuration file with any text editor and locate the JavaScript block which corresponds to our PI Data Archive name or IP. The data source Id is named as "Id" in configuration file.
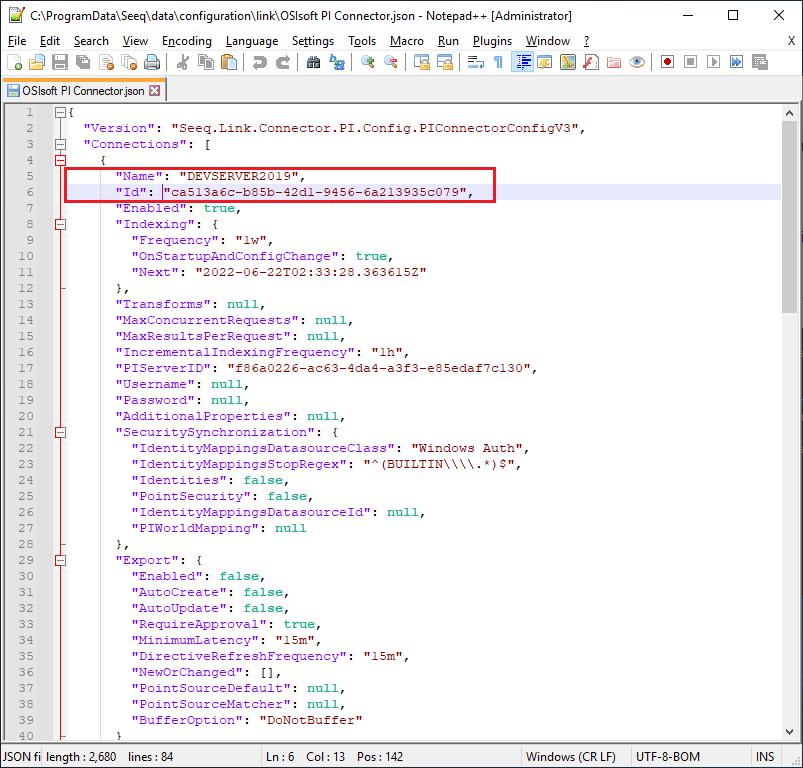
Copy and assign the guid in connection instance dialog: