With the release of PI Vision 2021, PI Vision introduced new capabilities that allow PI Vision displays to be imported or exported using the PI Vision API. It is an alternative to using PI Vision Display Utility offline display files (PDIX)
The PI Vision (PV) Driver utilizes this new PI Vision API to retrieve PI Vision displays and perform Live-Rendering through IOTA Vue.
Note
Although the primary purpose of the PV-Driver to visualize PI Vision displays, it provides full functionality of IOTA AF-Driver.
Authenticate to PI Vision API
Most PI Vision API endpoints require authentication with the request. The authenticated user must be authorized as a Utility User or as an Administrator in PI Vision.
PI Vision (PV) Driver uses Windows authentication to communicate with PI Vision API endpoint. By default, PV-Driver authenticates with current signed-on Windows user in interactive mode and when executed as a service - it uses assigned service user account. If required - the PV-Driver allows to authenticate using explicit Username and Password.
For more information on PI Vision security refer to AVEVA PI Vision API Reference documentation.
Authenticate to PI and AF, Level 1: Driver Service
To connect to the PI Data Archive, the PV-Driver supports the following authentication methods:
- Windows Authentication (strongly recommended)
- PI Trust
- Explicit login via PI username and password
To connect to PI Asset Framework, only Windows Authentication is supported.
Step 1: Configure the Driver Service's Account
By default, the PV-Driver service runs as LocalSystem, which is a built-in machine account with Administrator privileges. We recommend provisioning a domain account for the service to use instead. If that isn't possible, configure the service to run using a virtual service account.
To change the account that the service uses:
- Open the Services app (open the Start menu -> start typing "services" -> click Services).
- Scroll down to the driver service, whose name is
Iota PV-Driver <region> <site>. - Right click the service, select Properties, and then click the Log On tab.
- Click the radio button labeled "This Account". If you have configured a domain account (preferred), enter the account and password here. Otherwise, you can use a virtual service account by entering
NT SERVICE\<service name>, where<service_name>is the name shown in the Services app, i.e.,Iota PV-Driver <region> <site>.
When you make this change, please make sure the account you choose has permission to read from and write to the driver's directory in ProgramData:
- Open File Explorer and navigate to
C:\ProgramData\IOTA\Drivers(note that this is ProgramData, not Program Files). - Right-click the subdirectory for the driver, which should be named
PV-Driver_<region>_<site>, and click Properties. - Click the Security tab, then click the Edit button.
- Add the account you configured above to run the service. If you used a virtual service account, you can refer to it here as
NT SERVICE\<service name>. - Allow the account at least Read and Write permission on this directory.
Step 2: Configure PI and AF Mappings
Next, create mappings in the PI Data Archive and PI Asset Framework to map the driver service's account to appropriate PI and AF identities.
Use PI System Management Tools (SMT) to create a PI mapping as follows:
- Click Security -> Identities, Users & Groups and create a new identity for the driver to use, if desired. You can skip this step if you'd like to map the driver to a preexisting identity.
- Click Mappings & Trusts, then click the New... icon at the top of the pane to create a new mapping.
- Enter the account you configured for the driver service. If you're using a virtual service account, specify the name of the driver machine using the format
<domain>\<host name>$(including the dollar sign). - Choose an identity to map the account to. The driver will have whatever permissions you've granted to this identity, plus the permissions granted to PIWorld (by default, read-only access to all tags), unless you've disabled PIWorld.
Use PI System Explorer (PSE) to create an AF mapping as follows:
- Click File -> Connections -> Properties to open the AF Server Properties dialog.
- Click the Identities tab, then right-click in the table of identities and select New Identity to create a new identity for the driver, if desired. As before, you can skip this step if you'd like to use a preexisting identity.
- Click the Mappings tab, then right-click in the table of mappings and select New Mapping.
- Enter the name of the account you've configured the driver service to use. As before, if you've configured a virtual service account, specify the name of the driver machine using the syntax
<domain>\<host name>$. - Select the identity to map the account to. The driver will have whatever permissions you've granted to this identity, plus the permissions granted to the built-in World identity.
Step 3: (Optional) Configure Additional Authorizations
The previous steps are sufficient for PI and AF to authenticate the driver process. By default, those servers assign the mapped identity and the PIWorld or World identity, respectively, to the driver. PIWorld and World grant the driver read-only access to all tags, elements, and event frames, and if the mapped identity is new, it doesn't yet grant any additional privileges.
If you want to grant the driver permissions beyond PIWorld and World (or if you've disabled PIWorld and World), make sure to update the PI and AF objects you'd like the driver to access.
In PI/SMT:
- Click Security -> Database Security, right-click the PIPOINT database, and select Properties. Add the driver's identity here and grant it Read permission. If any users need to write data via IOTA to PI tags, additionally grant the driver's identity Write permission.
- For each tag that you'd like to authorize the driver to read or write, use Point Builder to add the driver's identity to both the Point Security and Data Security access-control lists (ACLs).
- Remember, it isn't necessary to grant read access this way unless you've disabled PIWorld, since PIWorld already grants the driver read access to all tags. In contrast, this step is required to grant the driver write access to a tag.
- If you need to update more than a handful of points, consider using the Point Builder add-on for Excel.
In AF/PSE:
- For elements, right-click the element and click Security to open the Security Configuration dialog. Here you can add the driver's identity and grant it read or write access to the element. Optionally, you can also apply this change to all descendants of this element, recursively.
- For element templates, right-click the template and click Security to open the same dialog.
- Likewise, for event frame templates, right-click the template and click Security. If you would like IOTA users to be able to acknowledge and/or annotate an event frame, make sure to grant the driver's identity "Annotate" permission.
Authenticate to PI and AF, Level 2: Individual Users
In some scenarios different users ought to have different permissions in PI and AF. This is especially common when some users must be able to write data back to these sources, since it is rarely desirable for all IOTA users to have write permission (see Example 1 below).
The PV-Driver supports user- and tag-level access controls by mapping user groups defined in your identity provider (IdP) to PI and AF identities. For each request that a user triggers from IOTA: 1) PI and/or AF verify that the driver is authorized to make the request (see the previous section), and 2) the driver verifies that at least one of the user's mapped identities authorizes the request. If both conditions are met, the request succeeds; otherwise it fails.
Prerequisites
- User groups in your IdP - You can create new groups specifically for IOTA or rely on preexisting groups. Either way, make sure there are enough groups to distinguish the different levels of access you require in PI and AF.
- PI and AF identities - Again, you can create new ones or use preexisting ones. Here are some tips:
- When configured to map user groups to PI and AF identities, the driver does not implicitly map users to the built-in PIWorld (in PI) or World (in AF) identities. If you want users to assume those identities, you must map them explicitly (see Example 1 below).
- Whereas PI and AF map each inbound connection to a single custom identity (plus PIWorld or World), the PV-Driver can map a given user group to multiple custom PI and AF identities. This makes it easy to incrementally expand access for a given group, since each new mapped identity merely augments, rather than replaces, the group's permissions.
Groups Claim
The access token that your IdP issues to IOTA includes a list of claims about the current user, optionally including the user's group memberships. This claim is required for Level 2 authorizations. Most IdPs do not return a groups claim in the access token by default, so you should verify that yours has been configured to do so.
One simple way to check for a groups claim is to log into IOTA, click the User Profile icon in the top-right corner of the page, and hover the mouse over the panel with your name and email address. In the following example, the access token that IOTA has obtained for this user includes a groups claim containing seven groups.
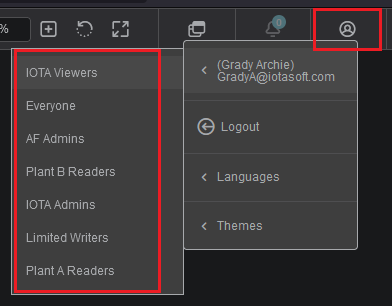
If you see your company's domain (e.g., [iotasoft.com]) instead of a list of groups, it's likely that your IdP is not configured to include a groups claim in the access token. You can troubleshoot as follows:
- If your company uses Microsoft Entra ID (formerly Azure Active Directory):
- In Entra's left-hand menu, click App Registrations -> (registration for IOTA) -> Token Configuration and confirm that the list of optional claims includes a claim named "groups".
- Ensure that the value of the Token Type column for the groups claim includes "Access".
- In the left-hand menu, click Manifest and check the value of the
groupMembershipClaimsproperty. If it is set toApplicationGroupthen only groups assigned to the IOTA application (in Entra) are included in tokens. - If this is the case, navigate back to the Entra home page and click Enterprise Applications -> (application for IOTA) -> Users and Groups. Make sure the groups that you expect to use in IOTA are listed here.
- If your company uses Okta:
- In the left-hand menu, click Security -> API -> (auth server for IOTA) -> Token Preview tab. Fill in the form as follows:
- OAuth/OIDC client - This is the name of the Okta application you created for IOTA. You can find it in the left-hand menu at Applications -> Applications.
- Grant Type - Authorization Code
- User - Any user with access to IOTA
- Scopes -
openid
- Click Preview Token, then click the "token" tab (not "id_token") in the Preview pane. Look for a
groupsproperty in the Payload pane and verify that it includes the expected groups for the user. - If not, click the Claims tab, click "Access" in the left column, and check for a "groups" claim in the right column.
- If this is absent, you must add it. Name it
groups, set the token type to Access Token, set Value Type to Groups, and choose a filter expression that matches the groups you've assigned to IOTA. For example, if they all have the prefix "IOTA_", then set the filter expression toIOTA\_.*. - If a groups claim is present, check its filter expression. Make sure it matches the groups you've assigned to IOTA.
- If this is absent, you must add it. Name it
- In the left-hand menu, click Security -> API -> (auth server for IOTA) -> Token Preview tab. Fill in the form as follows:
- For other IdPs, ask your IAM or IT team for help.
Finally, please note that there are different conventions for the groups claim, depending on which IdP you use and how it's configured. For example:
- Microsoft Entra ID allows multiple formats:
- Groups defined in Entra are always represented by ID, which is a GUID.
- Groups defined in on-prem Active Directory servers that are federated with Entra can be represented by ID, by name (with or without the AD domain as a prefix), or by SID. You can check your configuration in the Azure Portal by navigating to Entra -> App Registrations -> (your registration for IOTA) -> Token Configuration -> (ellipses in the row for the groups claim) -> Edit.
- Okta's groups claim lists groups by name.
Config File Changes
By default, the driver's config file is located at C:\ProgramData\IOTA\Drivers\PV-Driver_<region>_<site>\iota.pvdrv.json (note that this is ProgramData, not Program Files). To map user groups to PI and AF identities, add a new property called groupMappings to this JSON object as follows:
{
  "driverid": "iota.osiaf",
  "natsurl": ...,
  "reqtopic": ...,
  ...
  "groupMappings": {
    <IdP group>: {
      "roles": [ <PI or AF identity>, <PI or AF identity>, ... ]
    },
    <IdP group>: {
      "roles": [ <PI or AF identity>, <PI or AF identity>, ... ]
    },
    ...
  }
}
The strings represented here as <IdP group> must match exactly the strings in the groups claim that your IdP emits in the access token it issues to IOTA.
Configuring the driver this way will cause it to enforce access controls based on all identities mapped to any of a given user's groups. Note that if you do not map the PIWorld and World identities explicitly, the driver will not grant users the global read-only access that those identities confer.
Example 1: Write Access for a Subset of Users
IOTA and the PV-Driver can be used to write to PI or AF in a few different ways:
- Write a value to a PI tag
- Write a value to an AF attribute, which might or might not be bound to a PI tag
- Acknowledge or annotate an event frame
It's common to restrict these abilities to only a subset of IOTA users, leaving everyone else with read-only access. Since this scenario requires authorizing different users differently, it is necessary to configure mappings from user groups to PI and AF identities (level 2 authorization).
Suppose the following groups are defined in your IdP:
- IOTA Users
- IOTA Operators
- IOTA Engineers
Suppose also that you've configured the following identities in PI and AF:
- (PI and AF) IOTA Driver
- (PI) Manual Data Writer
- (AF) Event Frame Annotator
The desired authorizations are as follows:
- Members of IOTA Operators should be able to manually write data to a fixed set of PI tags via a form in IOTA.
- Members of IOTA Engineers should be able to acknowledge and annotate event frames via IOTA.
- IOTA users who are not members of either of these groups should have read-only access to PI and AF.
At a high level, the steps required to achieve this desired end state are as follows:
Configure PI and AF mappings for the driver service's Windows account that map it to the IOTA Driver identities in PI and AF.
In PI, grant the IOTA Driver identity Write permission on the PI tags which will hold manually entered data. Additionally, grant it Write permission on the PIPOINT database.
In AF, grant the IOTA Driver identity Annotate permission on the event frame template that generates the event frames you wish to work with in IOTA.
Add the following object to the driver's config file:
{
  ...
  "groupMappings": {
    "IOTA Users": {
      "roles": [ "PIWorld", "World" ]
    },
    "IOTA Operators": {
      "roles": [ "Manual Data Writer" ]
    },
    "IOTA Engineers": {
      "roles": [ "Event Frame Annotator" ]
    }
  }
}
To see how this configuration achieves the desired authorizations, consider the following requests:
- Alice, a member of IOTA Users and IOTA Engineers, loads an IOTA view that shows event frames. The PV-Driver connects to the AF Server, which assigns it the identities IOTA Driver and World (here, World is implicitly granted). The World identity grants read access to the requested event frames, so AF allows the driver to read them (level 1 authorization). Moreover, Alice is a member of IOTA Users, which the driver has mapped to World, so the driver allows Alice to see the event frames (level 2 authorization).
- Alice clicks a button in IOTA to acknowledge an event frame. The driver sees that she is a member of IOTA Engineers, which is mapped to Event Frame Annotator, which has permission to acknowledge the event frame, so the driver allows the request (level 2 authorization). It makes the request to the AF server, which sees that the IOTA Driver identity has been granted Annotate permission on the event frame, so the request succeeds (level 1 authorization).
- Bob, a member of IOTA Users but not IOTA Engineers, loads the same view. The requests to read event frames succeed because both IOTA Driver (implicitly, in AF) and IOTA Users (explicitly, in
groupMappings) map to the World identity. In contrast, when Bob attempts to acknowledge an event frame, the driver blocks the request because none of Bob's groups map to identities with Annotate permission. Note that the driver itself is authorized to do the acknowledgement (level 1), but it refrains from doing so because Bob is not so authorized (level 2).
Example 2: Different Read Access for Different Users
Suppose you aggregate data from two different plants in the same PI and AF servers. You'd like workers from each plant to access only their plant's data via IOTA. Once again, since different users must be authorized differently, it is necessary to configure mappings from user groups to PI and AF identities (level 2 authorization).
To start, suppose you've defined the following groups in your IdP:
- IOTA Users
- Plant A Workers
- Plant B Workers
Suppose also that you've defined the following identities in PI and AF:
- IOTA Driver
- Plant A Reader
- Plant B Reader
You can achieve the desired access controls as follows:
Configure PI and AF mappings for the driver service's Windows account that map it to the IOTA Driver identities in PI and AF. Assuming you haven't disabled PIWorld and World, there's no need to update PI tags or AF elements to grant this identity read access. The driver process will automatically get read access via PIWorld or World.
If you haven't done so already, make sure Plant A's PI tags are readable by the Plant A Reader identity, and likewise for Plant B. In the Point Security and Data Security access control lists in PI, you should see strings like "Plant A Reader: A(r)".
Add the following object to the driver's config file:
{
  ...
  "groupMappings": {
    "Plant A Workers": {
      "roles": [ "Plant A Reader" ]
    },
    "Plant B Workers": {
      "roles": [ "Plant B Reader" ]
    }
  }
}
Notice that you have not mapped any user groups to PIWorld or World! This is important because (by default) those identities grant read access to tags and elements from both plants. Mapping a user group to those identities would allow users from that group to read data from both plants.
To summarize this configuration:
- The driver process itself assumes the identities IOTA Driver (no additional authorizations) and PIWorld/World (read access to everything) when it connects to PI or AF. This is level 1 of authorization.
- The driver allows users from each plant to read tags or elements from their respective plant. If a user from Plant A, who is a member of IOTA Users and Plant A Workers, tries to read a tag or element from Plant B, the driver blocks the request because there are no mappings from either of these groups to an identity allowed to read Plant B objects. This is level 2 of authorization.
IOTA Vue Data Source Configuration
IOTA Vue drivers are architected to support the often multiple and distributed PI System and PI Data Archives (PI Servers). The IOTA PV-Driver is deployed on a network with access to the required PI Systems and PI Data Archives.
You can install multiple PV-Drivers to accommodate deployment of PI Systems on different subnets. IOTA Vue uses distributed "mesh-like" data source topology to support any deployment topology of your PI Systems. The hierarchical topology is as follows:
There are no limits to the number of Regions, Sites, and instances. IOTA Software recommends naming the topologies to reflect the PI Server deployment topology; however, there are no restrictions on the names. Here is a simple example:
| Name | Example | Description |
|---|---|---|
| Region | us-east-1 | geographical territory, similar to availability regions |
| Site | siteB | specific plant or a building. It can also be a proxy to another PV-Driver instance serving the same PI Data Archives |
To simplify the installation process, the IOTA Software provides an automated driver installer generation.
The user is only required to select/create a region and site. Then for selected driver type, download the installer.
The installer will contain all necessary PV-Driver configuration with public and private keys for secure communication with
the company's IOTA Vue NATs message bus.
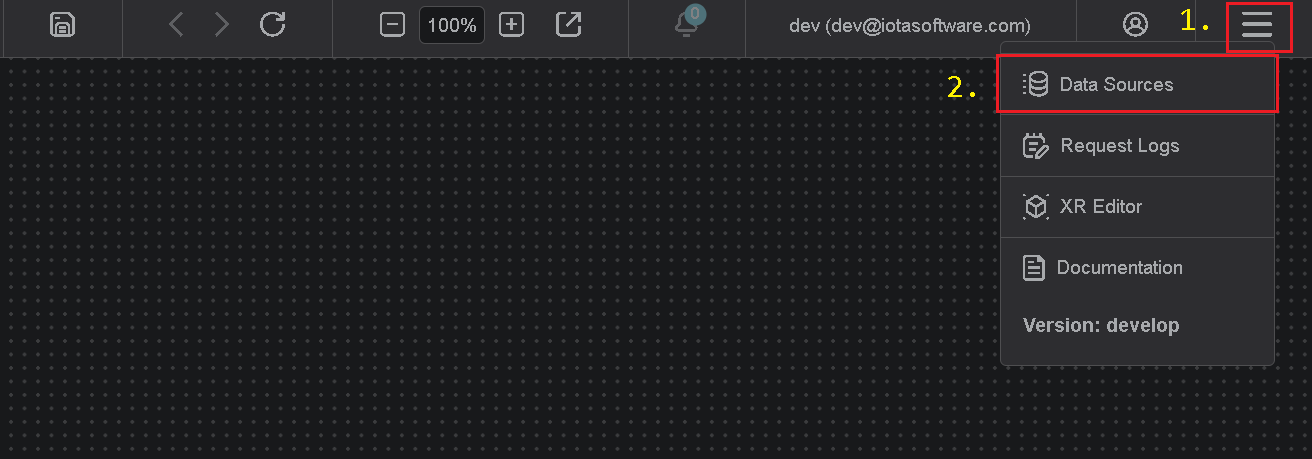
To access the Data Sources menu, click at the top right corner on "hamburger" icon, then select "Data Sources".
Add Region
Click on the "Add" icon to add a new region, then in popup dialog enter the region name.
Note, there are 2 input fields:
- Region name
- Channel name (optional)
Where region name is a user-friendly name and channel name can contain abbreviations.
If the channel name is not provided, it is automatically assigned to the region name on "Apply" button click.

Add Site
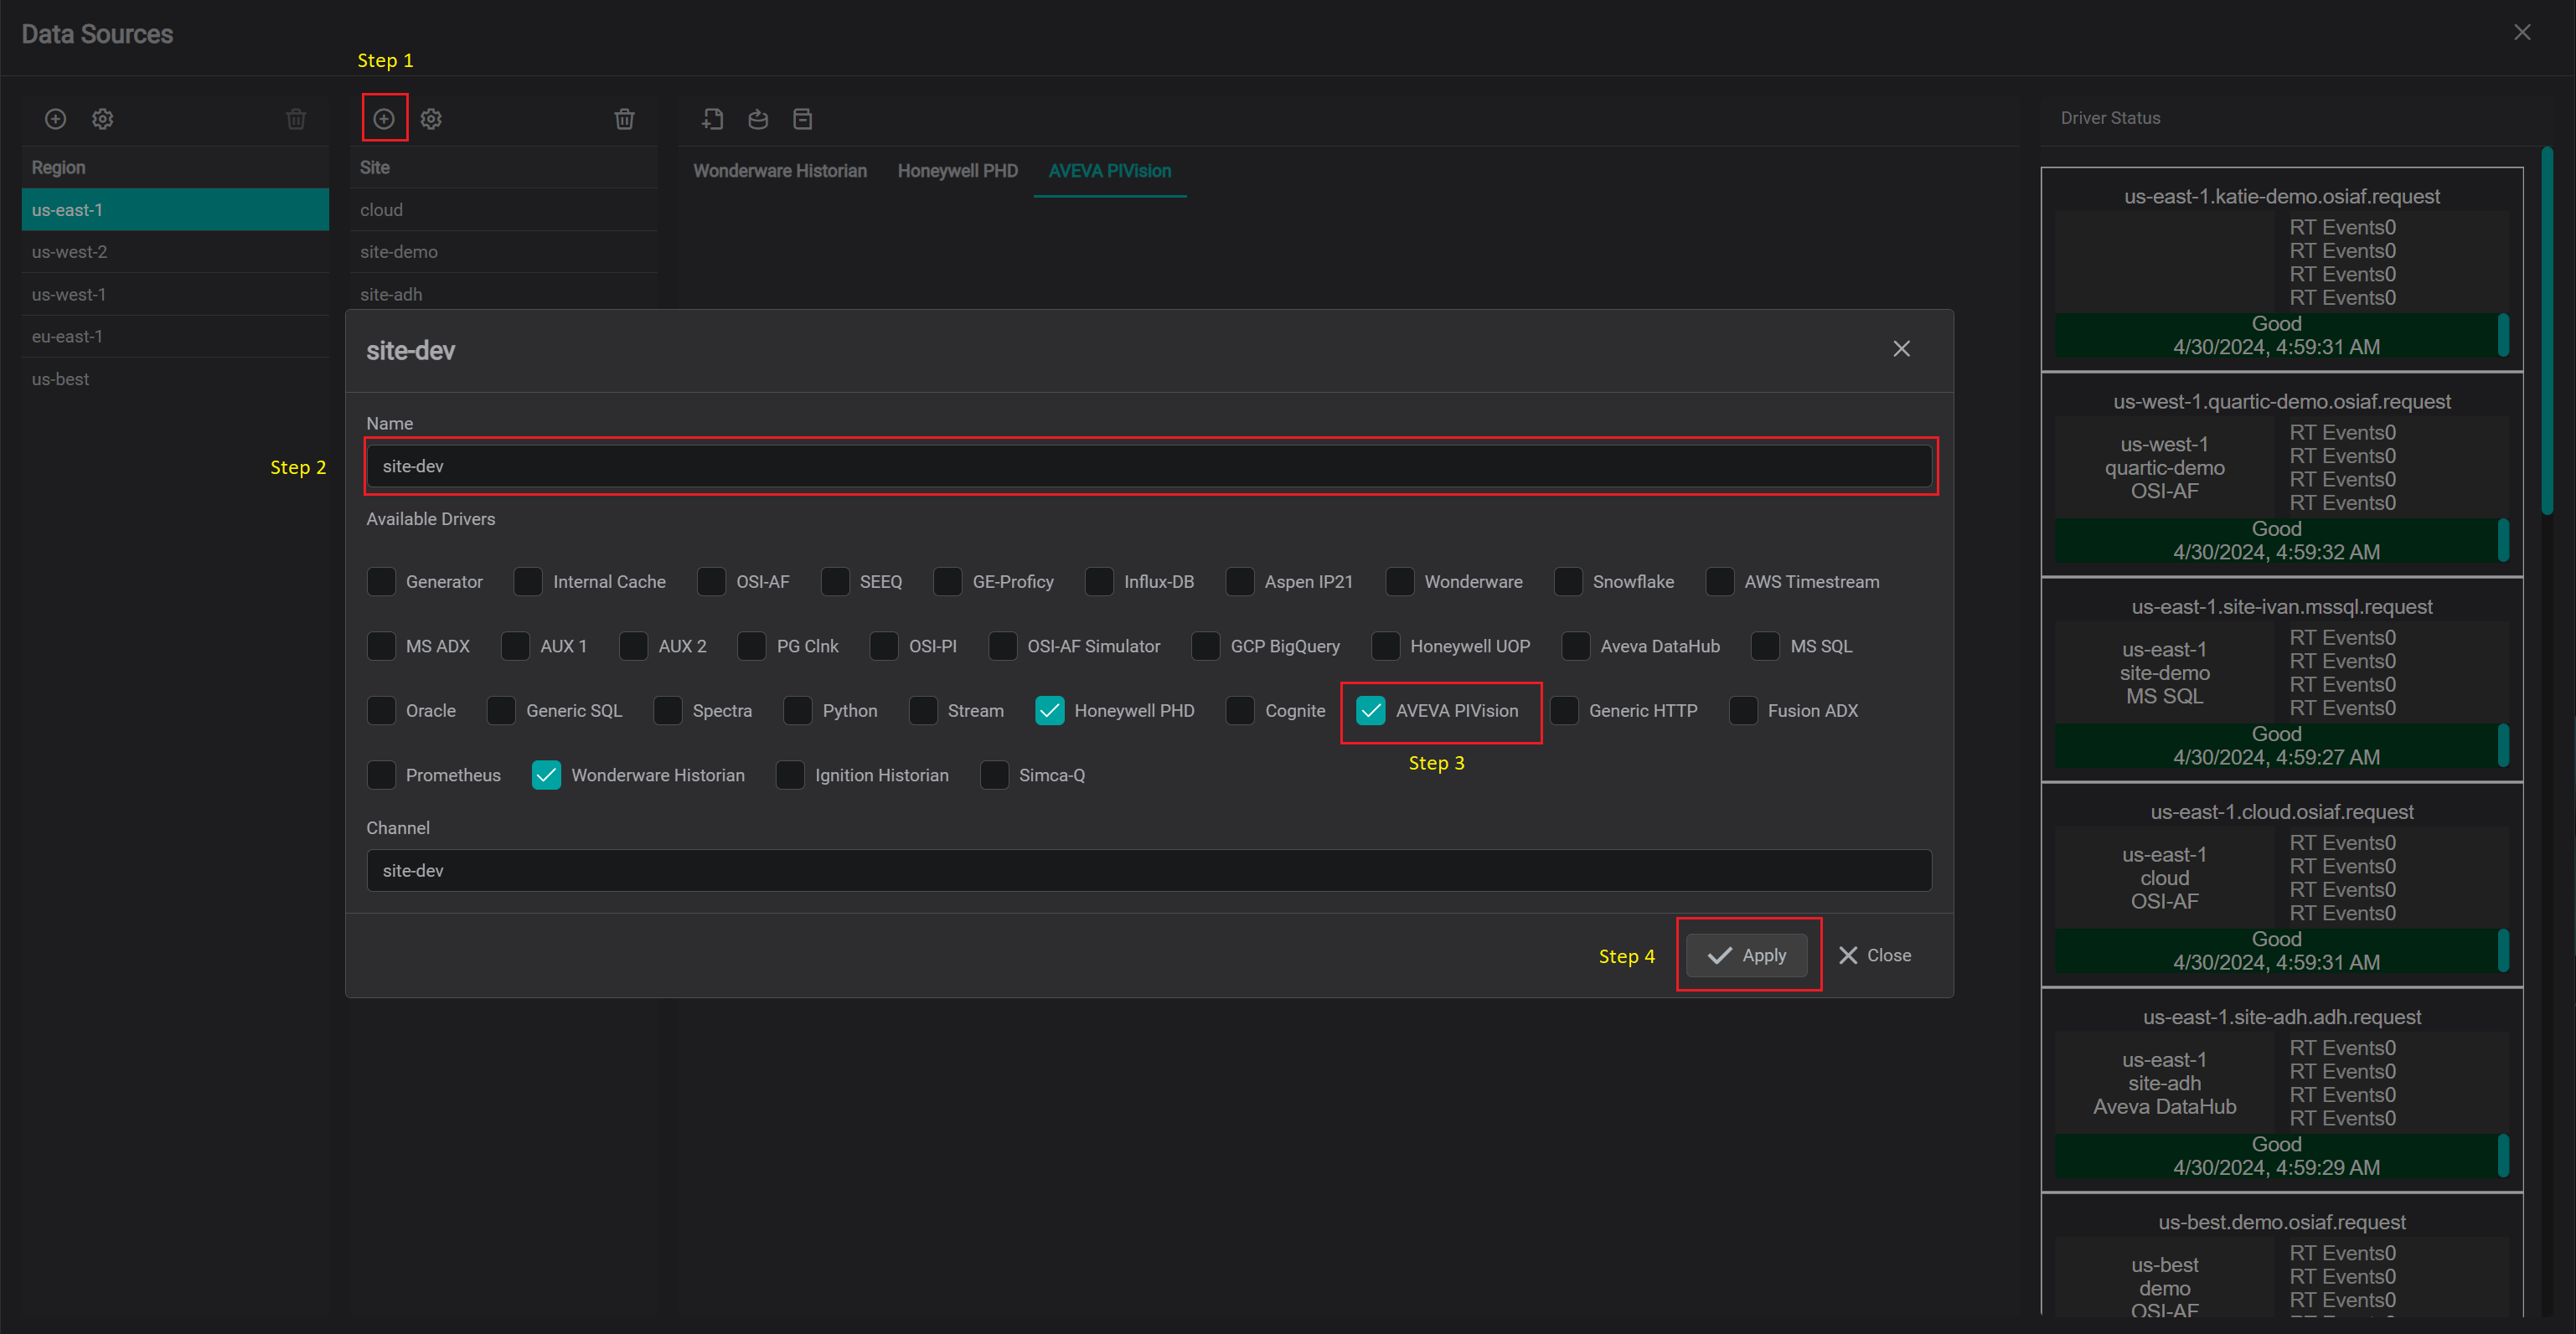
Click on the "Add" icon to add a new site, then in the popup dialog enter the site name.
Make sure the AVEVA PIVision checkbox is checked. Each site can contain multiple driver types.
For each checked driver type the instance pane will contain selected driver tabs to which connection instances can be added.
Note, there are 2 input fields:
- Site name
- Channel name (optional)
Where site name is a user-friendly name and channel name can contain abbreviations.
If channel name is not provided, it is automatically assigned to the site name on "Apply" button click.
Add AVEVA PI Vision Connection
In order for PV-Driver to connect to AVEVA PI Vision API endpoint and/or to be used in Tag/Asset/TimeFrame searches - specific connection instance(s) must be configured from within IOTA Vue UI.
Warning
PV-Driver for specific region and site must be downloaded and installed on MS Windows OS node prior to creating a new connection instance.
To add a new connection instance, navigate to data sources menu, then:
- Select region of interest
- Select site of interest
- Select IOTA PI Vision Driver tab named as
AVEVA PIVisionwithin selected site. - At the top of
AVEVA PIVisiontab left corner - click on theAddicon.
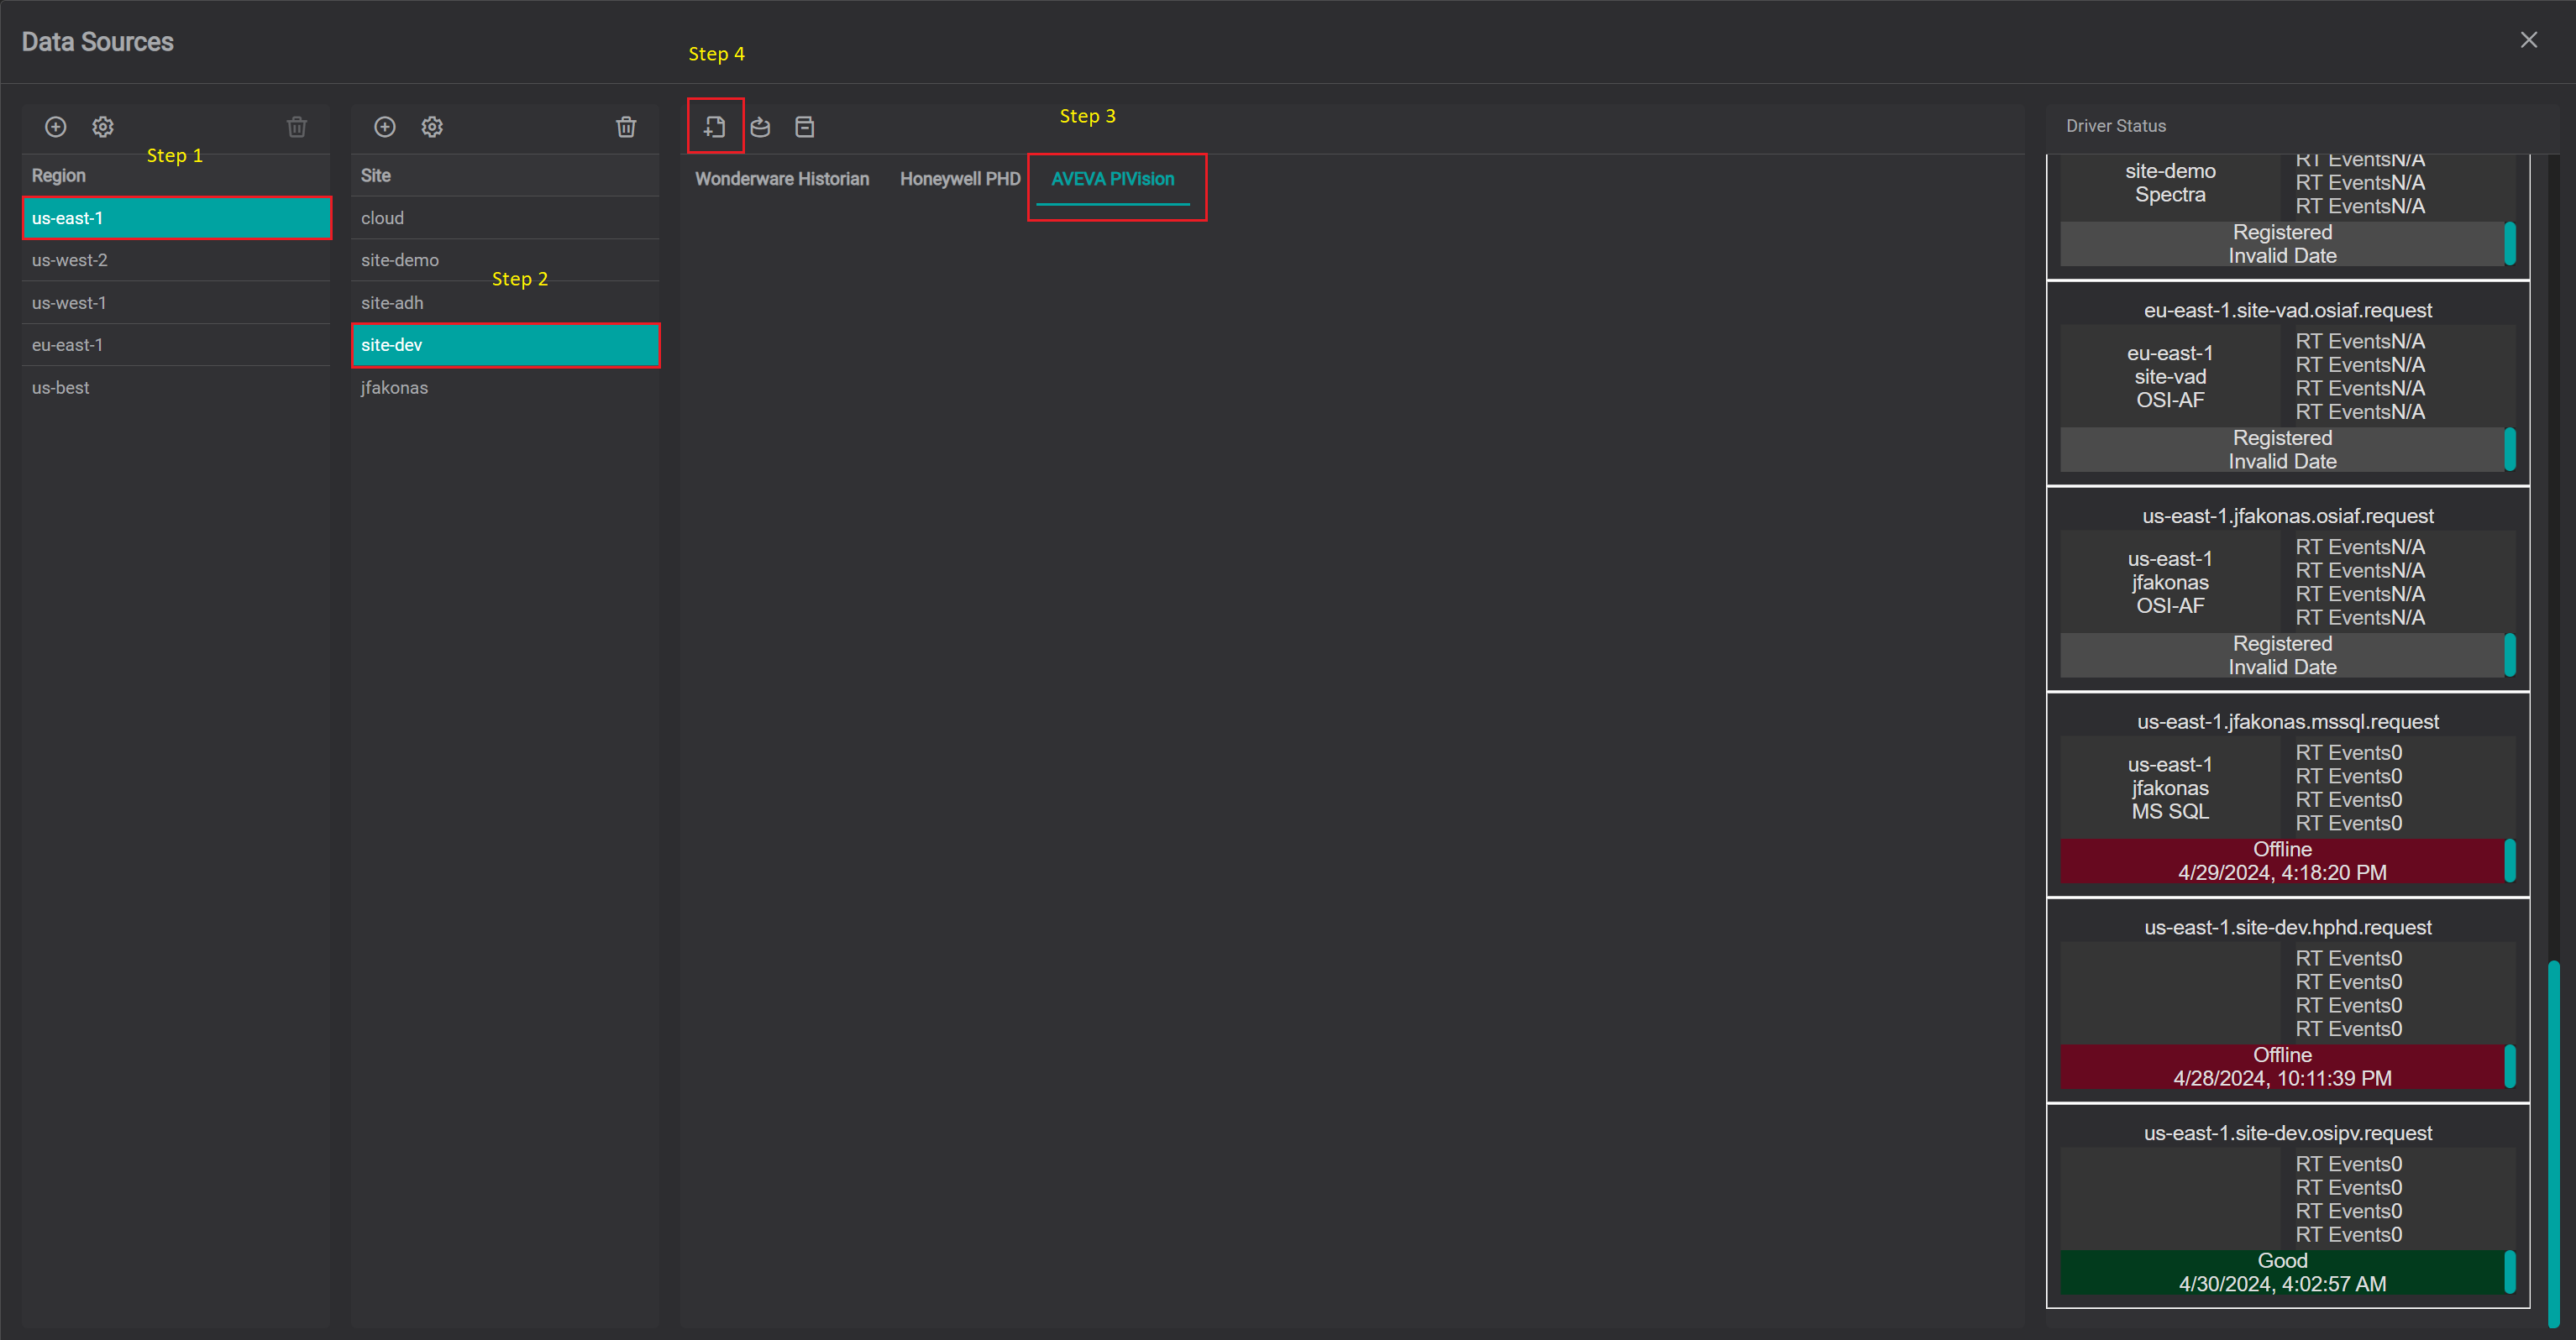
The PV-Driver's connection instance dialog will appear.
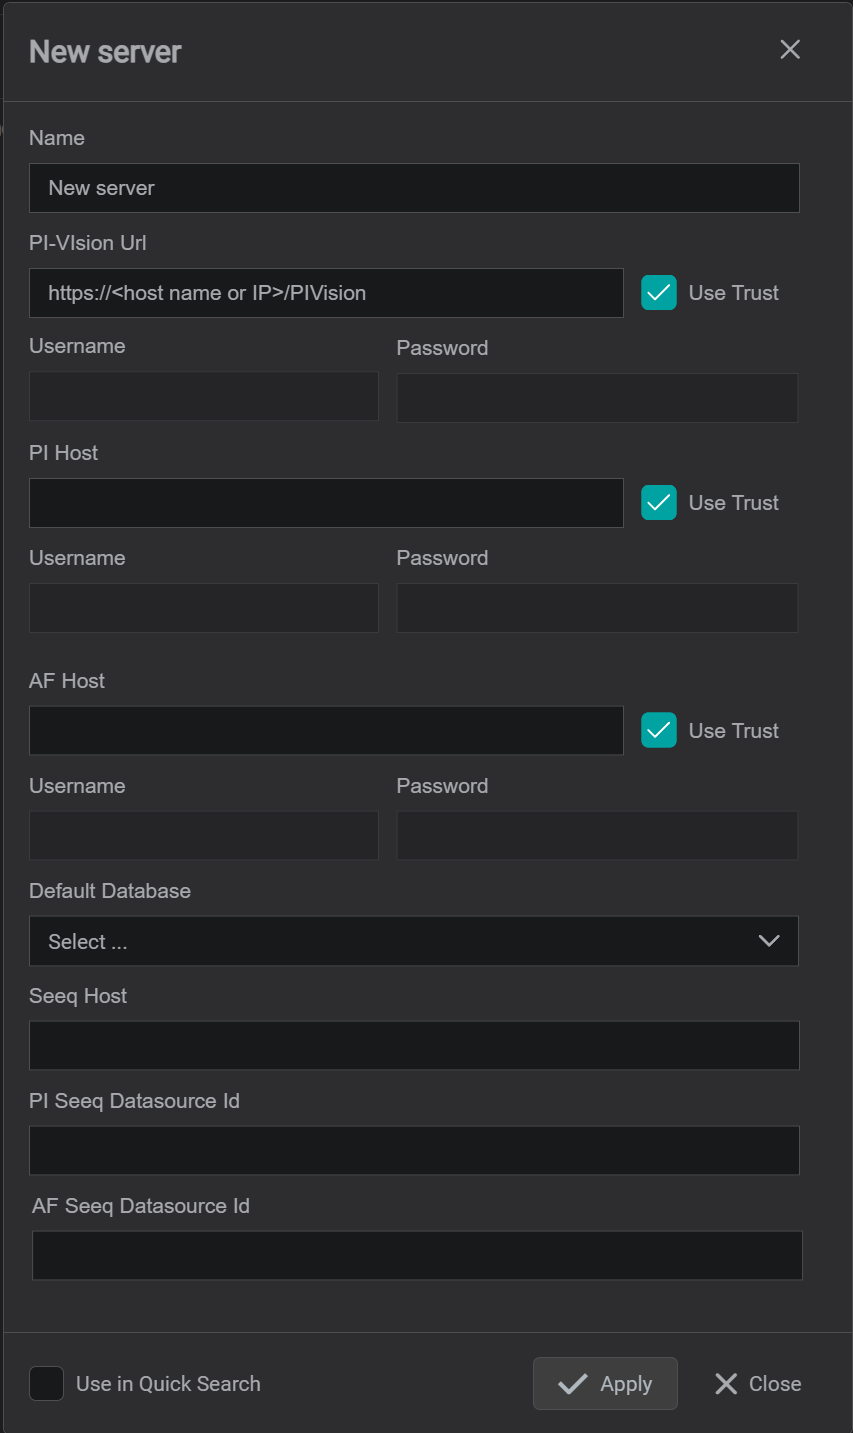
- Provide a name for PI Vision Connection. All search results will be prefixed with this name
RequiredSpecify PI Vision API endpoint URL.- If explicit login is required for PI Vision API endpoint, uncheck
Use Trustand specifyUsernameandPassword - If PV-Driver is required to access PI Data Archive, specify
PI Hostname or IP address. Note, the name or IP must be known server list on the PV-Driver node - If explicit login is required for PI Data Archive, uncheck
Use Trustand specifyUsernameandPassword - If PV-Driver is required to access PI System, specify
AF Hostname or IP address. - If explicit login is required for PI System, uncheck
Use Trustand specifyUsernameandPassword - For PI System data access - it is possible to provide
Default Database. In order to set default database, the newly defined connection instance must be finalized first by clicking onApplybutton then reopen viagearicon and thenDefault Databasecan be selected from the dropdown. - For Seeq integration - please refer to AF-Driver Seeq Integration documentation.
- Please check
Use in Quick Searchcheckbox if PI Vision Connection should be used in quick search side bar. If not checked,
the configured connection will be available in Advanced search only. - Click on
Applybutton to save changes.
Tips
If PI Vision Connection has Use in Quick Search checkbox checked, then it becomes available in side bar quick search.
Seeq Integration
Note
For Seeq integration - please refer to AF-Driver Seeq Integration documentation