The IOTA to Python (PYT) Driver is designed to execute user defined calculation scripts on dedicated Windows OS node.
Unlike all other data drivers - Python driver does not have real data source connections. Instead it acts like the IOTA API node where for each input variable it makes requests to actual data driver via common message bus.
From user perspective - Python driver should be viewed as a searchable virtual data source.
Info
For the generic Calculations user interface that applies to any calculation driver, see Calculations. This page covers what is specific to the Python driver.
Warning
IOTA Python Driver DOES NOT install Python. Python must be downloaded and installed separately.
Make sure that pythondll path is defined in specific ProgramData driver's configuration file: iota.pytdrv.json before using the driver.
Add/Edit Calculations
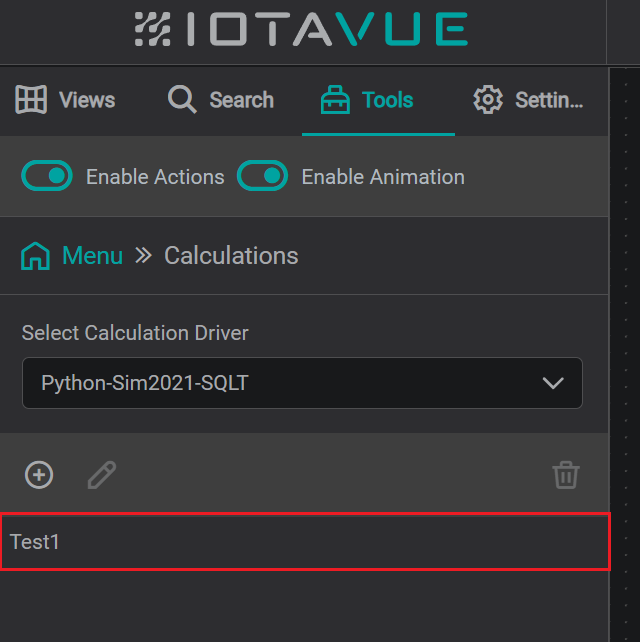
In the left pane, under
Toolstab, underMenumain section - click onCalculationsselection
add or edit view In Calculations section, from
Select Calculation Driverdrop down - choose available Python connection instance.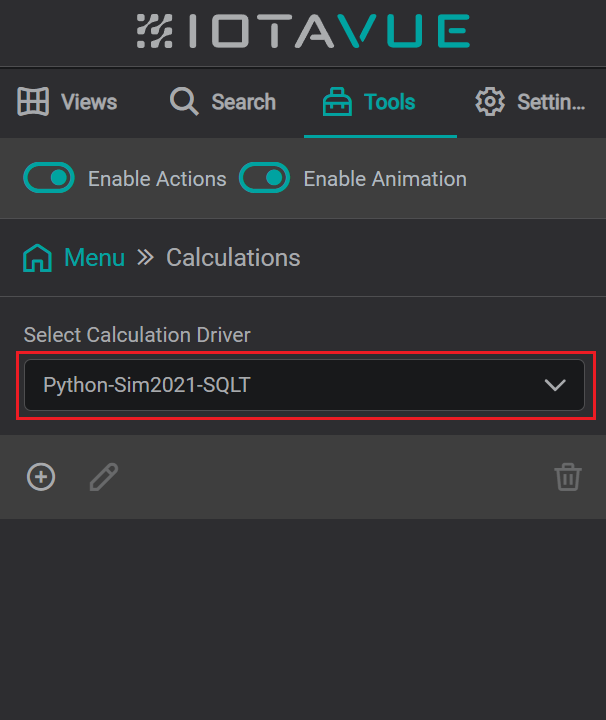
reference tab To Create the new calculation module - click on
+icon or to Edit existing module - click onpencilicon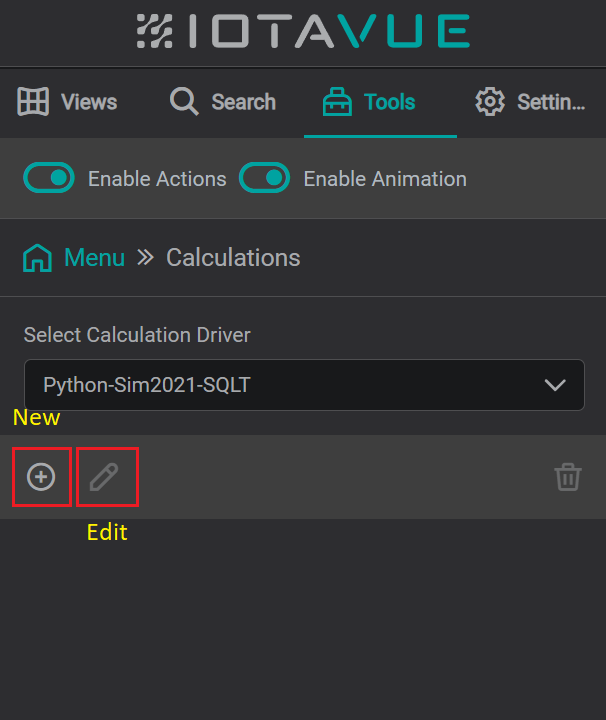
reference tab The configuration dialog will open. Each tab is described below.
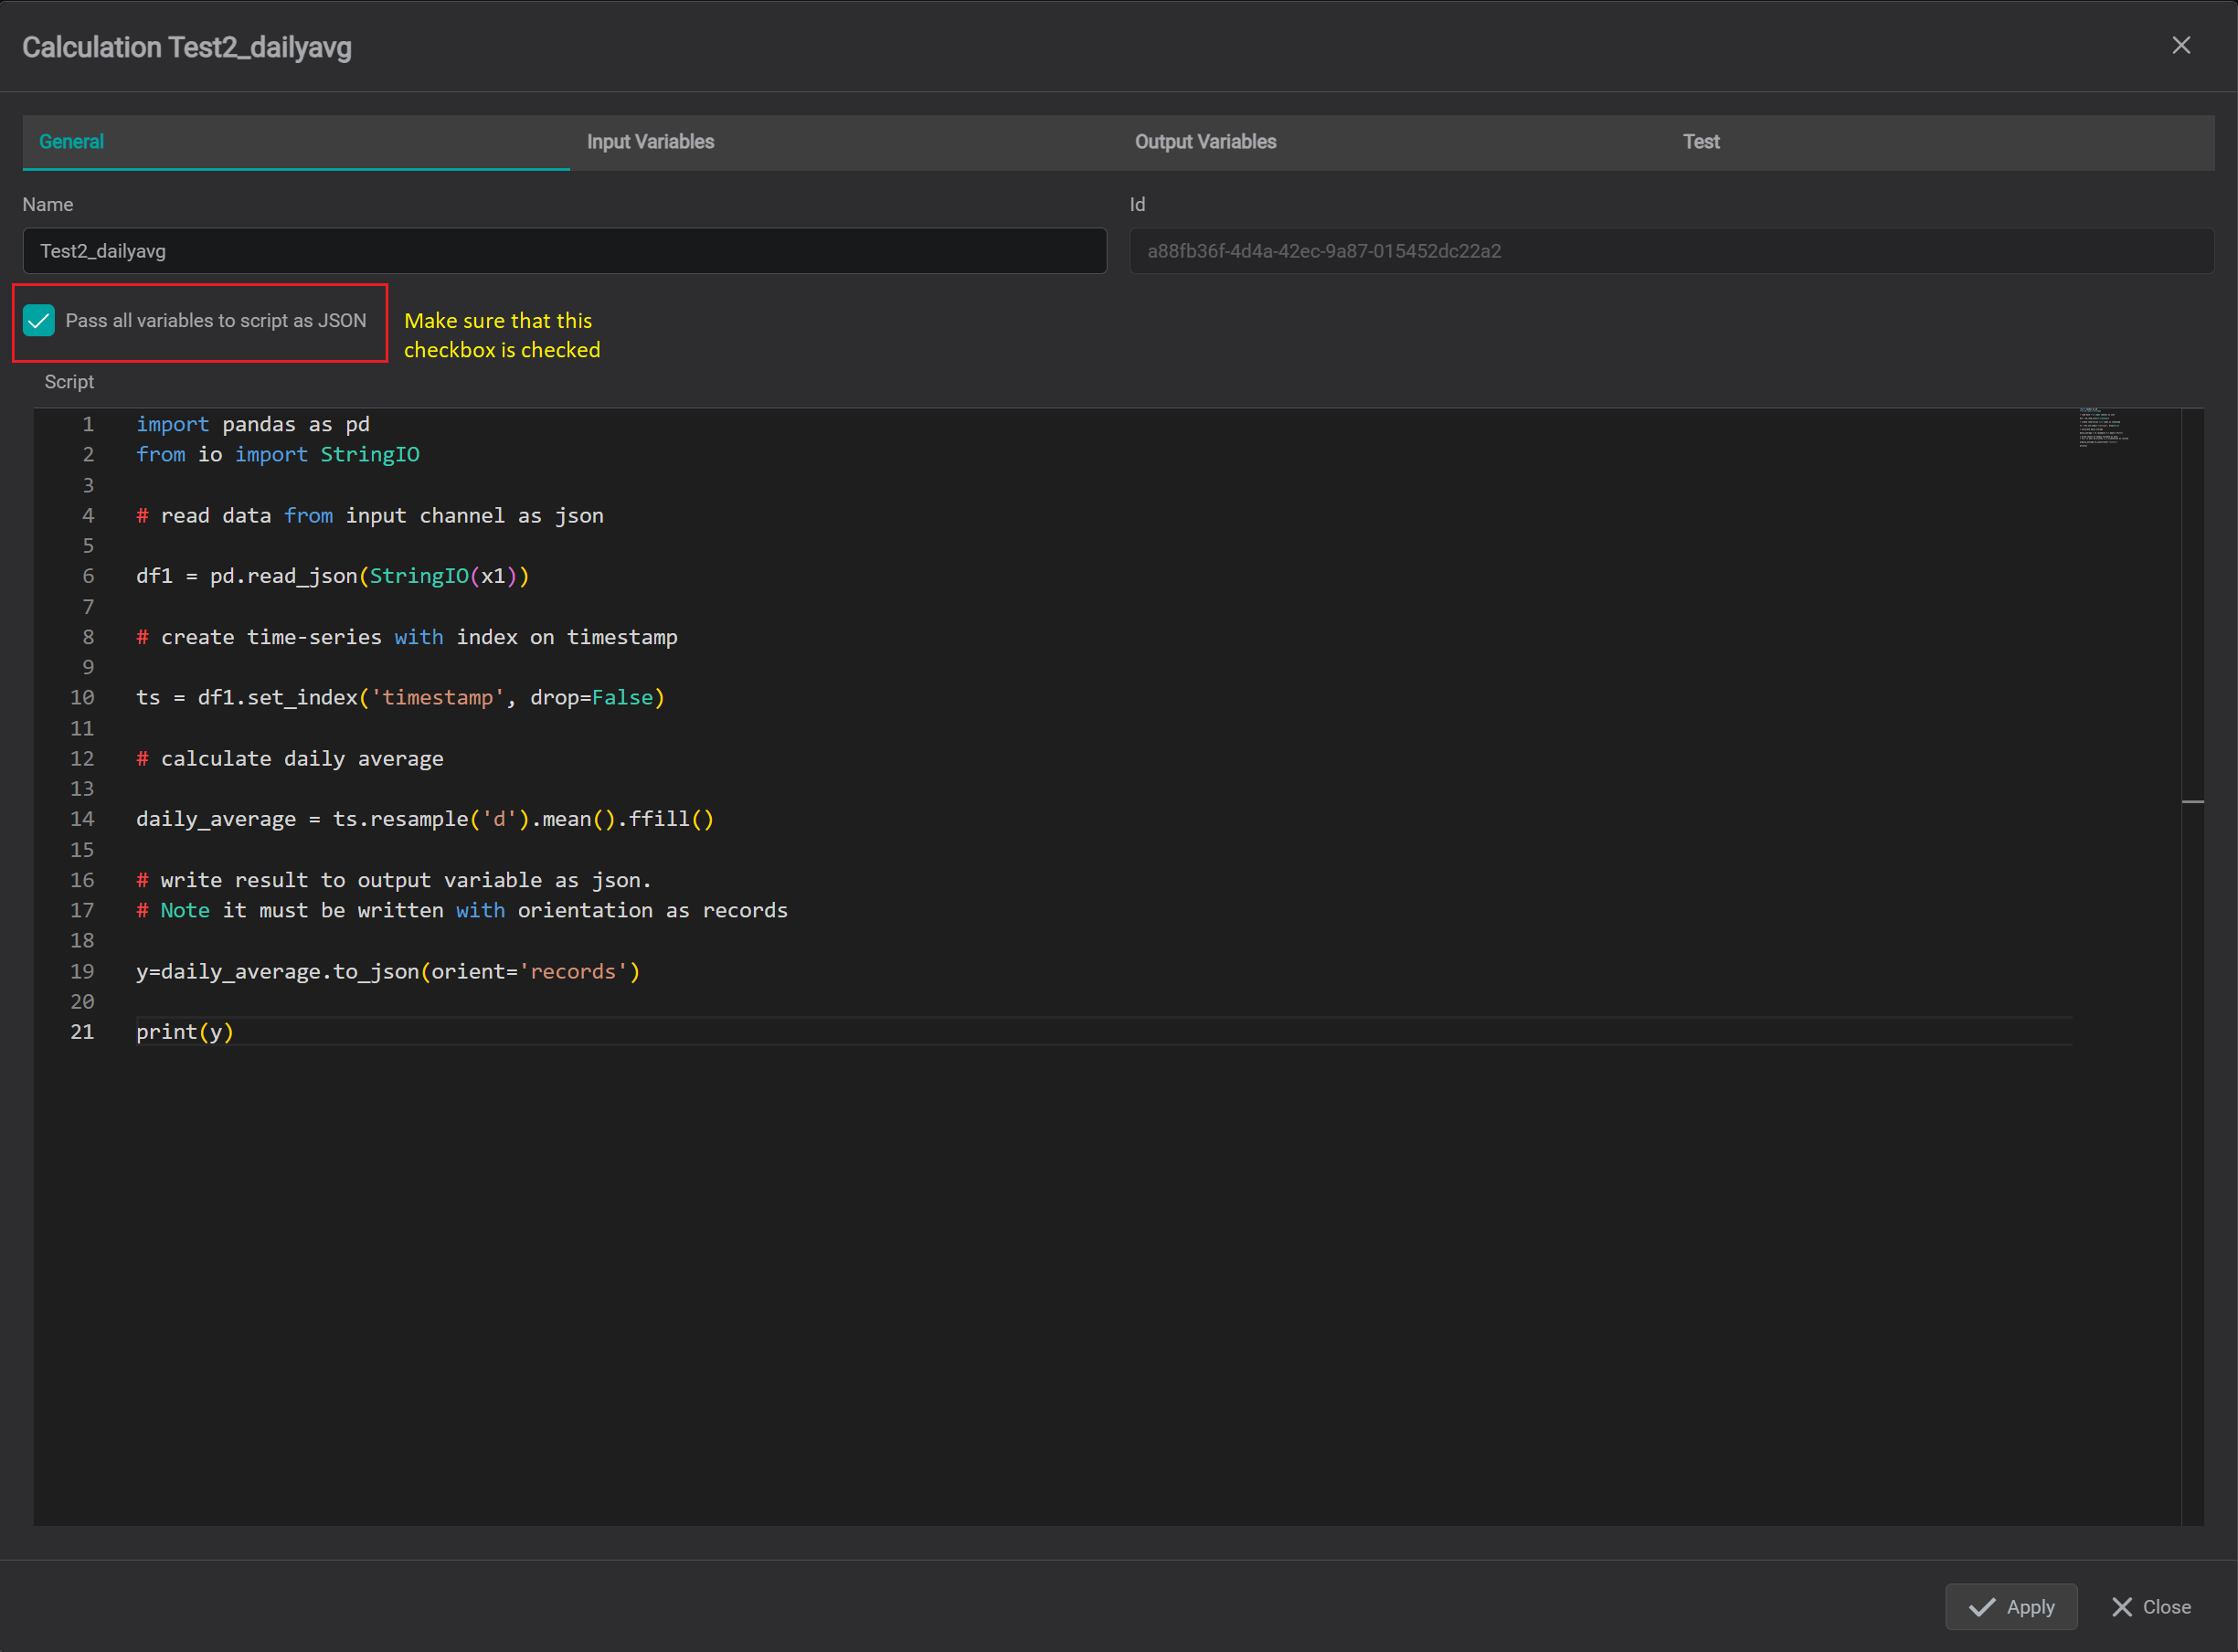
General
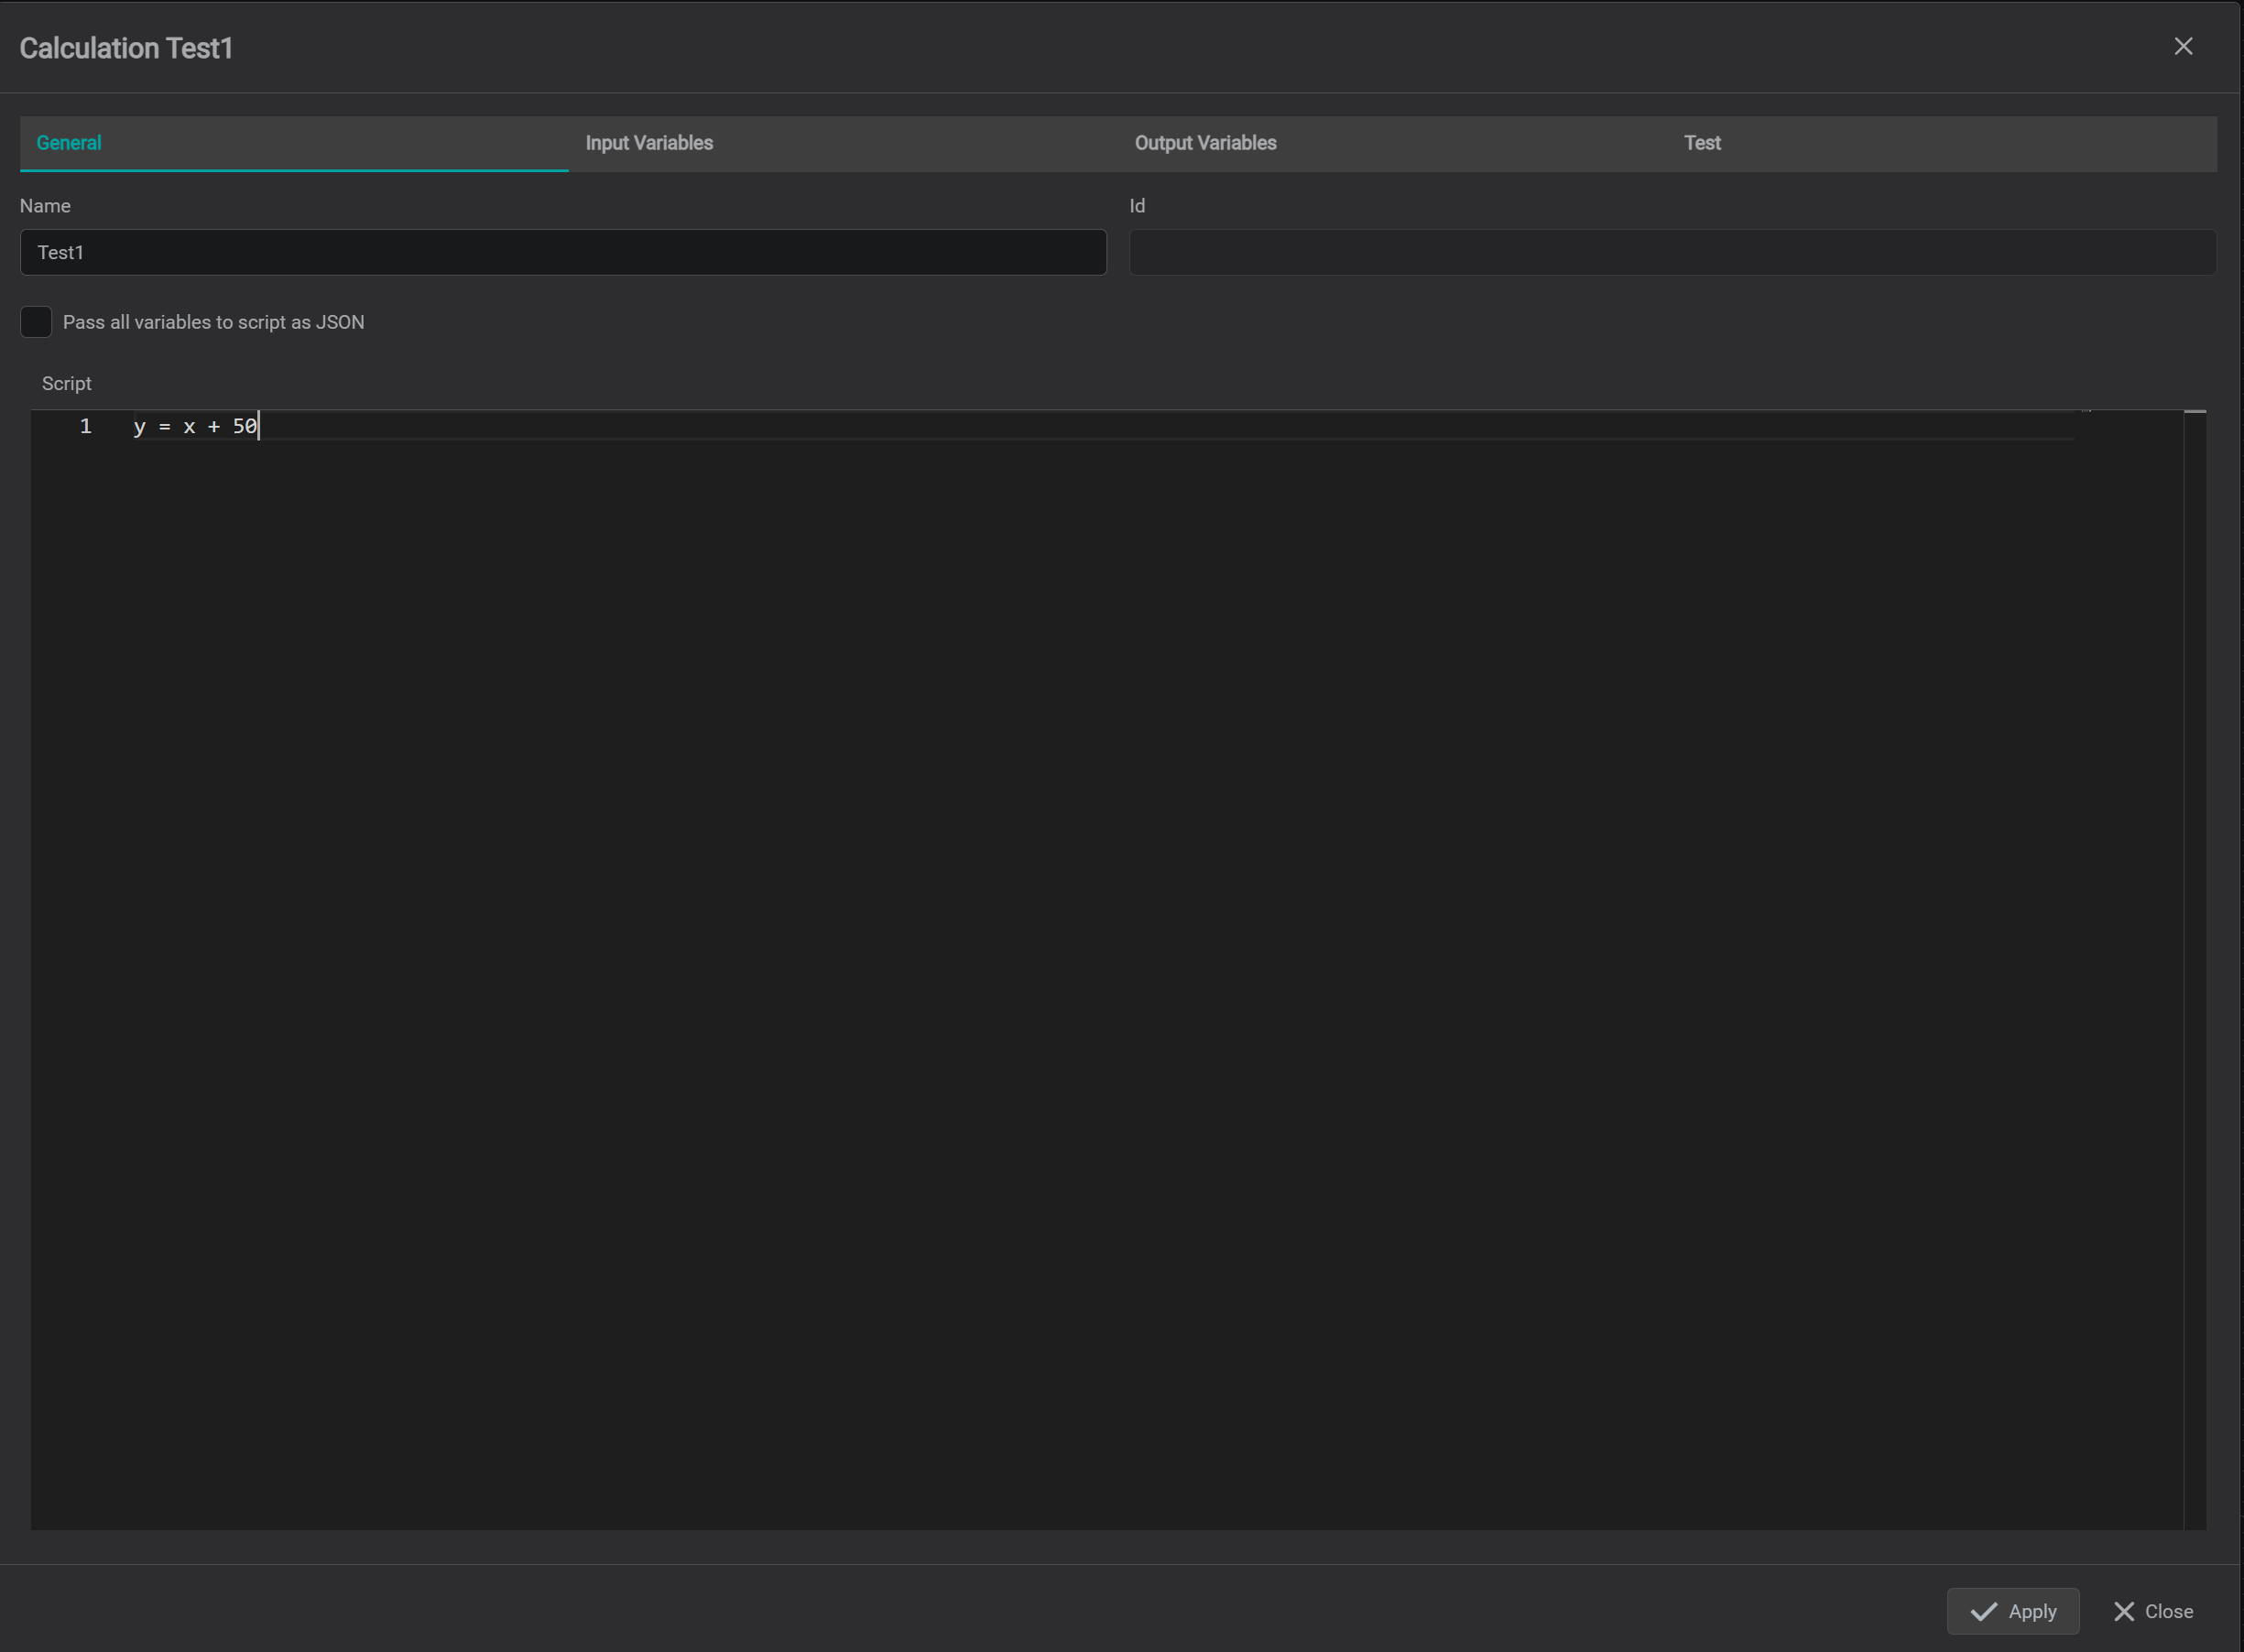
The General Tab allows to define:
Calculation
Module Name.How to put and retrieve data from Python memory. There are 2 modes on how time-series data can be marshalled into/from Python memory. The selection between modes is controlled by
Pass all variables to script as JSONcheckbox.Uncheckedstate - The driver usesMergeprocessing concept where all input variable time-series arrays are merged into a single 'bucket' array and ordered by timestamps.Processing algorithm for each input
timestamp-valuepair in merged 'bucket' array:
- Putvalueobject on Python memory stack
- Execute script
- Retrieve output variable'svaluefrom Python memory stack,
- Create outputtimestamp-valuepair by assigning thetimestampfrom inputtimestamp-valueto output variablevalue
- Put newly created outputtimestamp-valuepair into output variable time-series array.Checkedstate - For each input and output variables - time-series data is marshalled to and from Python memory in form ofJSONarrays:
  {
    "timestamp": <timestamp in milliseconds>,
    "value": <simple data type object>
  }
Define calculation Python script
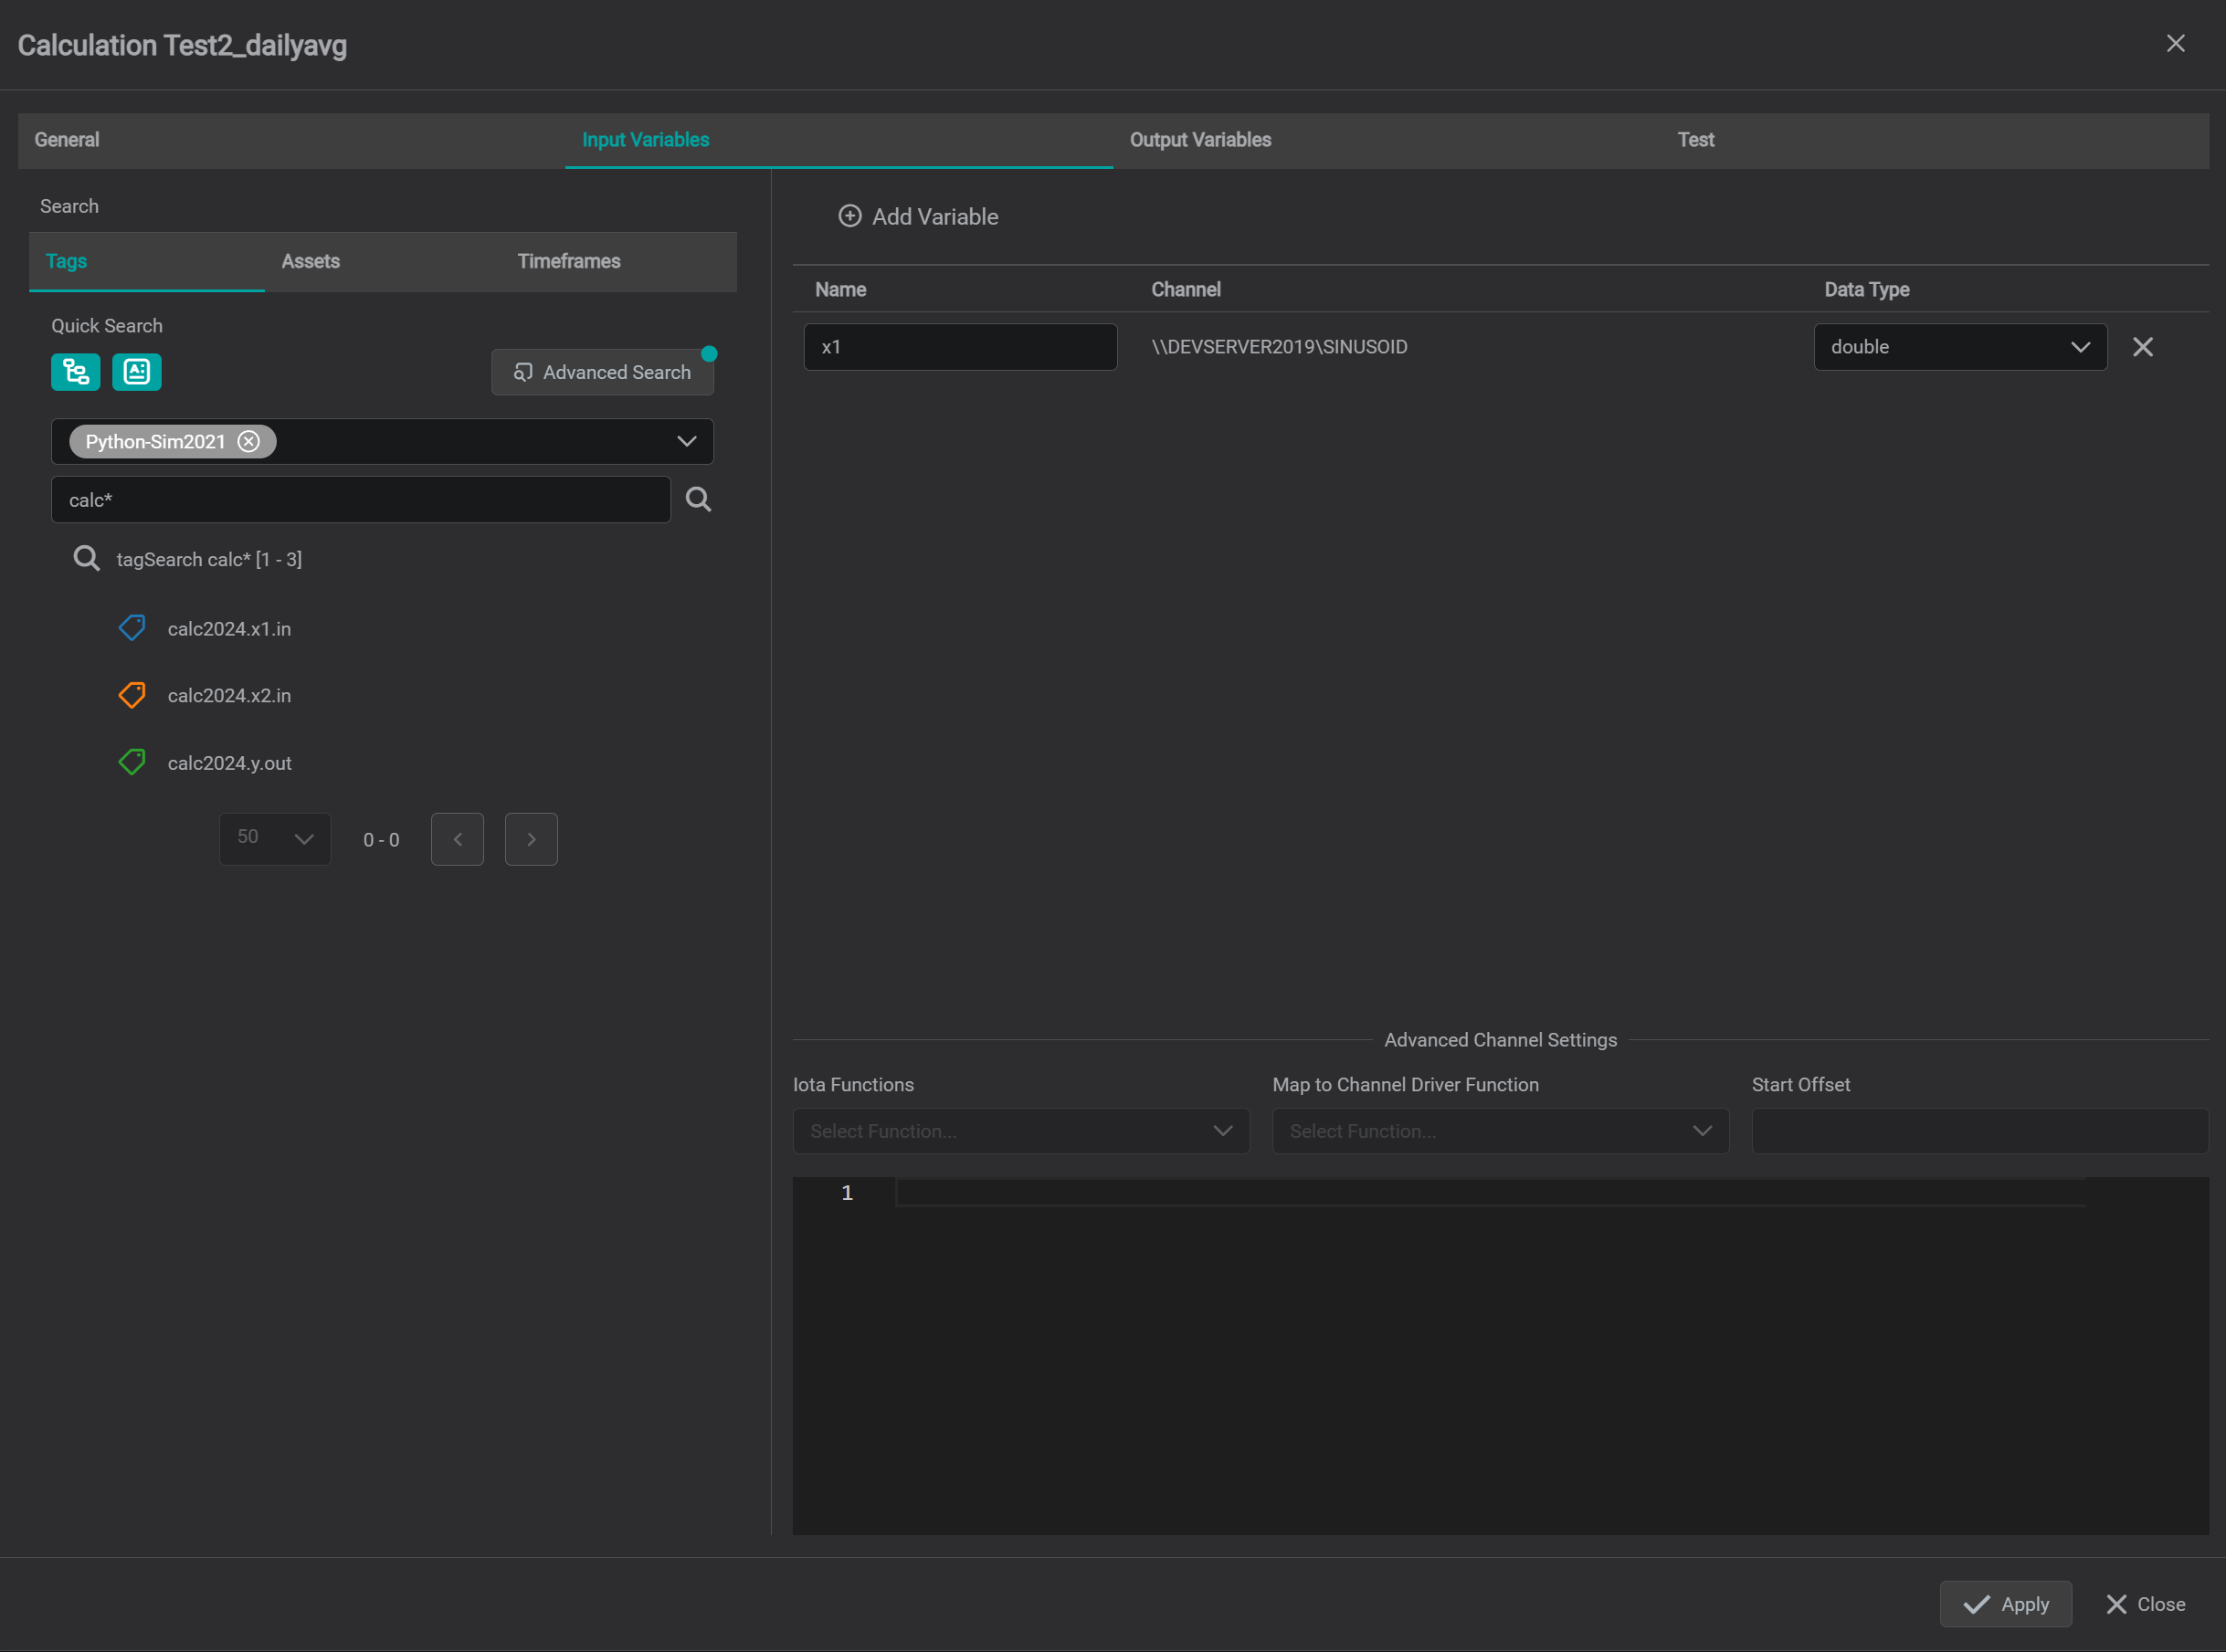
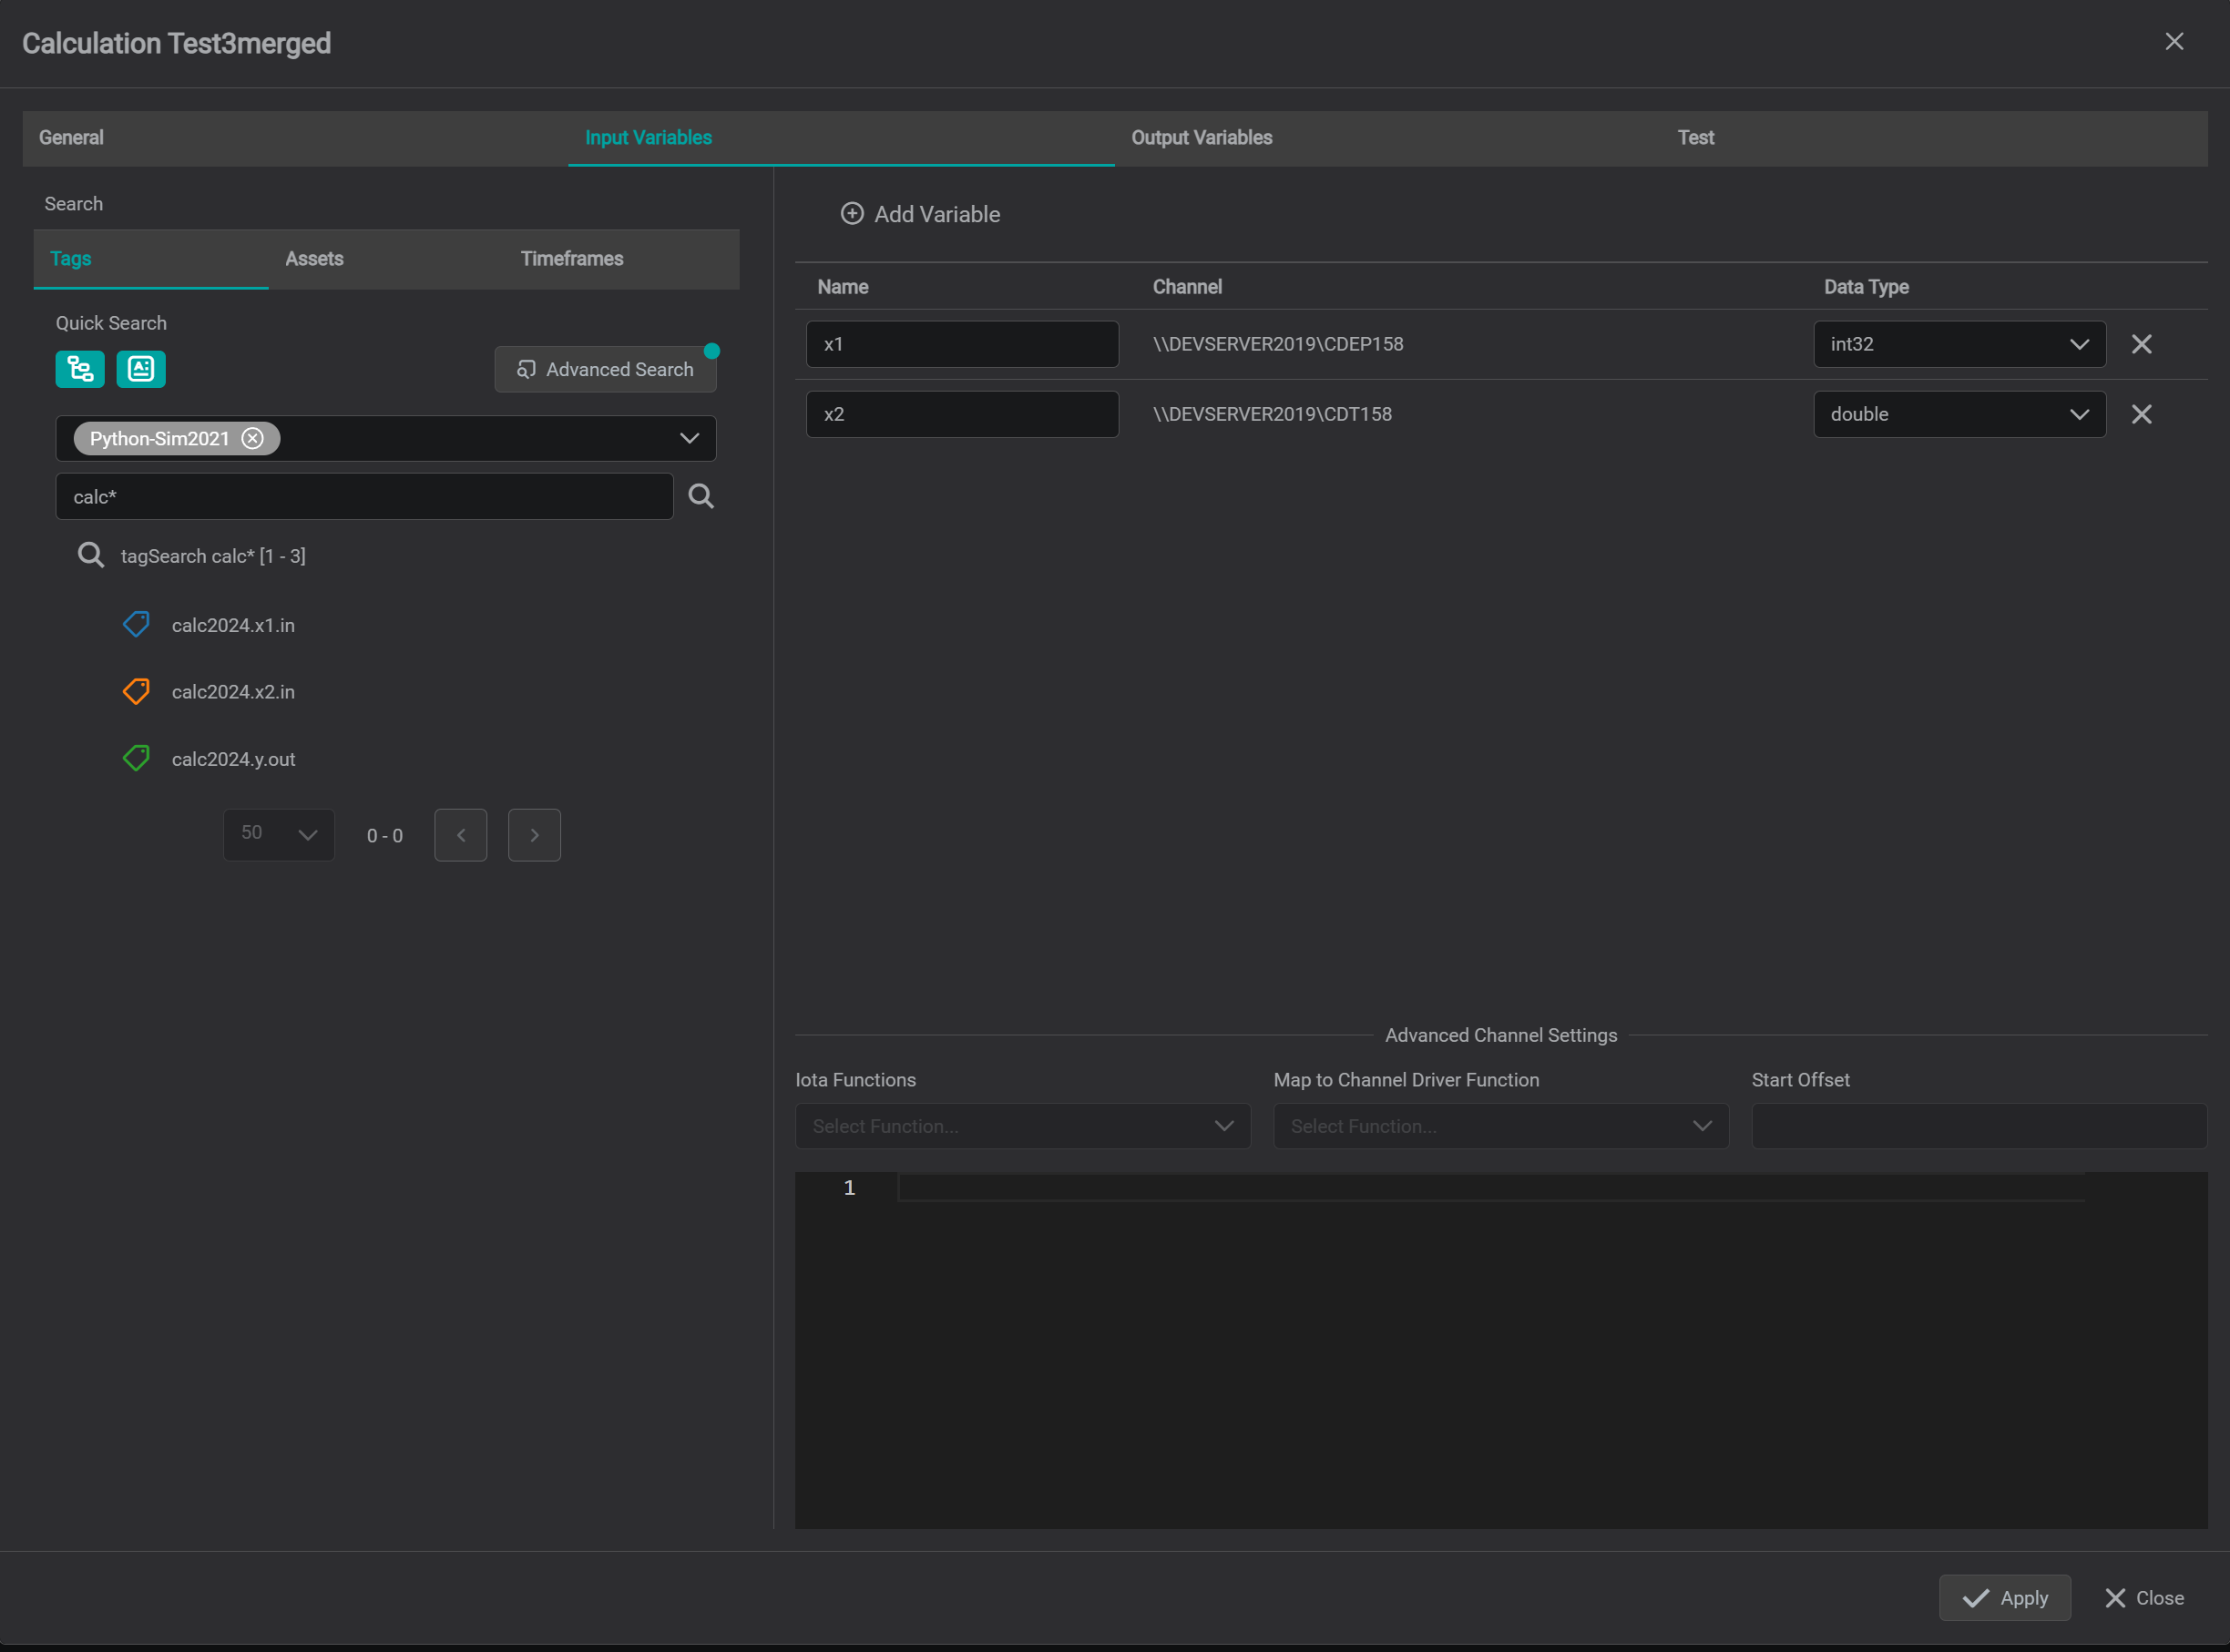
Input Variables
The Input Variables Tab allows:
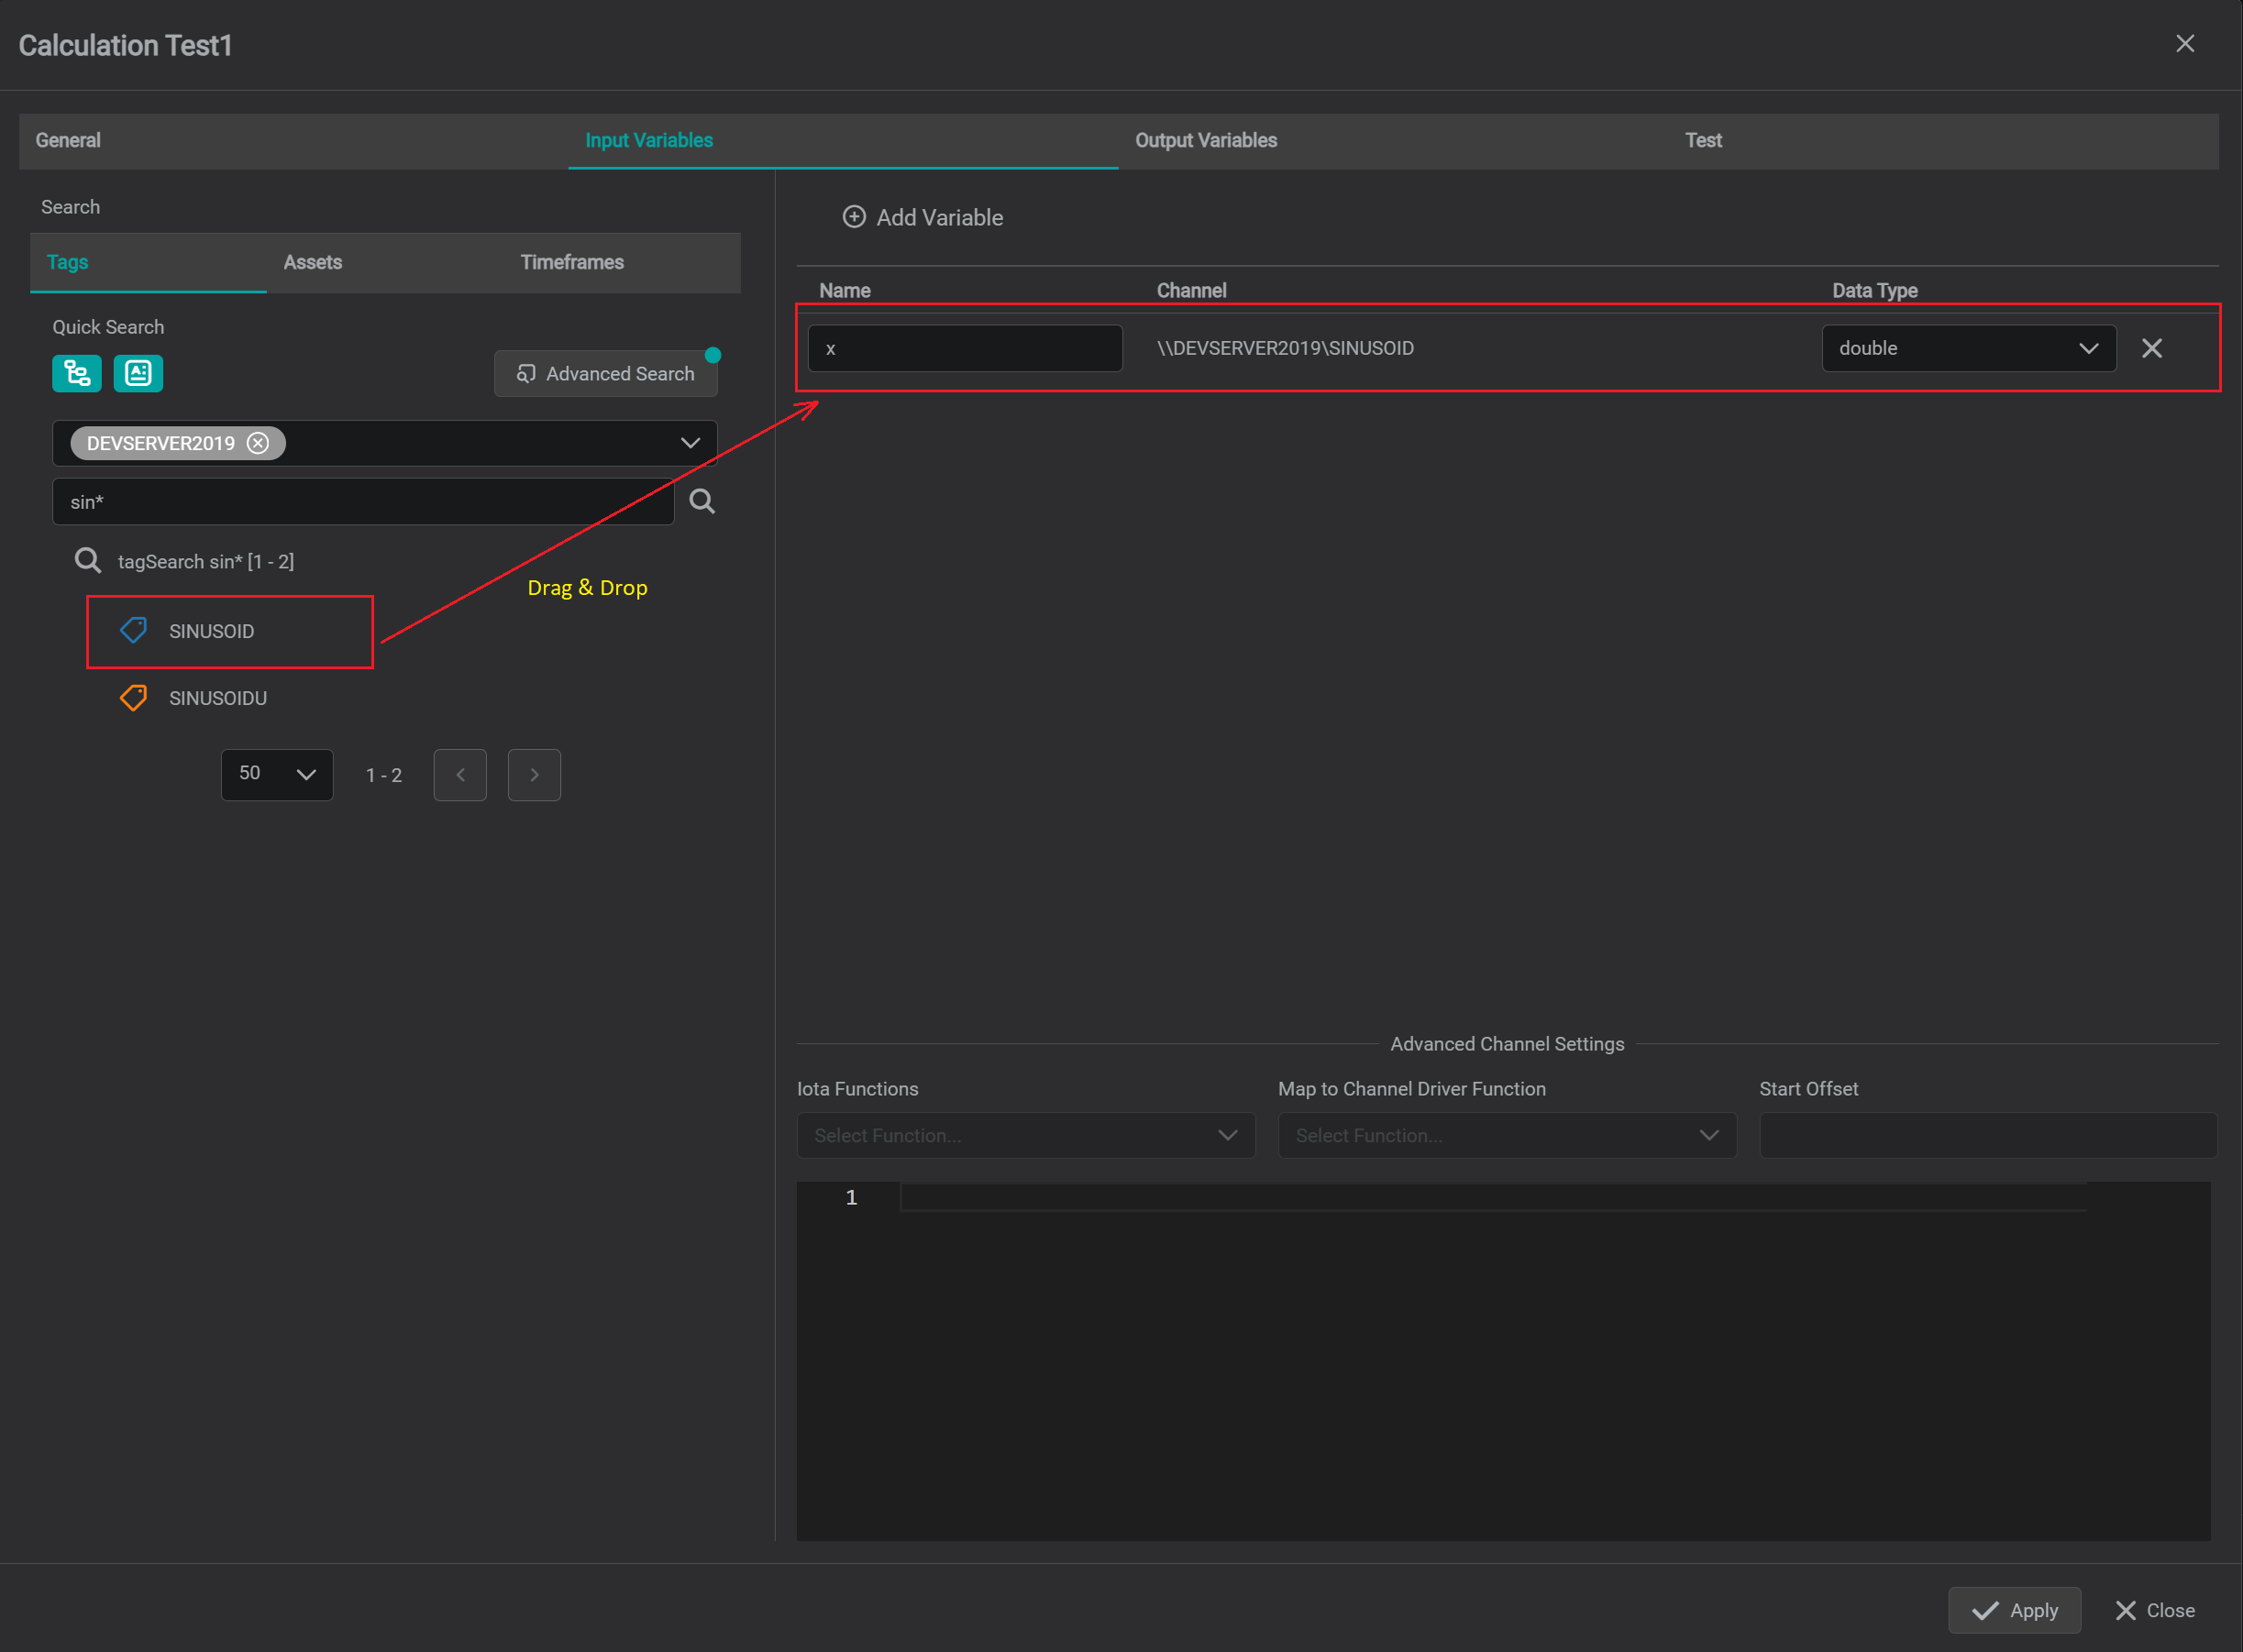
Create new input variable to be used in Python script. For each input variable
NamePython Driver puts values on Python memory stack. There are 2 ways to create input variable:- Click on
+icon - Or simply drag and drop
TagorAttributechannel from search pane on the left to the central area of the dialog. Input variable will be automatically created with input variableNameas channel name
- Click on
Assign IOTA Tag or Attribute data channels to input variables.
Define input variable
Nameto be used inside theScriptDefine input variable
Data Typeto be used in Python scriptTo delete specific input variable - click on
Xicon which is located at the end of each input variable row.Per each input variable channel - if necessary - replace (override) generic IOTA API function calls with channel's driver custom function call.
In order to override input channel functions - select input variable row then at the bottom of the dialog useIota Functionsdrop down andMap to Channel Driver Functiondrop down to create the function overrides.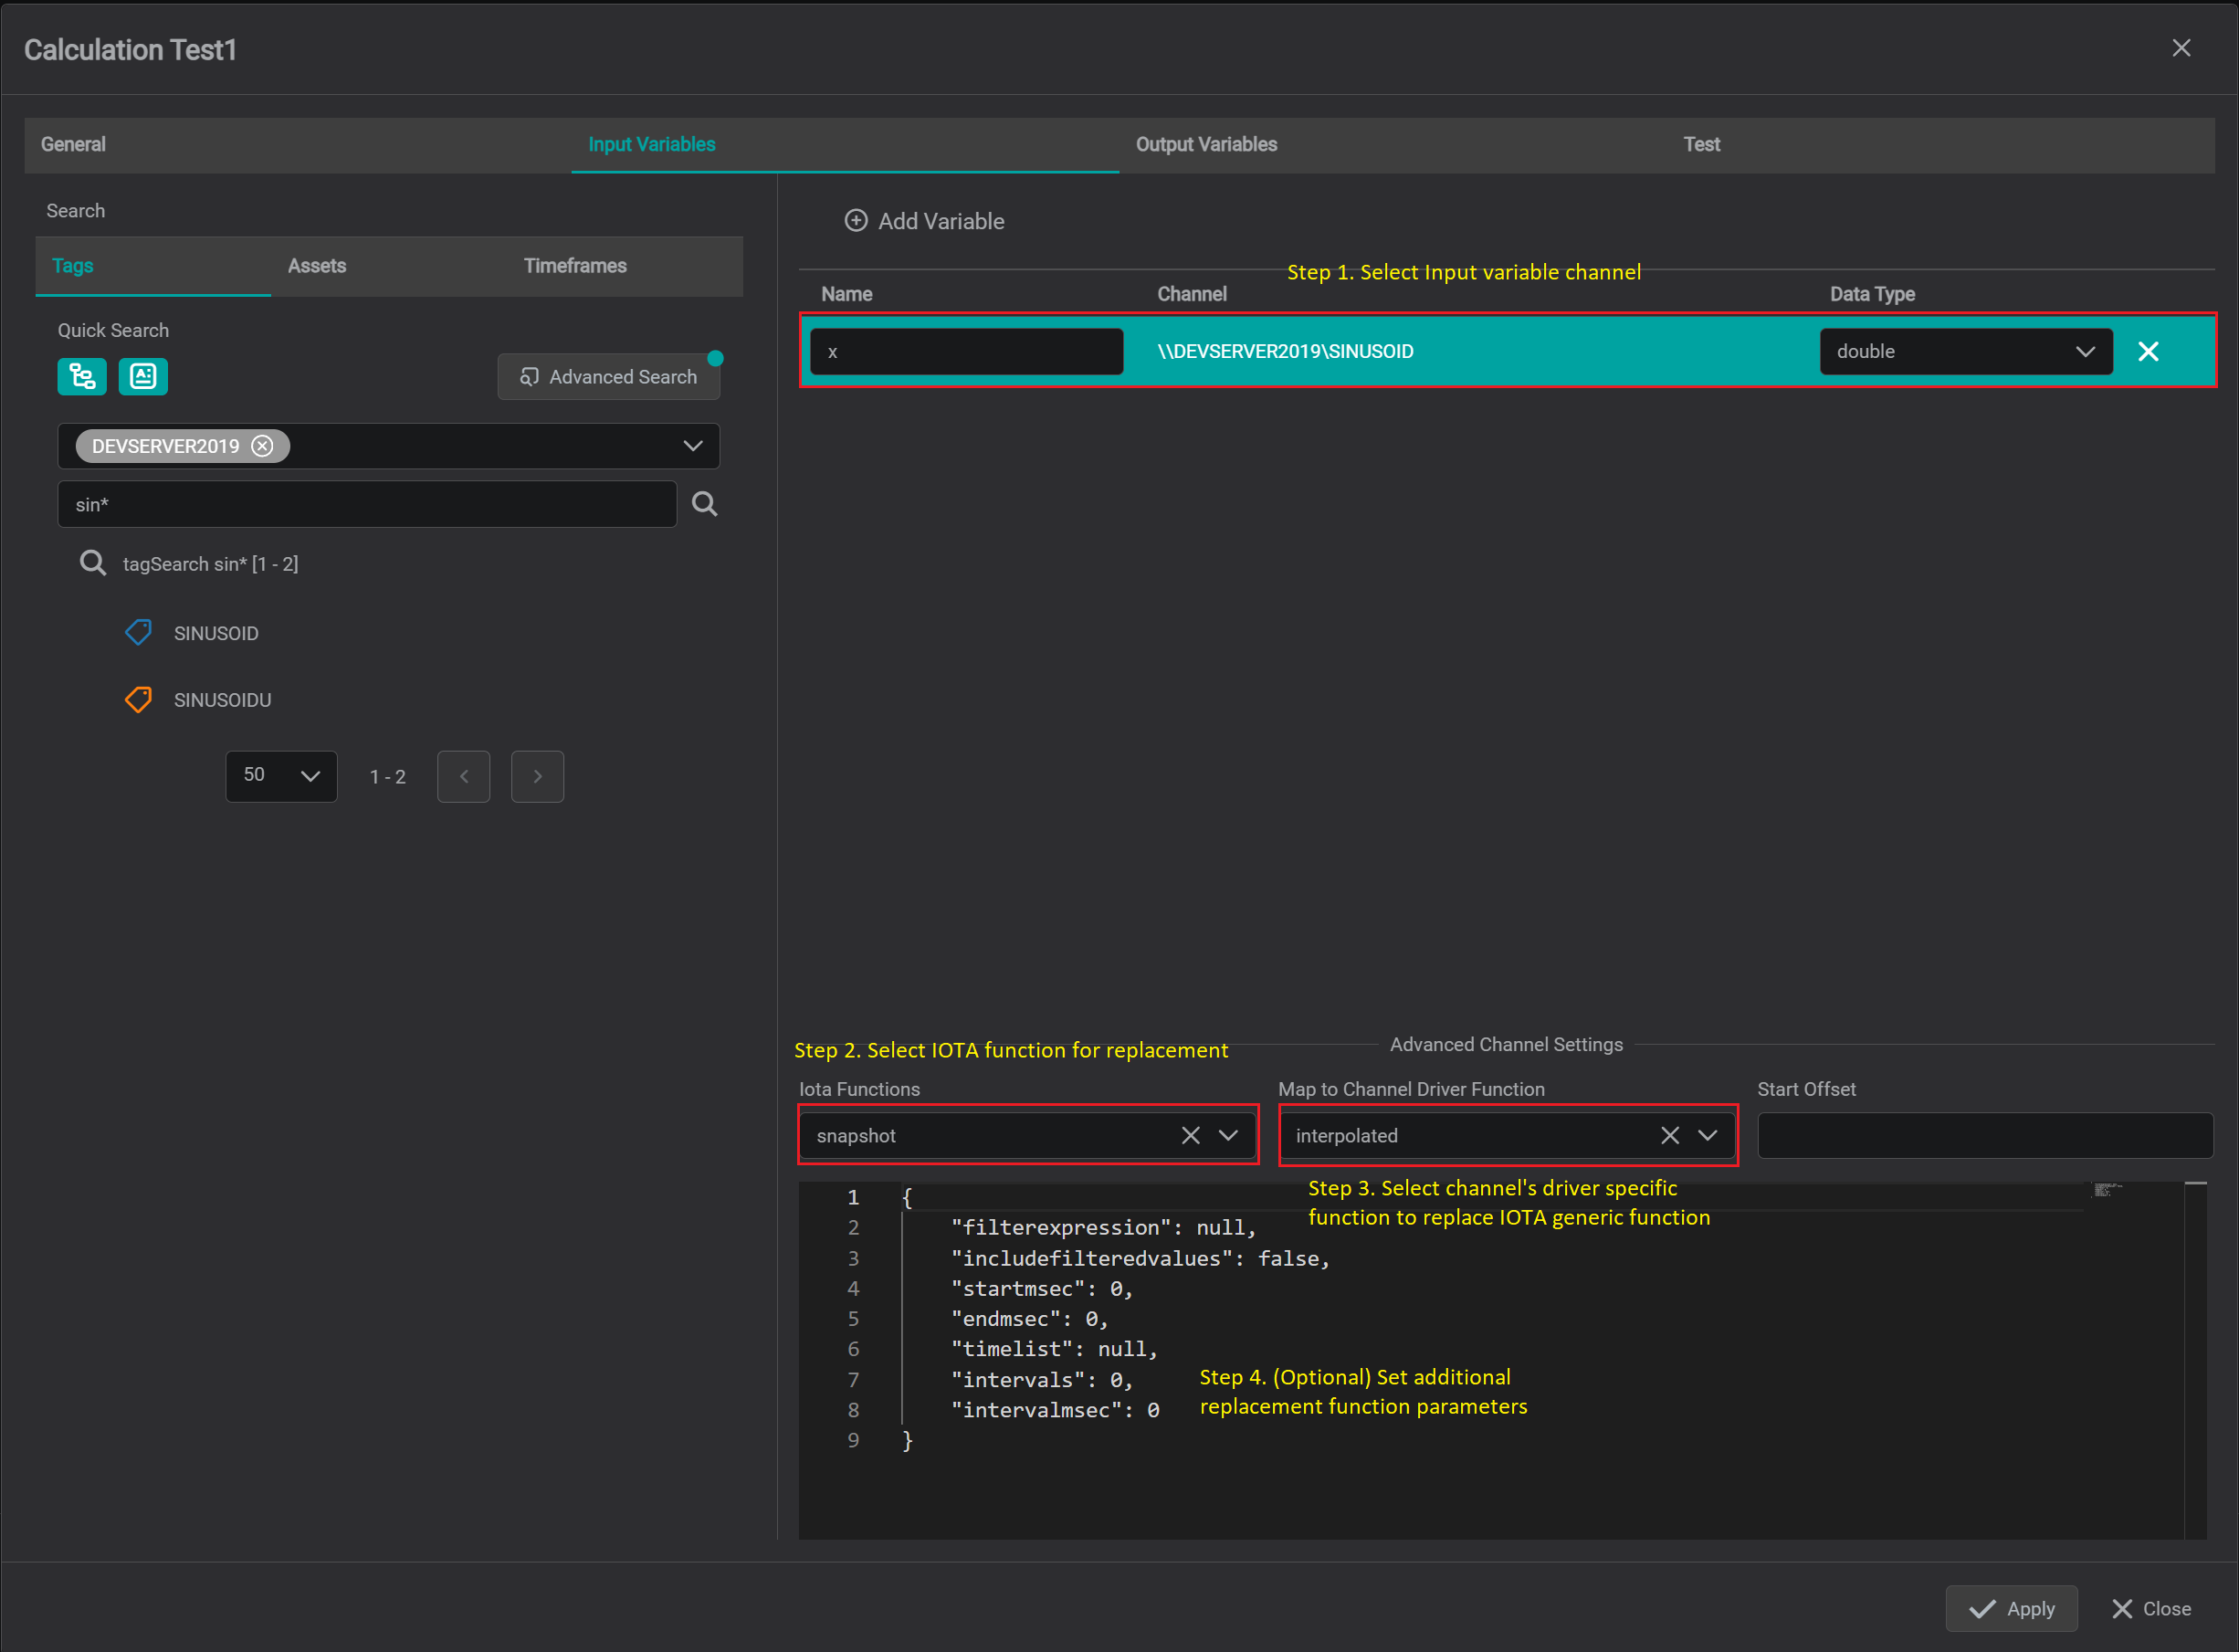
iota function override Define
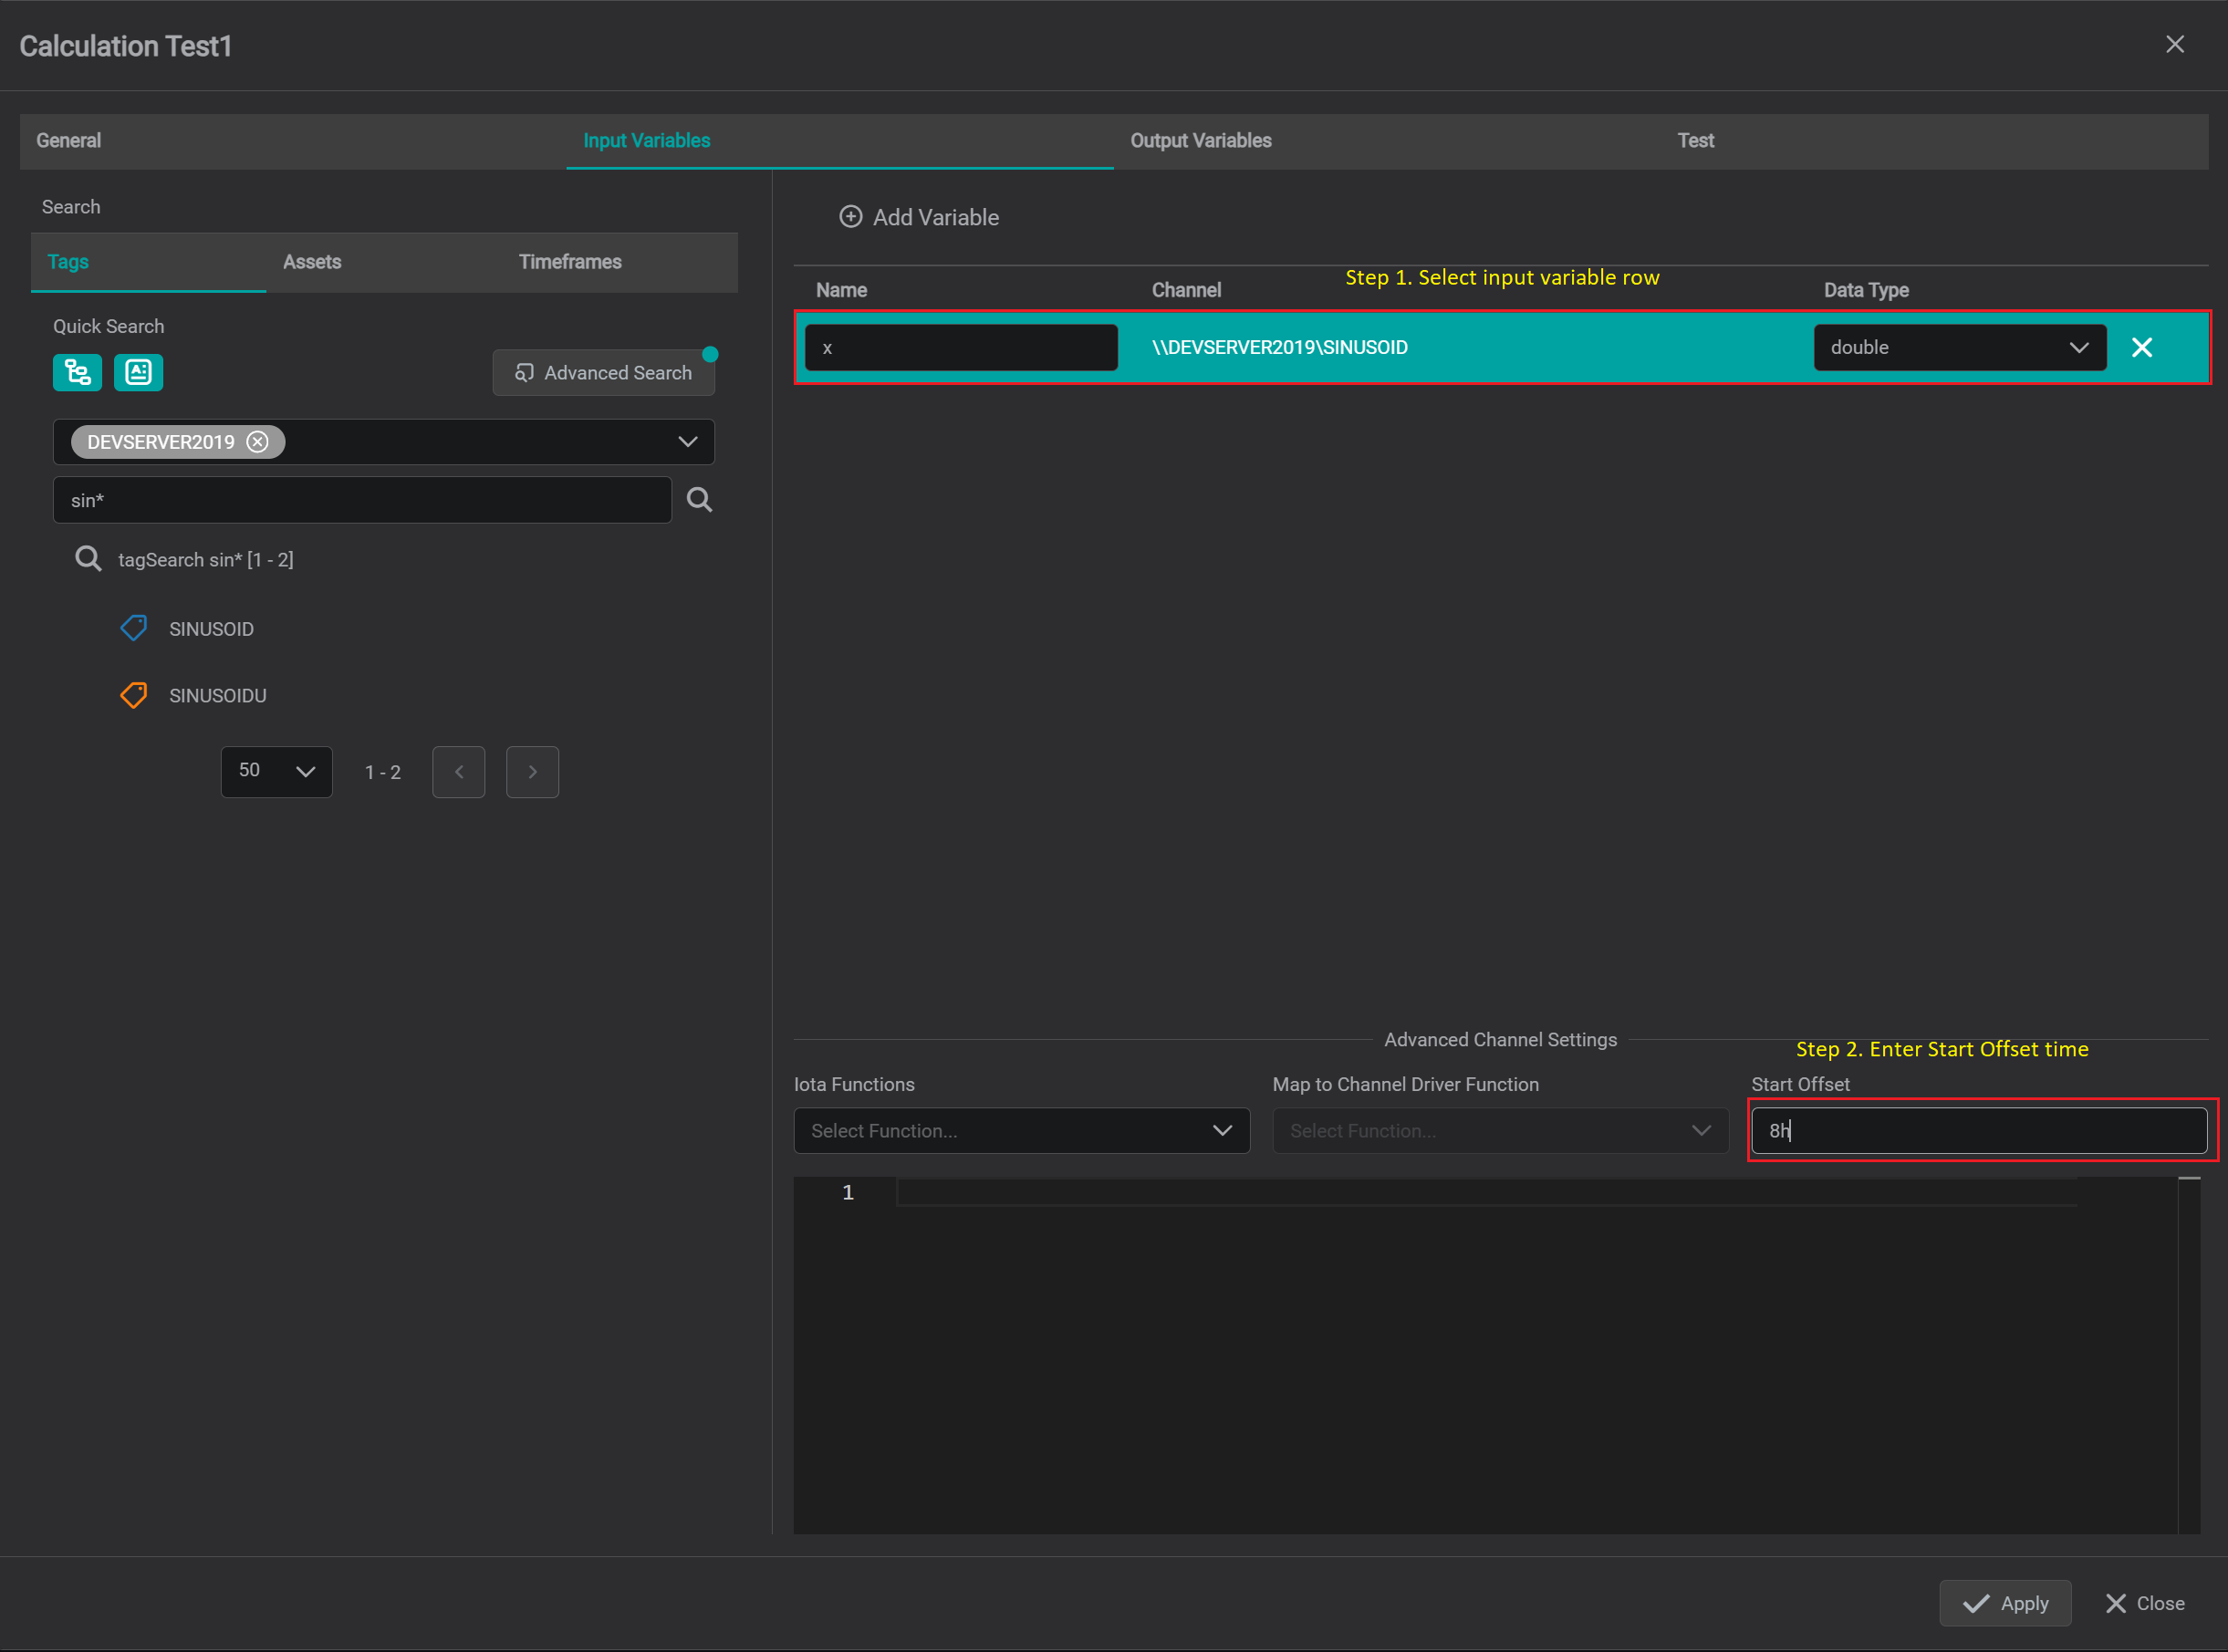
Start Offsettime. It is important when moving-window aggregation calculations are required. when defined - Python driver for specific input channel(s) will request data for extended time interval:
Start Time:Original Start Time-Start Offset
End Time:Original End TimeStart Offsetshould be defined in relative time format. Example:8hRelative Time Format Options
Abbreviation Description Example s Second 10s m Minute 20m h Hour 12h d Day 5d w Week 2w mo Month 3mo y Year 10y To set
Start Offsetfollow 2 simple steps:- Select Input variable row
- At the lower section of the screen in
Start Offsettext box enter desired start offset timespan.
set input variable start offset time
Output Variables
Output variables represent the result of Python script execution and in IOTA Tag search result are presented in the following format:
Calculation Module Name.Output Variable Name.out

The Output Variables Tab allows:
- Create output variable(s) by clicking on
+icon. - Define the
Nameof each output variable - Define output variable
Data Type - Define Units of Measure (UOM)
- To delete specific output variable - click on
Xicon which is located at the end of each output variable row.
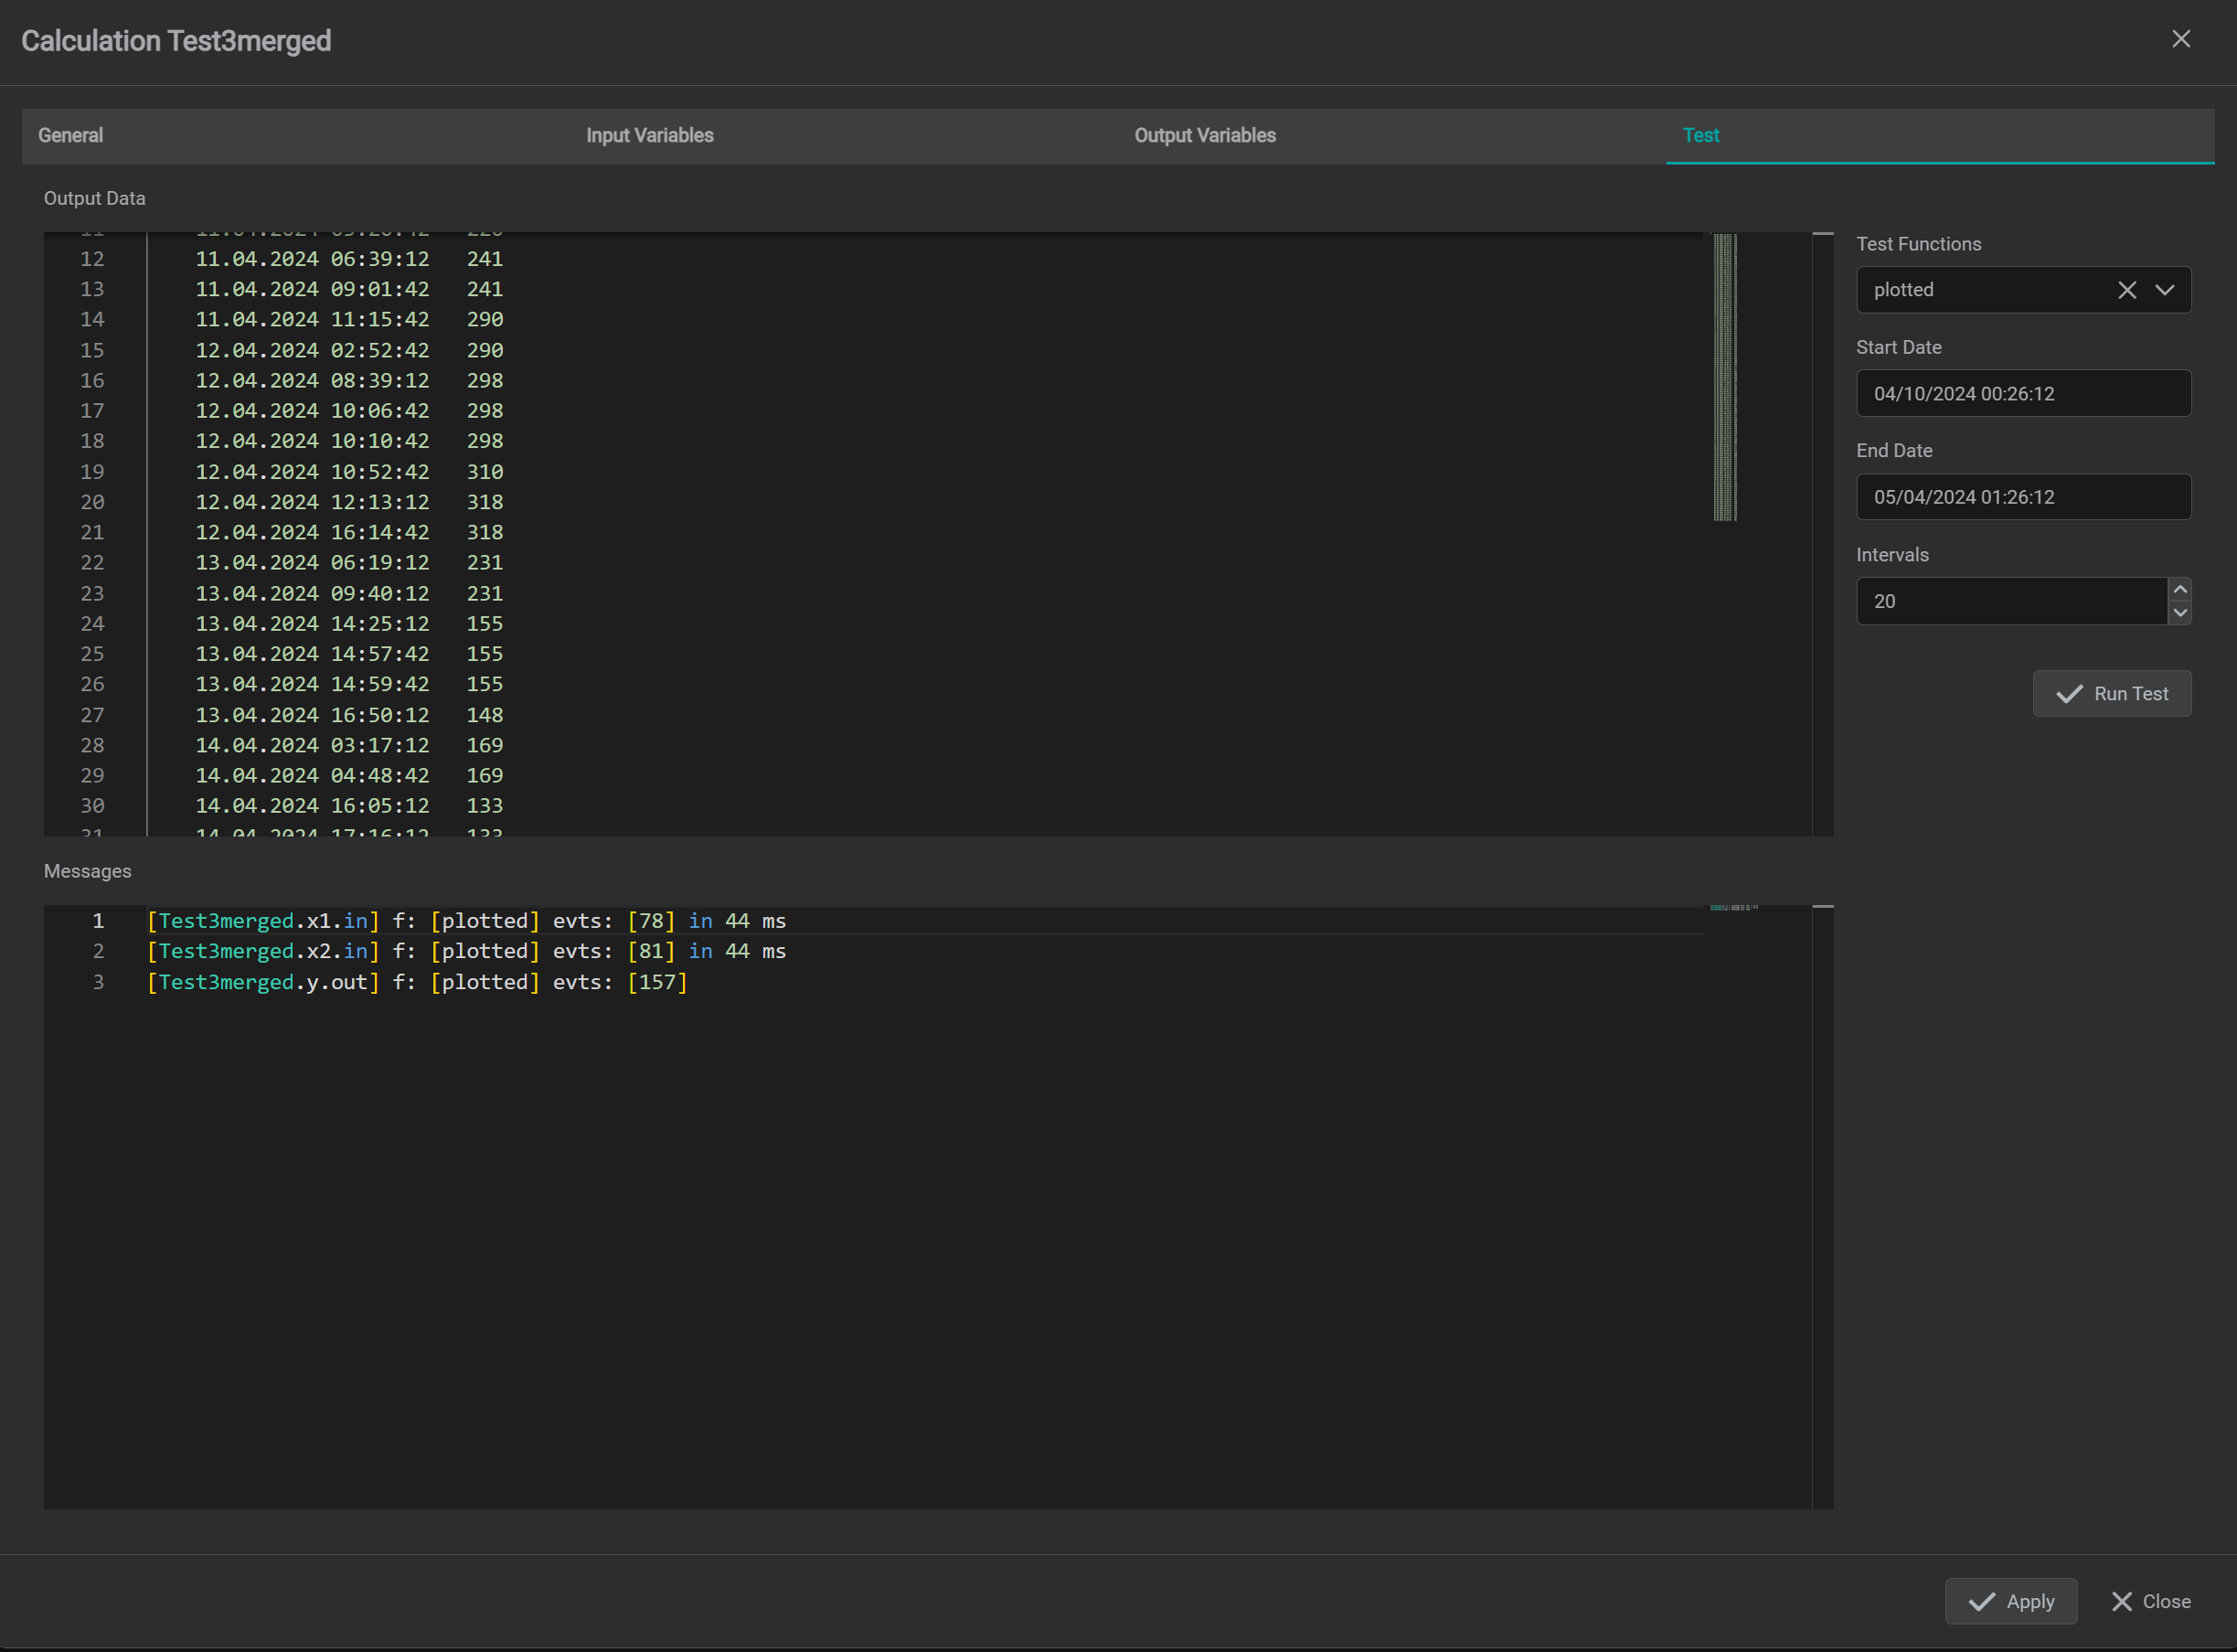
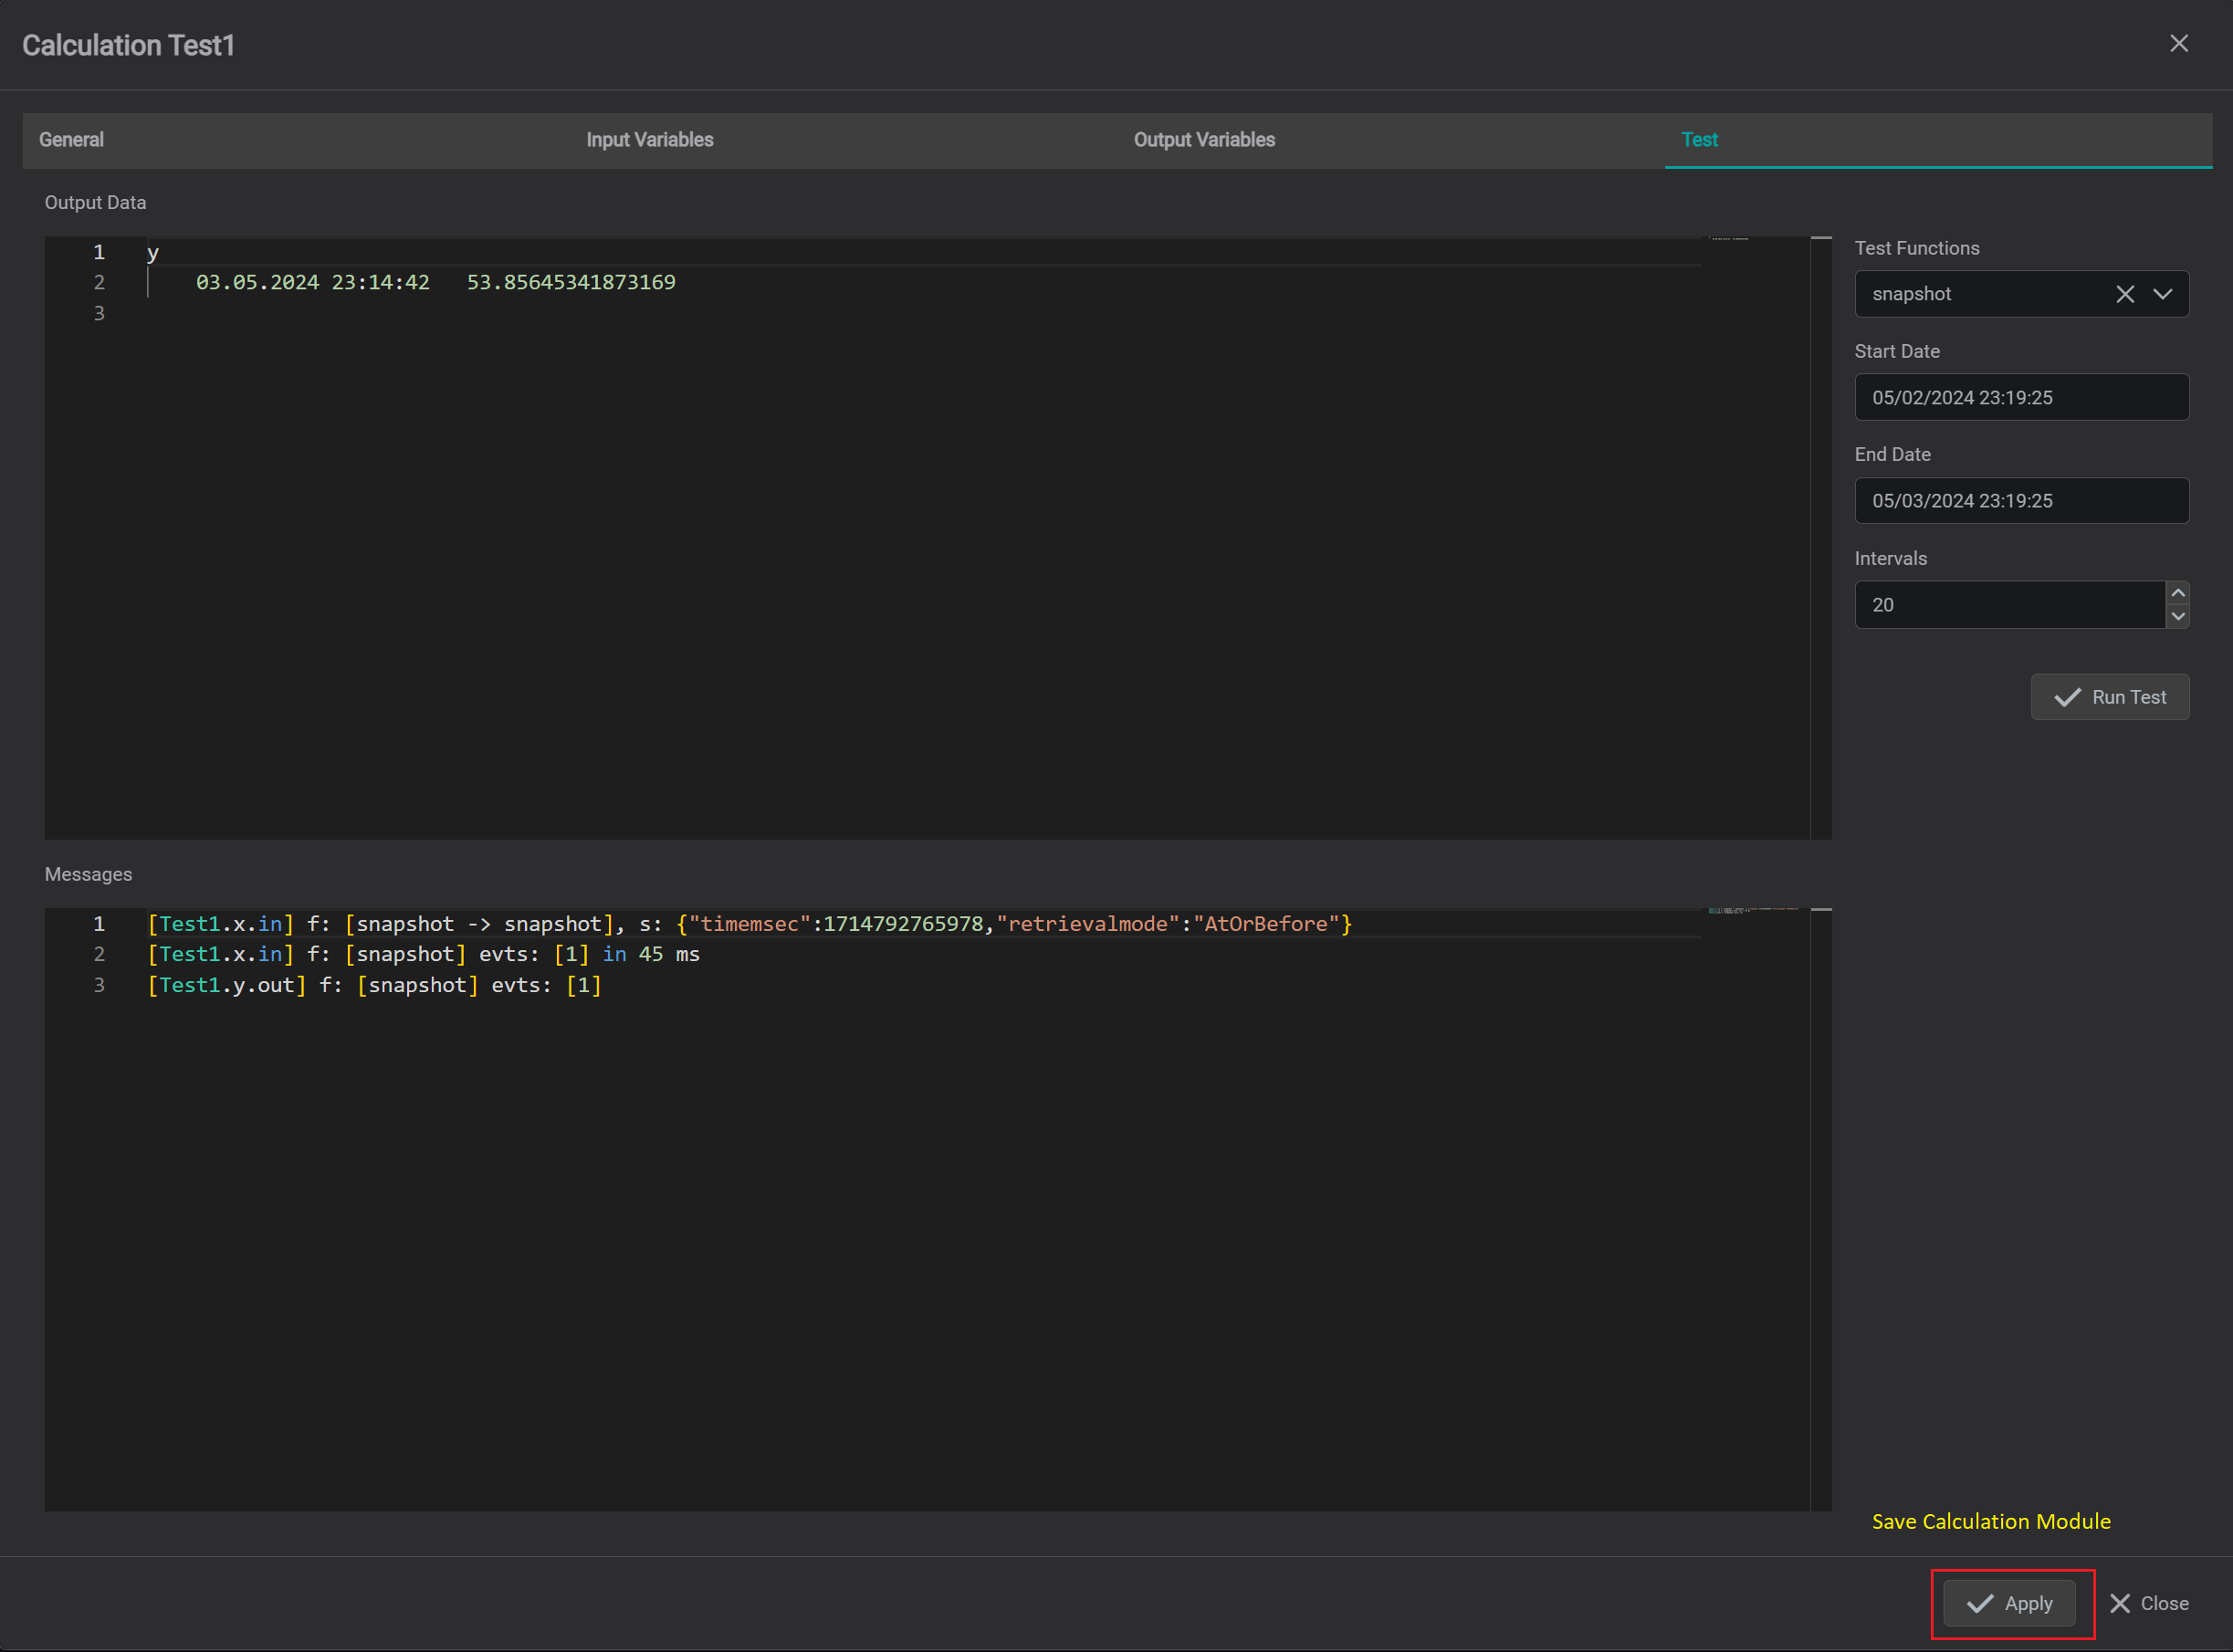
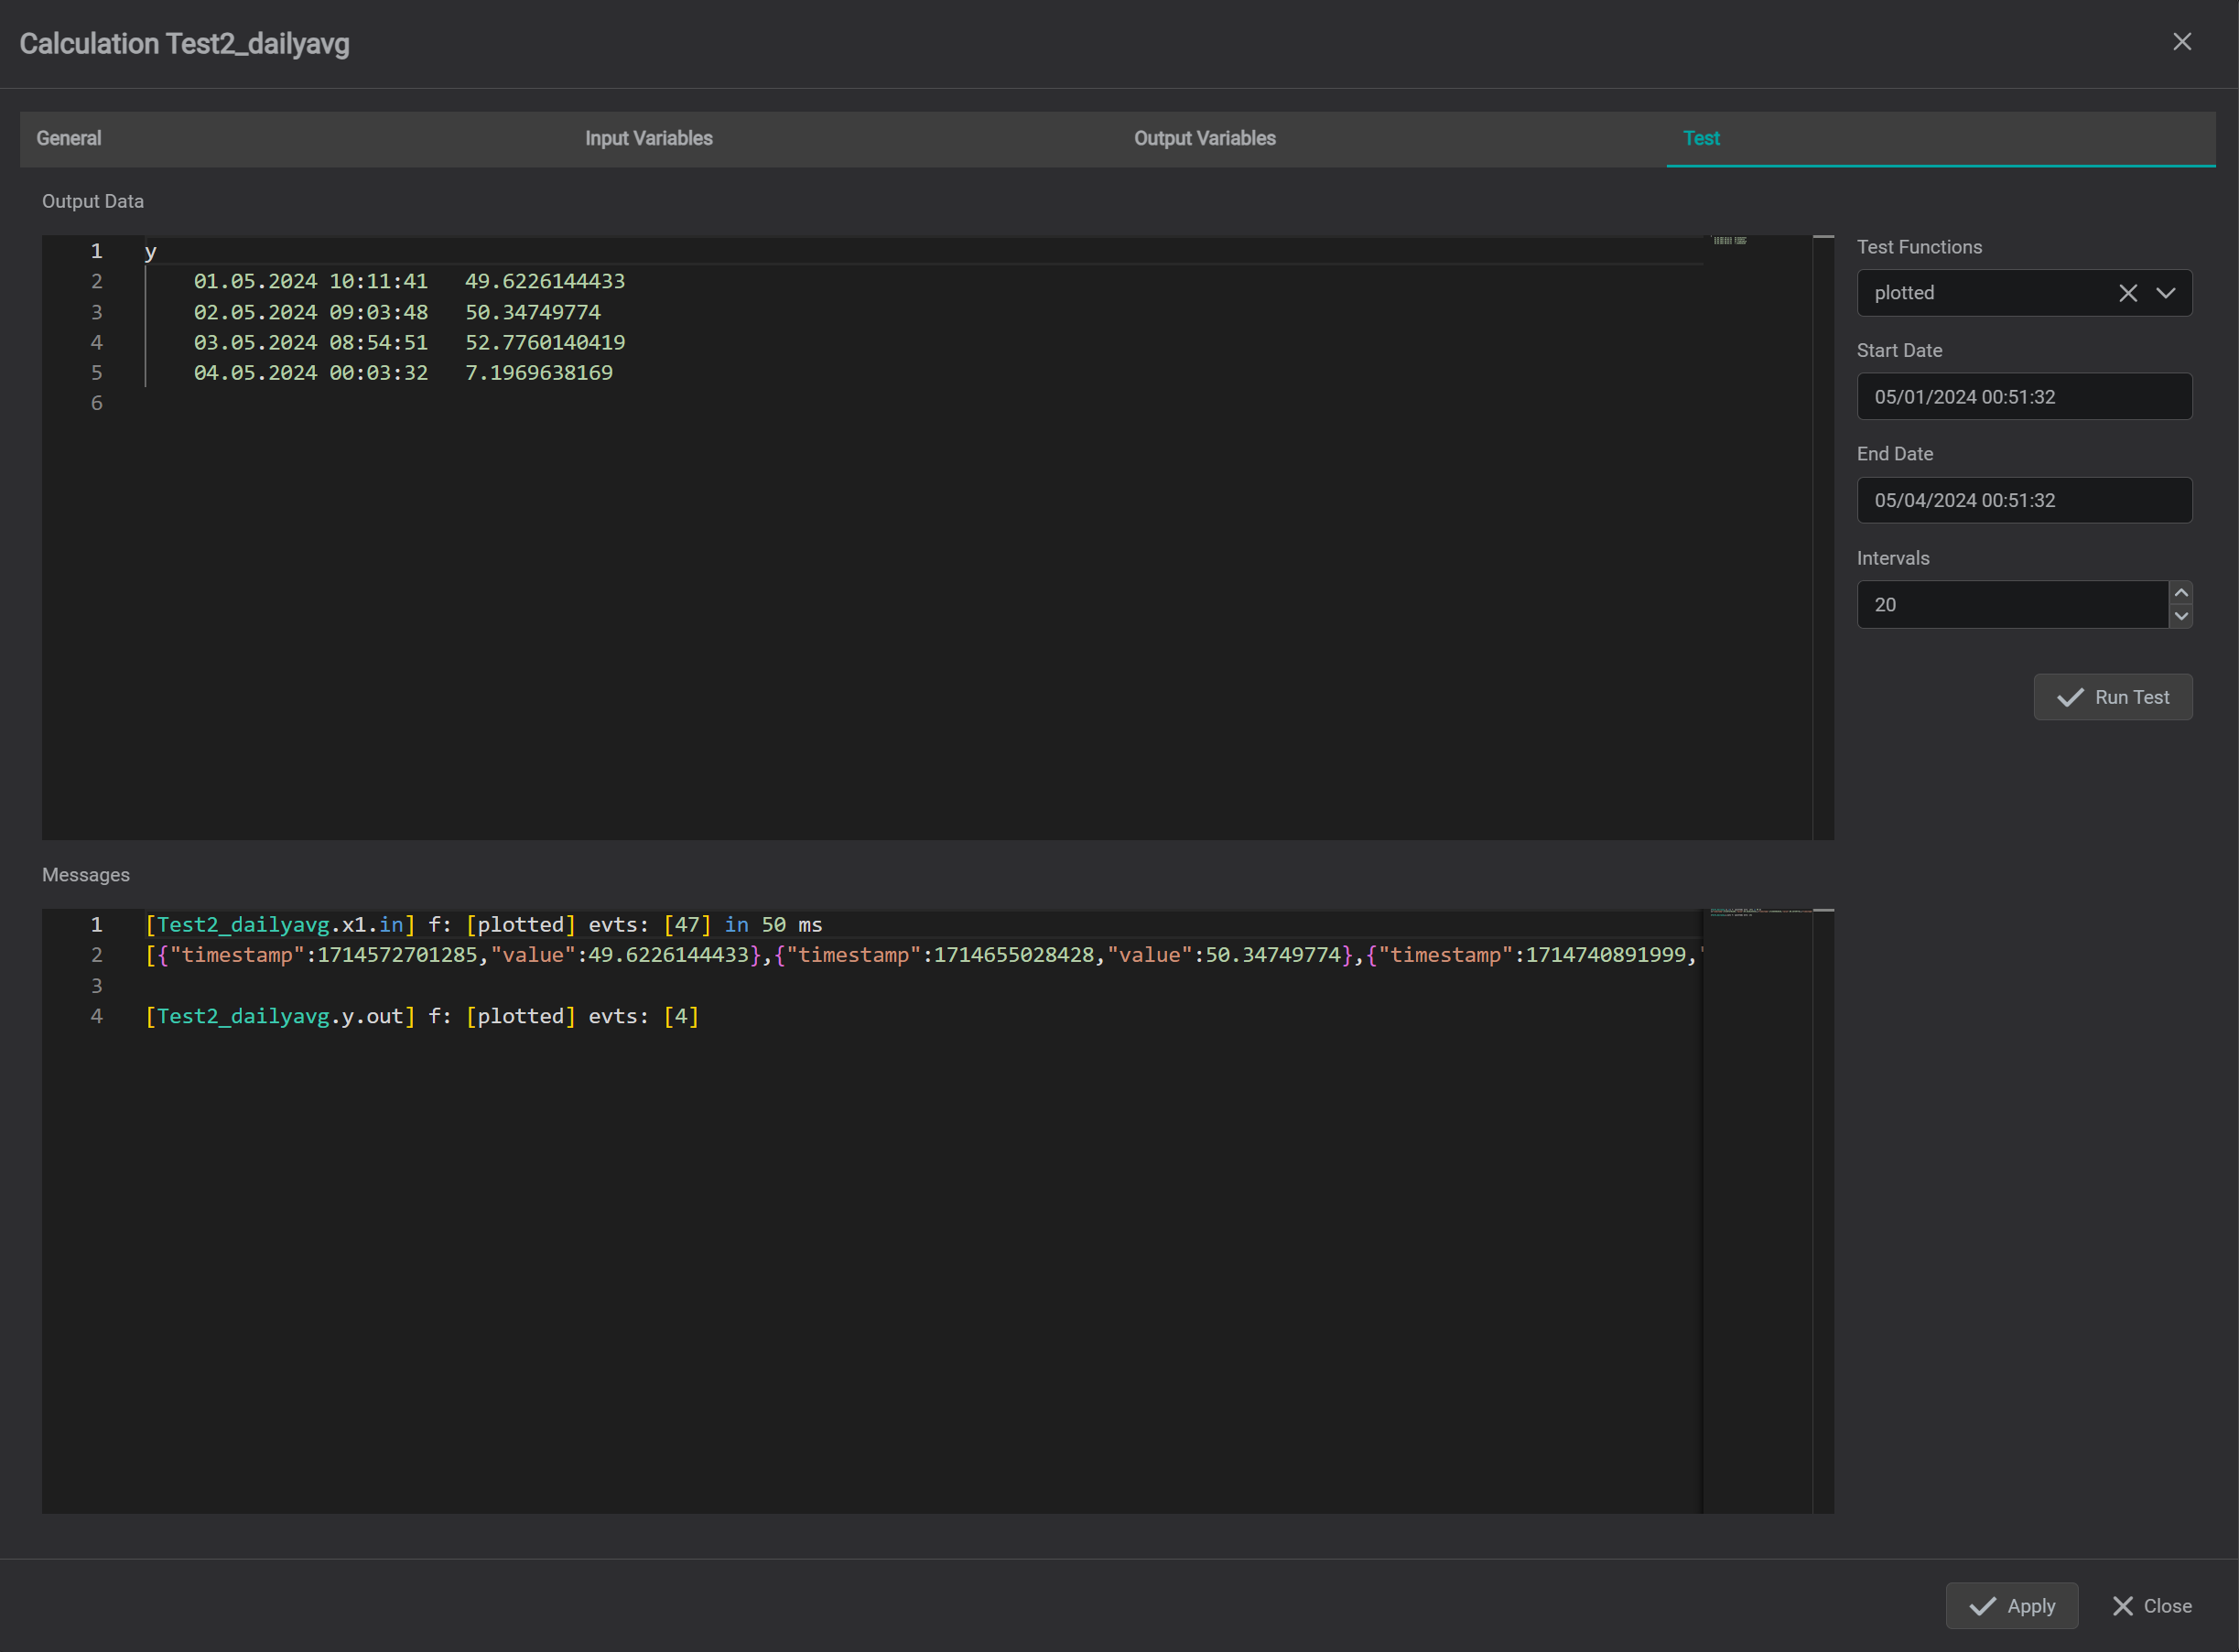
Test Calculation
The Test Tab allows to test calculation without saving it to database.
The following steps should be performed for test execution:
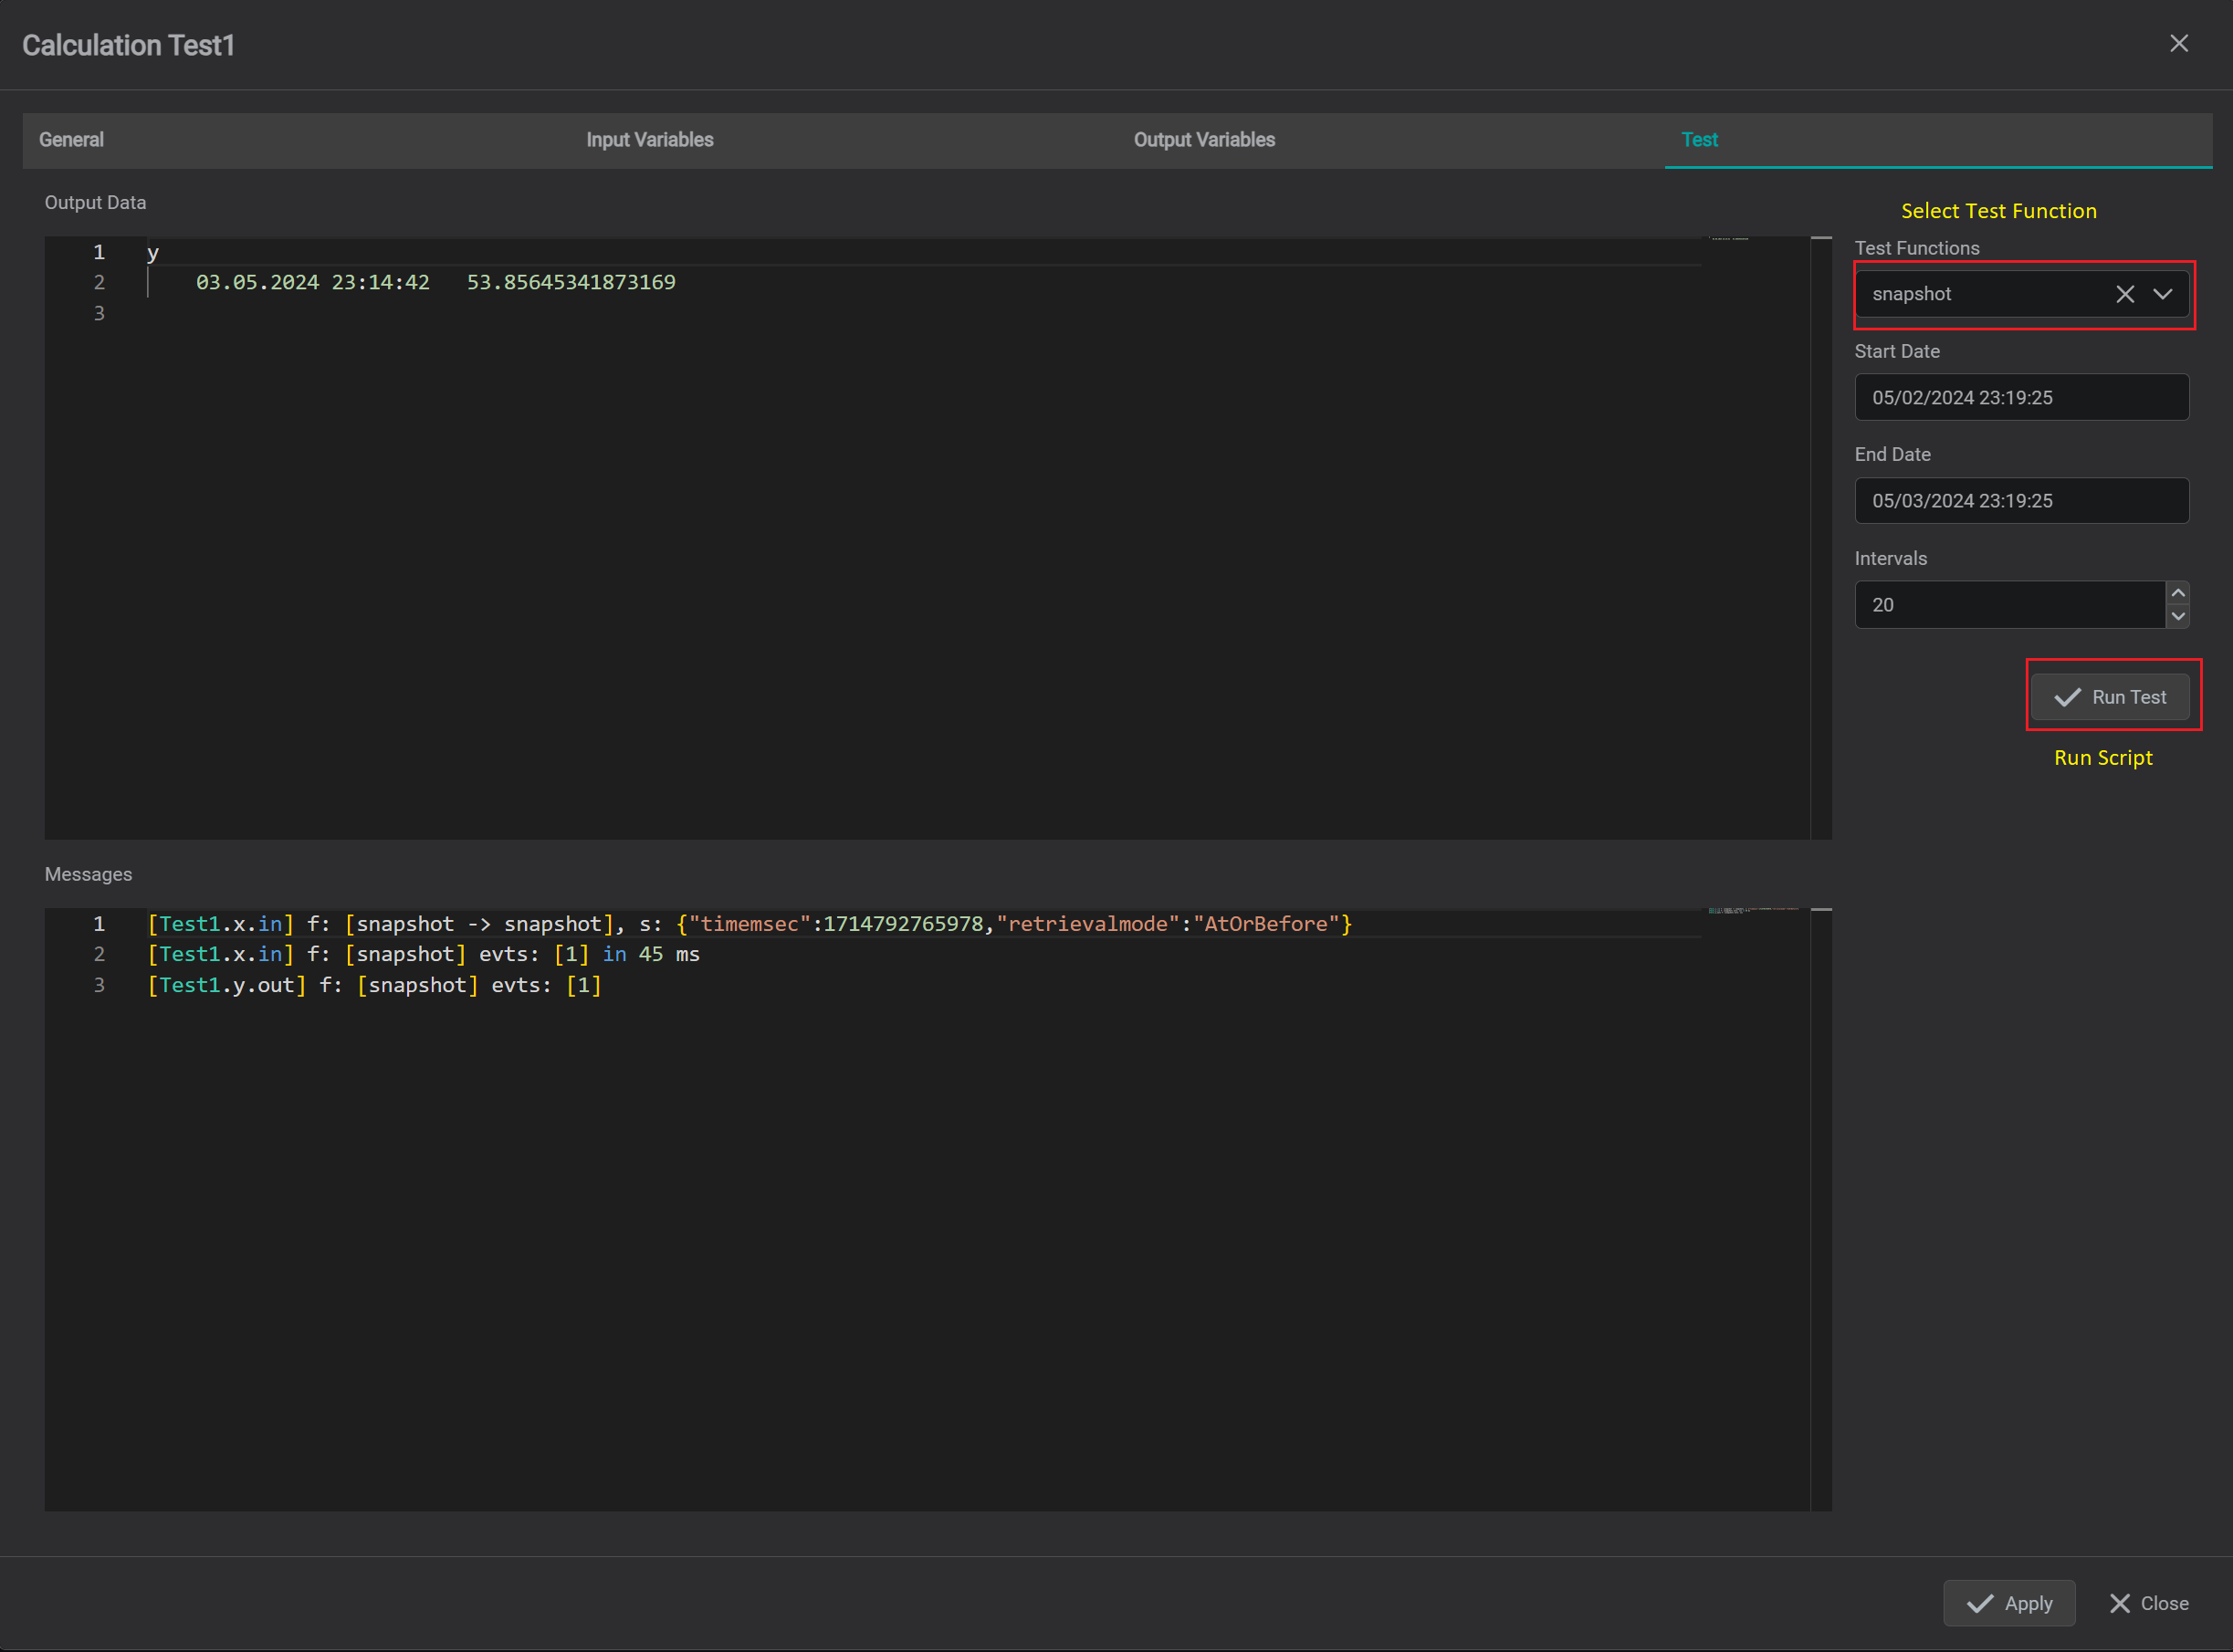
- Select test
Function. Default:snapshot. - If necessary - pick Start and End times. By default, when the dialog is opened,
StartTime=NOW-1 dayEndTime=NOW:
Forsnapshottest function - theEnd Timeis used as requestTimestamp - If selected test function is based on resampling such as
plotted,interpolated,discrete- then user can pick number of sub-intervals for resampling. Default:20 - Click on
Run Testbutton - The output variable data as Python driver reads it will be displayed at the top
Output Datasection and messages will be displayed at the lowerMessagessection.
Tips
Python Driver supports print() function. The results of printout are displayed at the lower Messages section.
Save Calculation
Note
Before saving please make sure that there are no print() functions in the script.
When script is executed in runtime - there is no handler for catching printouts and all print messages are directed to standard output which can reduce the execution performance
To save calculation module - click on Apply button at the lower right corner of the calculation dialog.
The calculation editor dialog will close and saved calculation will appear in the list of available calculations.
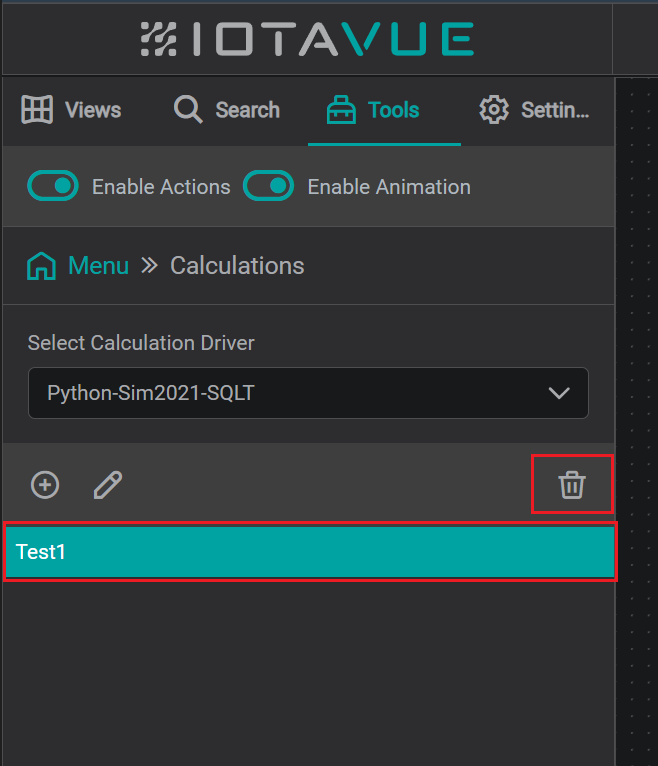
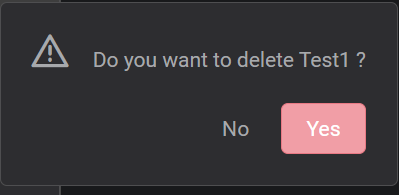
Delete Calculation
To delete specific calculation module - select the module to be deleted and then click on Trash icon. The confirmation dialog will appear - click Yes to delete.
Use Calculations in IOTA
Tag Search
The Python driver in IOTA can be used just like any other data driver. All input and output variables are available as tags with names defined by the following convention:
Calc Module Name.Variable Name.in/out
Pick Python connection instance from the dropdown
Perform
Namebased search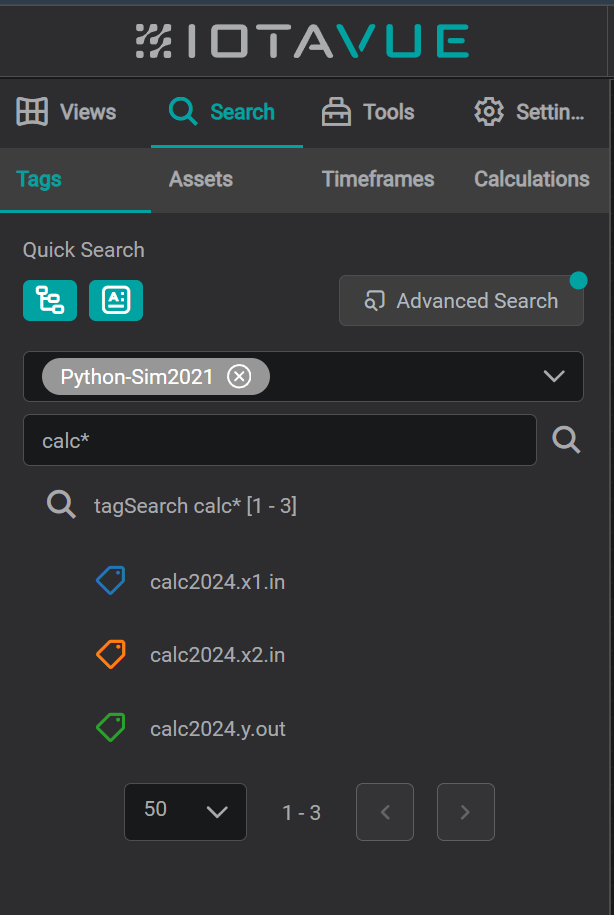
tag search by name Or open
Advanced Searchdialog. Advanced search dialog allows to search on:- Variable Type
- Name
- Description
- Data Type
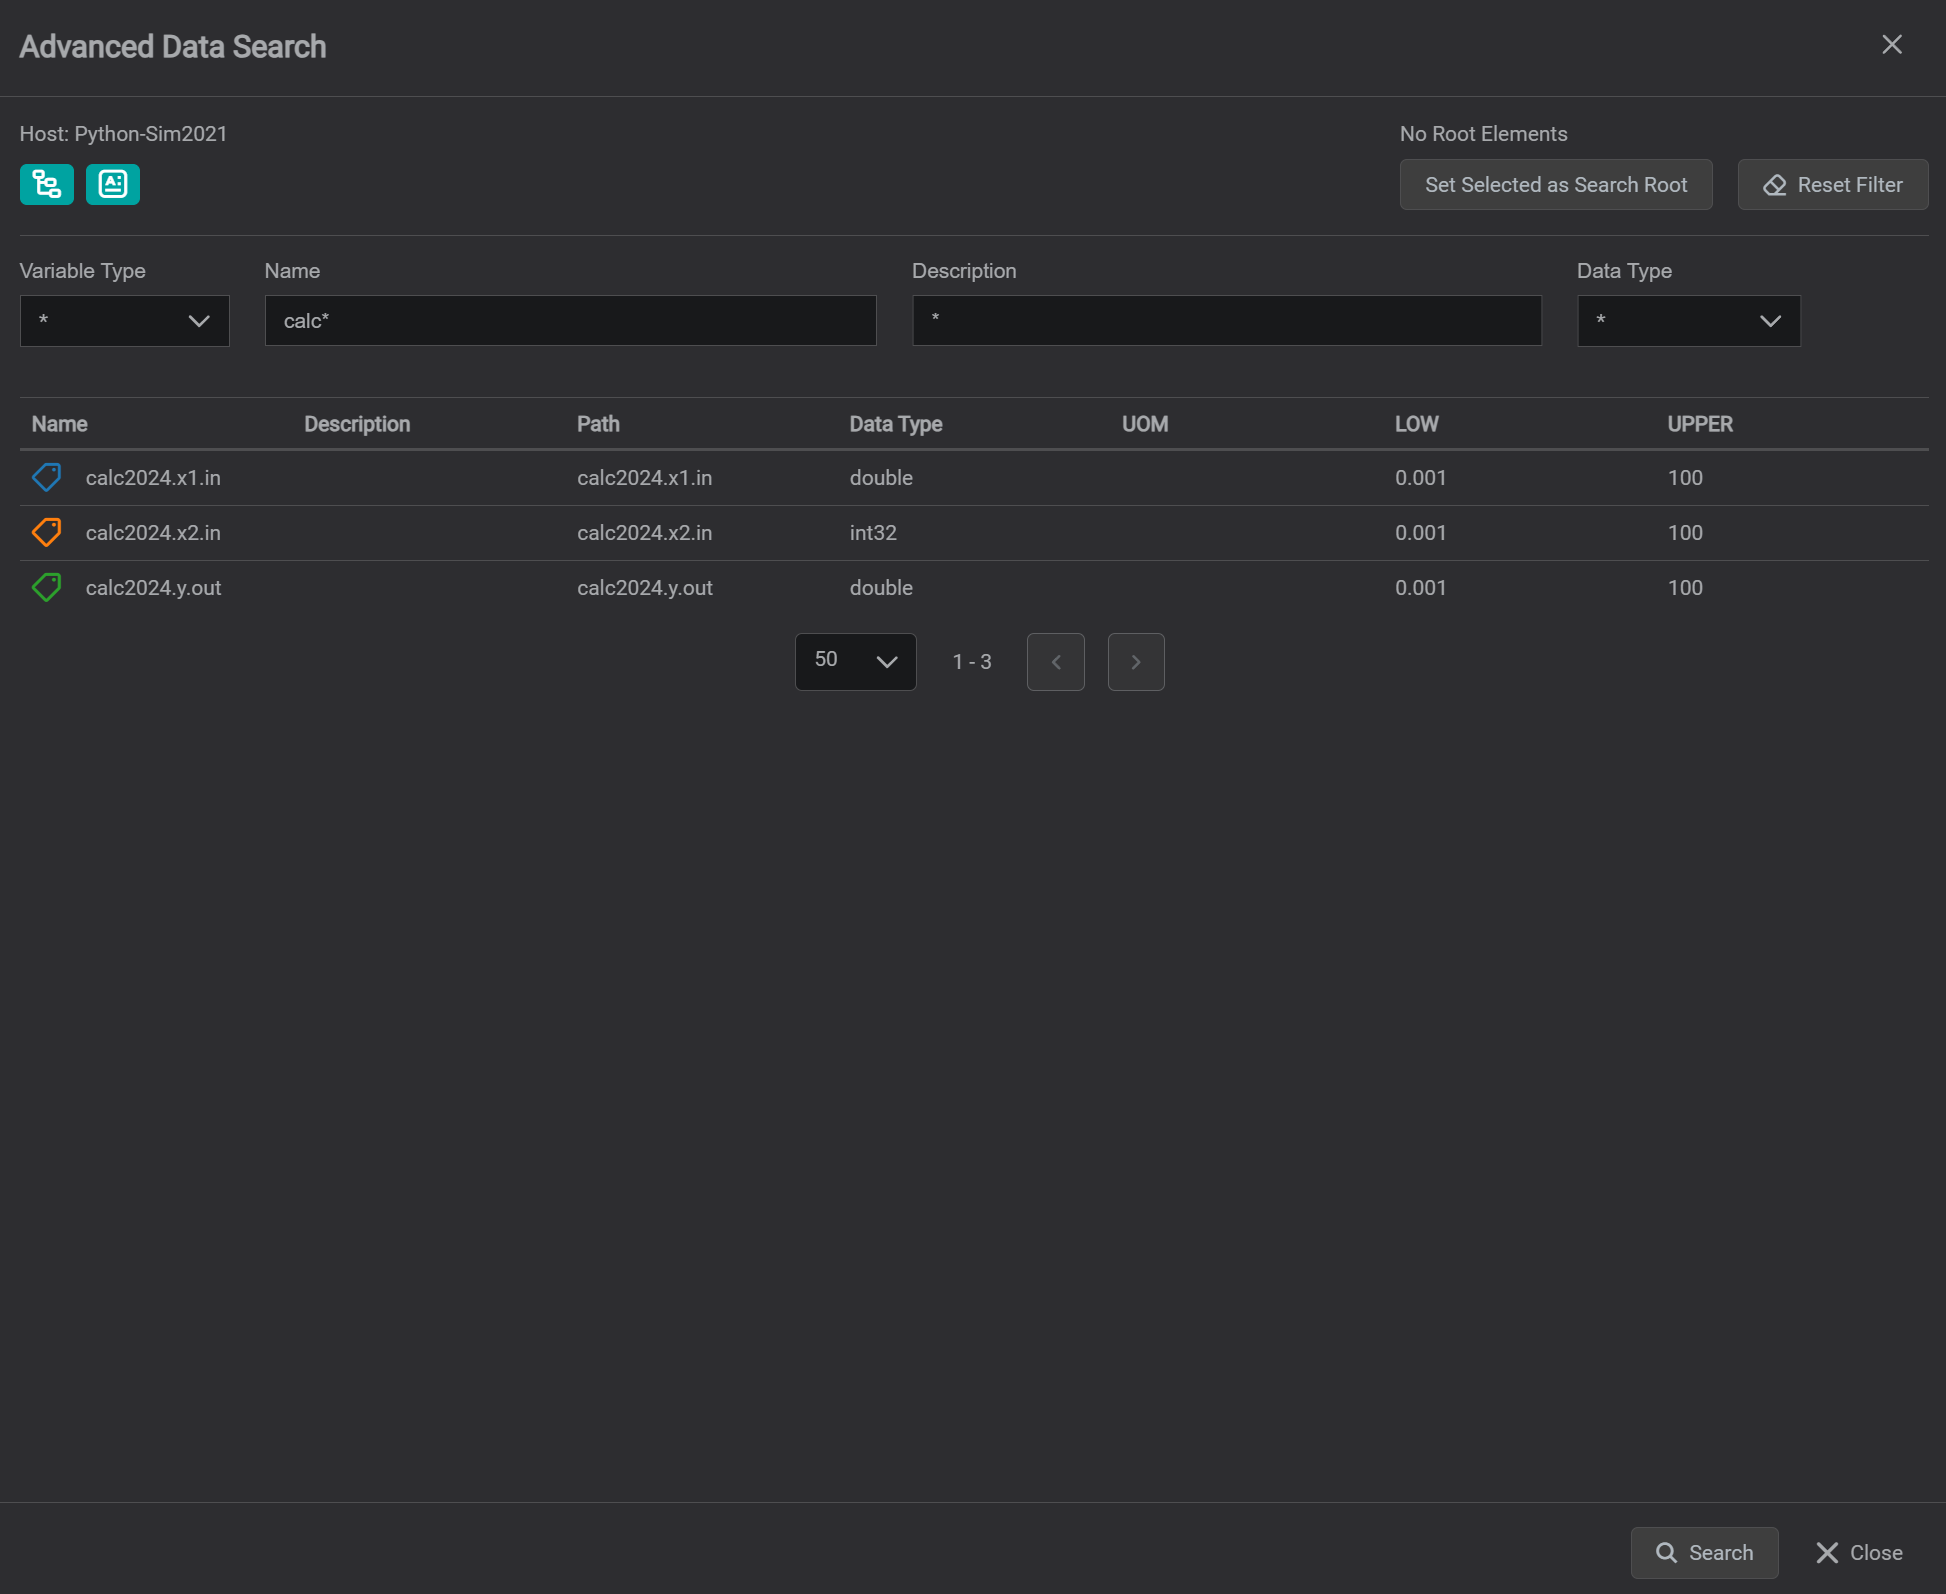
advanced tag search To visualize search results - simply drag & drop selected calculation tags onto visualizing component, such as trend.

assign tag search results to component
Your First Calculation
The simplest Python calculation has no imports and one line of script. This example sums two input tags and writes the result to an output tag — useful as a smoke test that the driver is wired up correctly.
The script
y = x1 + x2That is the entire script. x1 and x2 are names you'll define on the Input Variables tab; y is the name you'll define on the Output Variables tab. The driver does the rest.
Step-by-step
Open the calculation editor (see Add/Edit Calculations above) and click
+to create a new calculation. Set the Module Name to something descriptive, for examplesimple_sum.On the General tab, leave Pass all variables to script as JSON unchecked. This is the default "Merge" mode — the driver feeds the script one timestamp at a time and assembles the results into an output time-series automatically. Paste
y = x1 + x2into the script editor.general tab On the Input Variables tab, drag two numeric tags from the search pane on the left into the central area. Rename them to
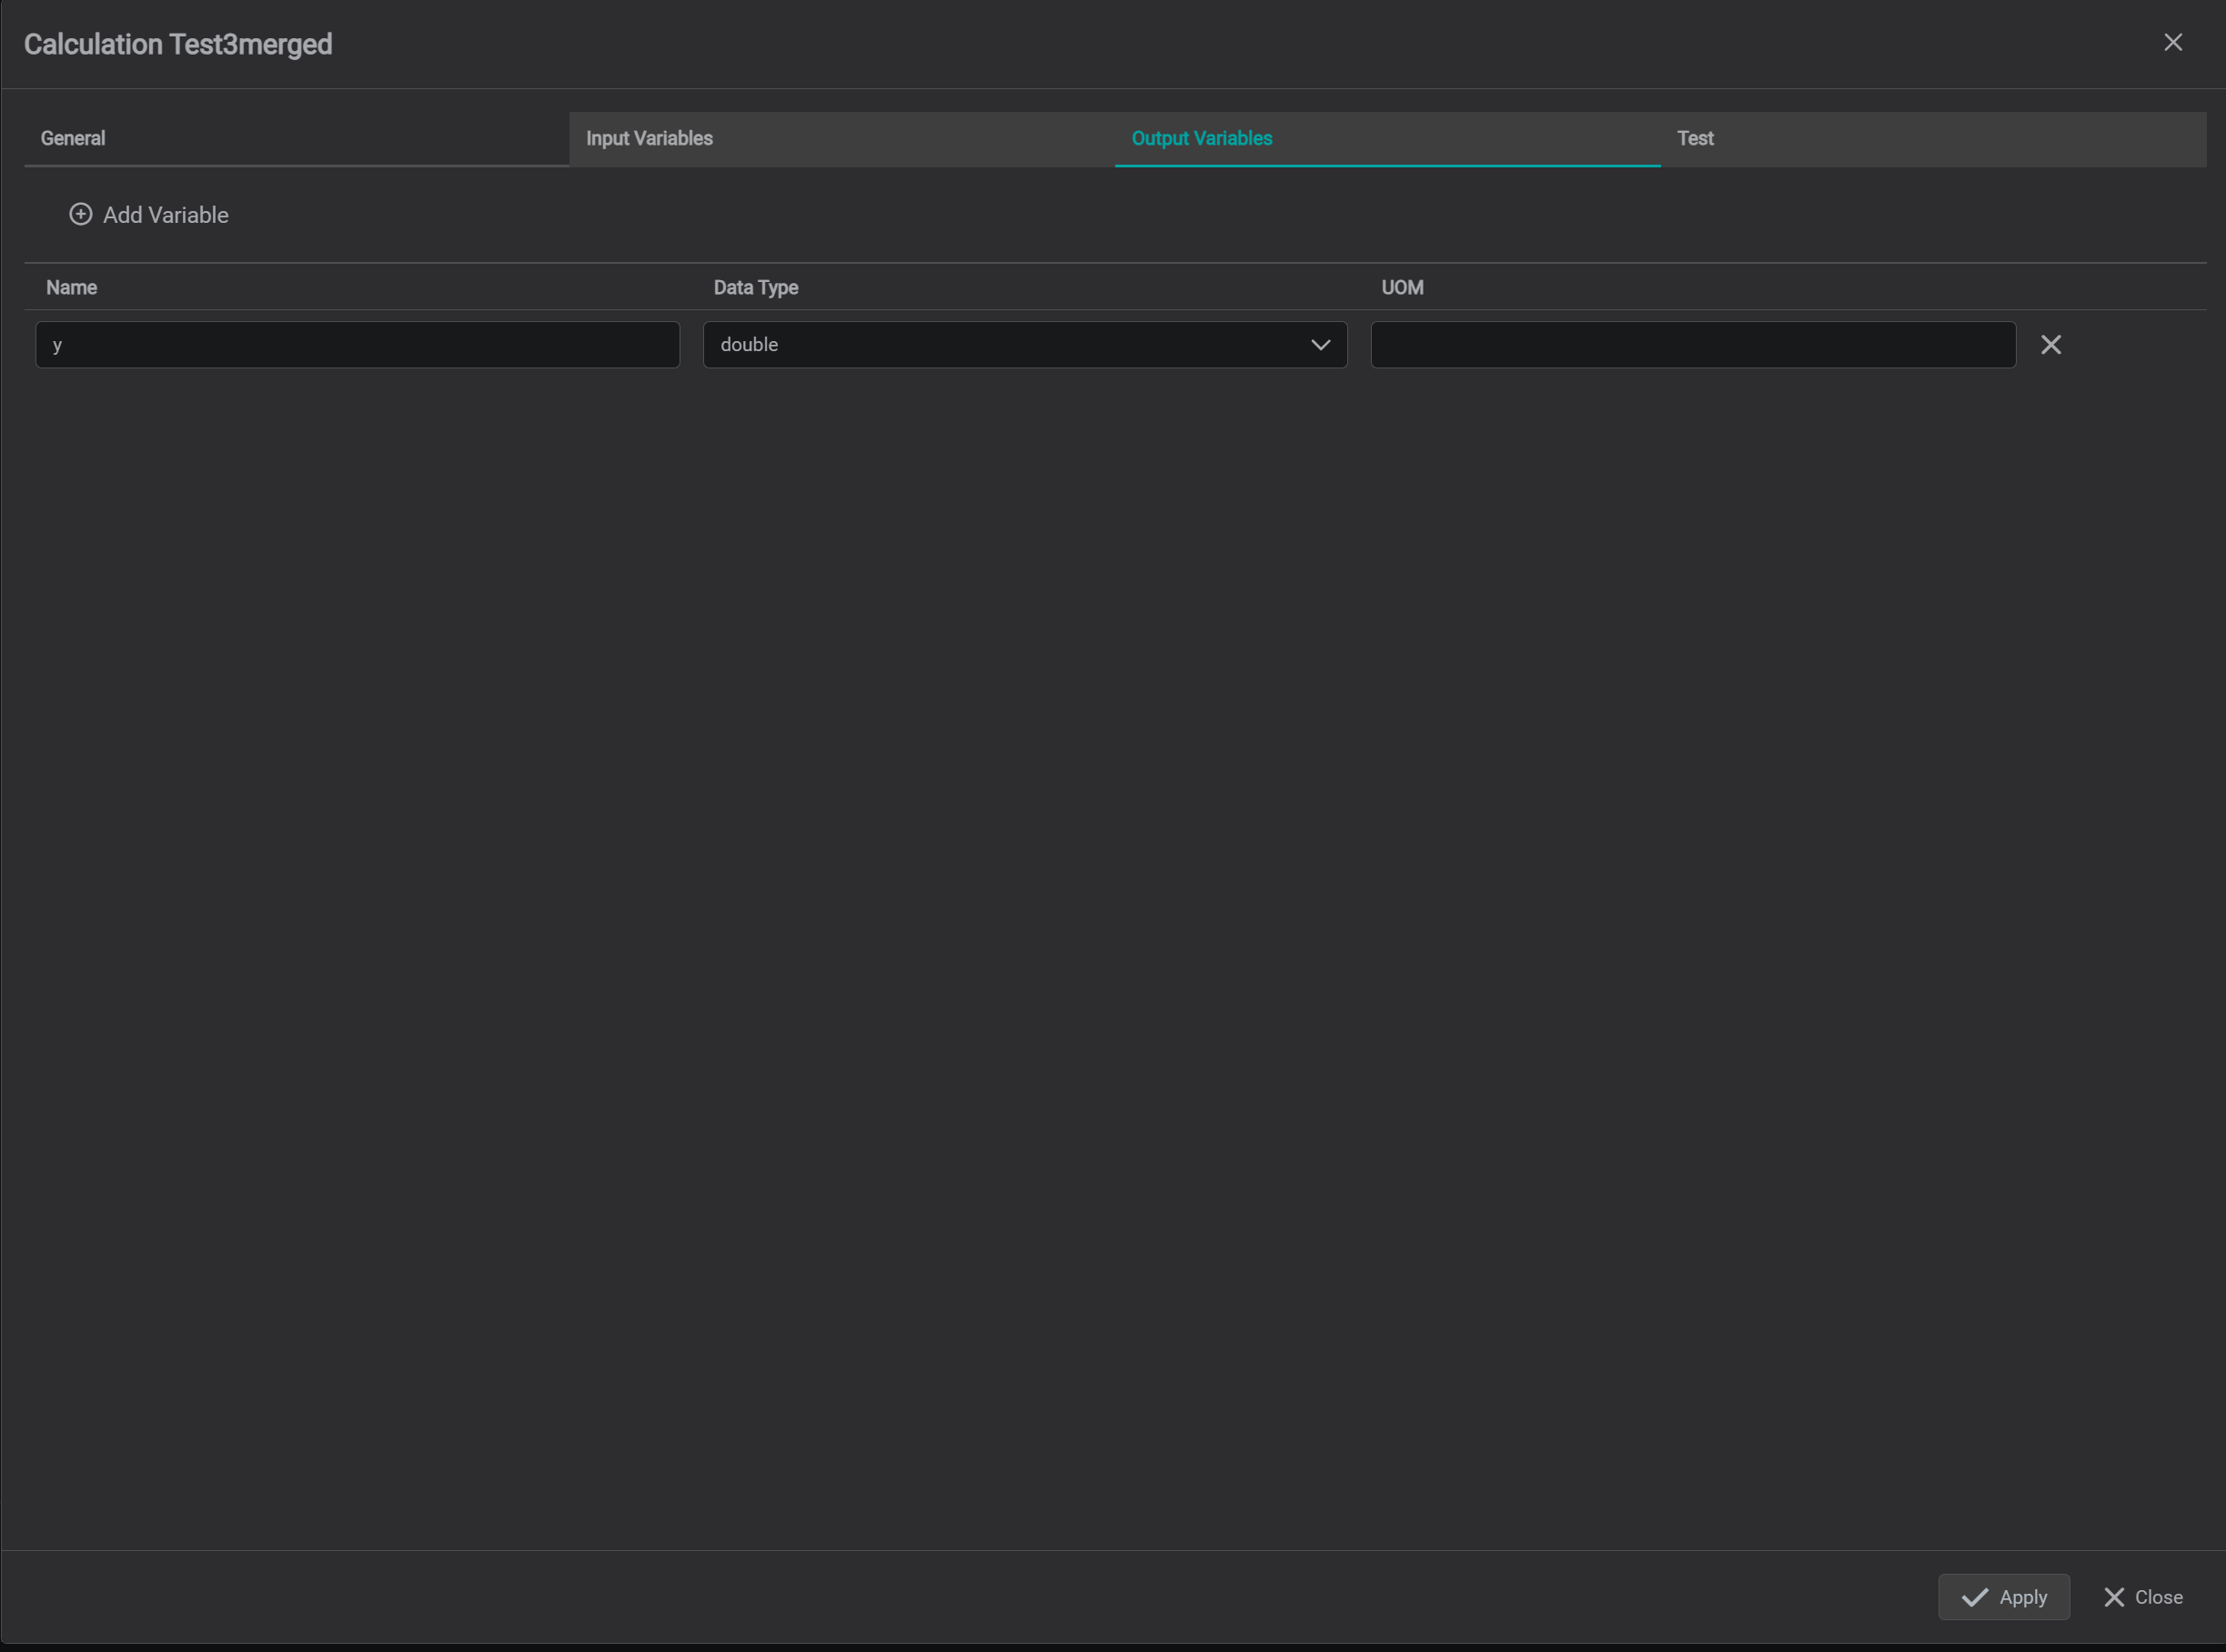
x1andx2, and set Data Type toDoublefor both.input variables On the Output Variables tab, click
+and addywith Data TypeDouble. Set a Unit of Measure if it makes sense for your inputs.output variables On the Test tab, pick a recent 1-hour window, switch the Function dropdown to
plotted(so the result is a time-series rather than a single snapshot value), and click Run Test. The output values in the upper grid should matchx1 + x2at each timestamp.test tab Click Apply to save. The calculation is now searchable as
simple_sum.y.out, with the two inputs assimple_sum.x1.inandsimple_sum.x2.in.tag search
When to use Merge mode vs JSON mode
Merge mode (the path above) is the right default when:
- Your calculation is a pointwise function of its inputs — addition, scaling, thresholds, simple expressions.
- All inputs share (or can be aligned to) a common timeline.
- You don't need pandas or NumPy.
Switch to JSON mode (the next section) when you need to:
- Resample or aggregate over a window (daily averages, rolling means).
- Join multiple time-series with different timestamps.
- Use pandas DataFrames, NumPy arrays, or any logic that needs the full series in memory.
In JSON mode the script receives each input as a JSON string and must emit JSON for the output — that's why the dataframe examples below import pandas and call to_json(orient='records').
Python DataFrame
IOTA Driver does provide the support for Python dataframes by passing time-series data as JSON arrays to/from Python script execution runtime.
IOTA uses the following JSON format which is supported by dataframe natively:
      [
        {
          "timestamp": <timestamp in milliseconds>,
          "value": <simple data type object>
        }
      ]
The following steps must be taken when passing data as JSON objects:
- Import
pandasandio.Pandaslibrary provides the support fordataframeoperations - Convert
JSONstring todataframeobject - Convert
dataframetotimeseriesobject by indexing ontimestamp. IMPORTANT: setdrop=Falseotherwisetimestampcolumn will be removed. - Perform required manipulations
- Convert
dataframeortimeseriesobject back toJSONand assign result to output variable name. IMPORTANT: setorient='records'so the generatedJSONobject will be in the form of:
     [
       {
         "timestamp": <timestamp in milliseconds>,
         "value": <simple data type object>
       }
     ]
Example 1 - Daily Average
# Step 1 - Import Pandas and IO

import pandas as pd
from io import StringIO

# Step 2 - read data from input variable as json and create dataframe

df1 = pd.read_json(StringIO(x1))

# Step 3 - create time-series with index on timestamp

ts = df1.set_index('timestamp', drop=False)

# calculate daily average

daily_average = ts.resample('d').mean().ffill()

# Step 4 - write result to output variable as json.
# Note it must be written with orientation as records

y=daily_average.to_json(orient='records')
General Tab
Input Variables Tab
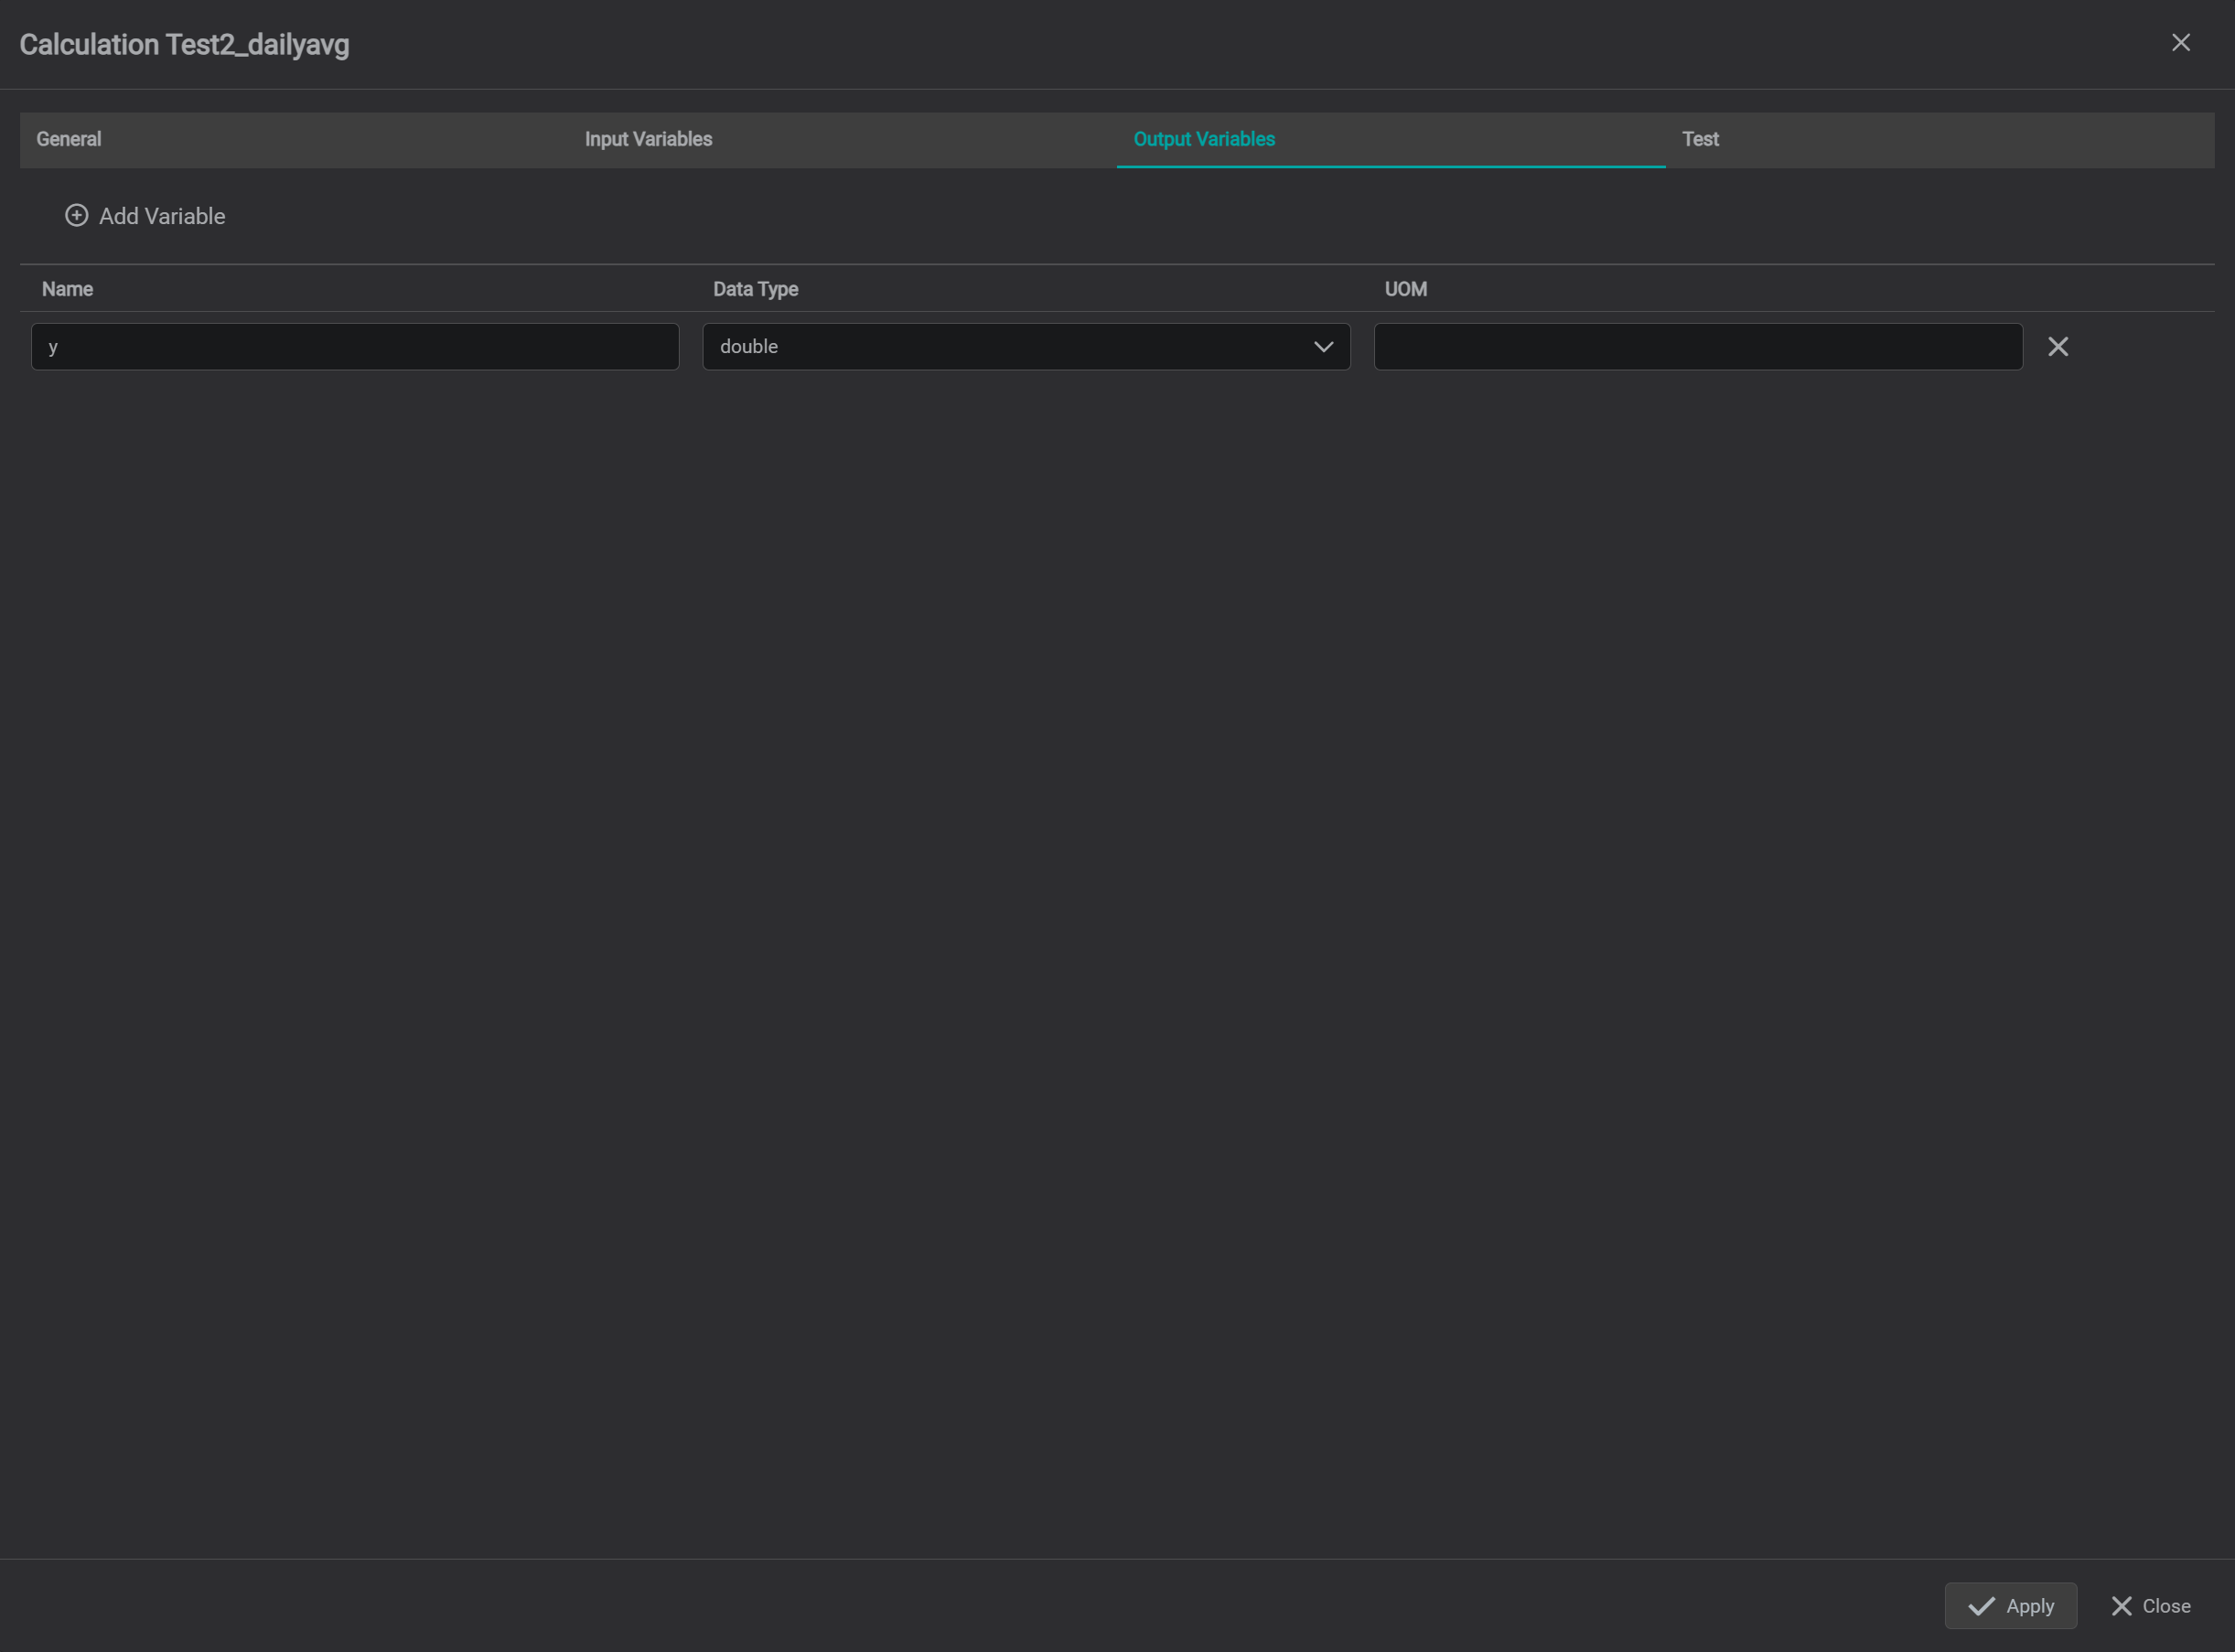
Output Variables Tab
Test Tab - Output
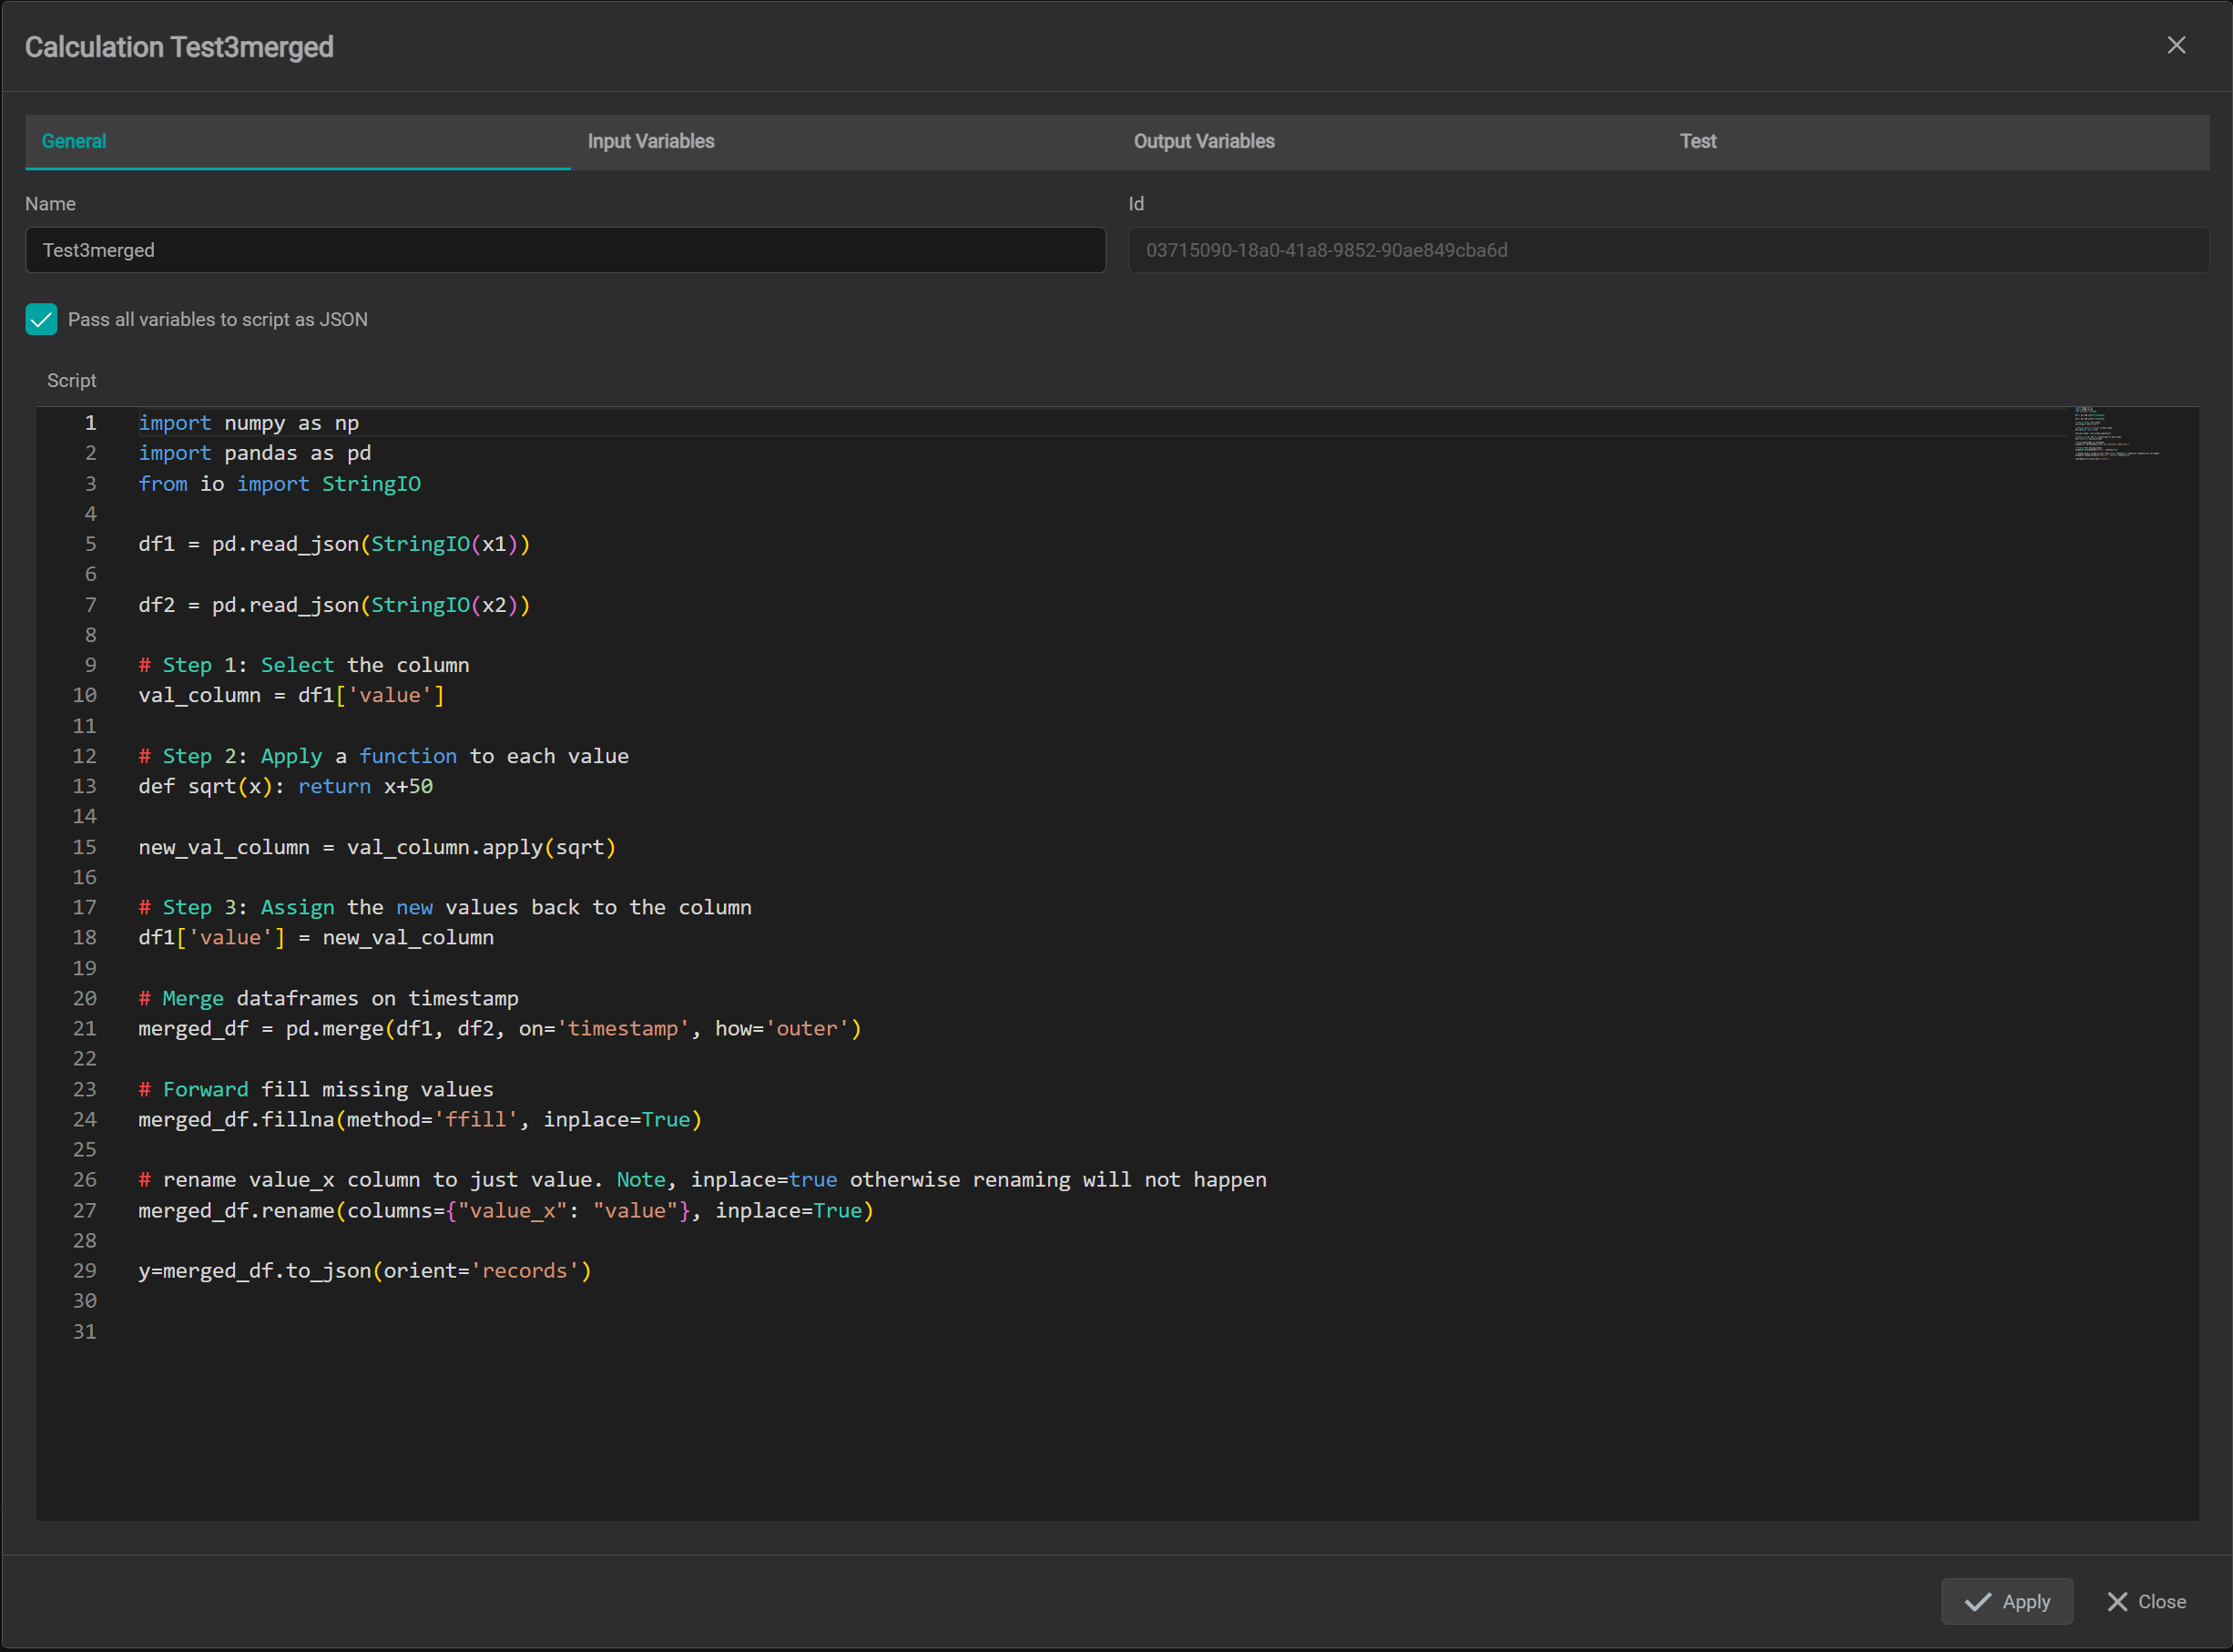
Example 2 - Merge DataFrames
import numpy as np
import pandas as pd
from io import StringIO

df1 = pd.read_json(StringIO(x1))

df2 = pd.read_json(StringIO(x2))

# Step 1: Select the column
val_column = df1['value']

# Step 2: Apply a function to each value
def add_offset(x): return x + 50

new_val_column = val_column.apply(add_offset)

# Step 3: Assign the new values back to the column
df1['value'] = new_val_column

# Merge dataframes on timestamp
merged_df = pd.merge(df1, df2, on='timestamp', how='outer')

# Forward fill missing values
merged_df.ffill(inplace=True)

# rename value_x column to just value. Note, inplace=true otherwise renaming will not happen
merged_df.rename(columns={"value_x": "value"}, inplace=True)

y=merged_df.to_json(orient='records')
General Tab
Input Variables Tab
Output Variables Tab
Test Tab - Output