
Configuring Your Identity Provider
To enable SSO using your organization-managed Identity Provider (IdP) in a VUE instance, first create a web server OpenID Connect (OIDC) application. The steps below outline how to configure this in Azure Entra ID and Okta.
After completing the setup, contact the assigned Customer Success Advisor (CSA) to schedule a switch-over call. This ensures a smooth transition with minimal disruption to end users.
Azure Entra ID
1. Create the Application
To enable Azure AD authentication, create an Enterprise Application:
Navigate to the Azure Portal and go to Enterprise Applications.
Select + New application → + Create your own application.
Enter a name for the application and select Integrate any other application you don't find in the gallery.
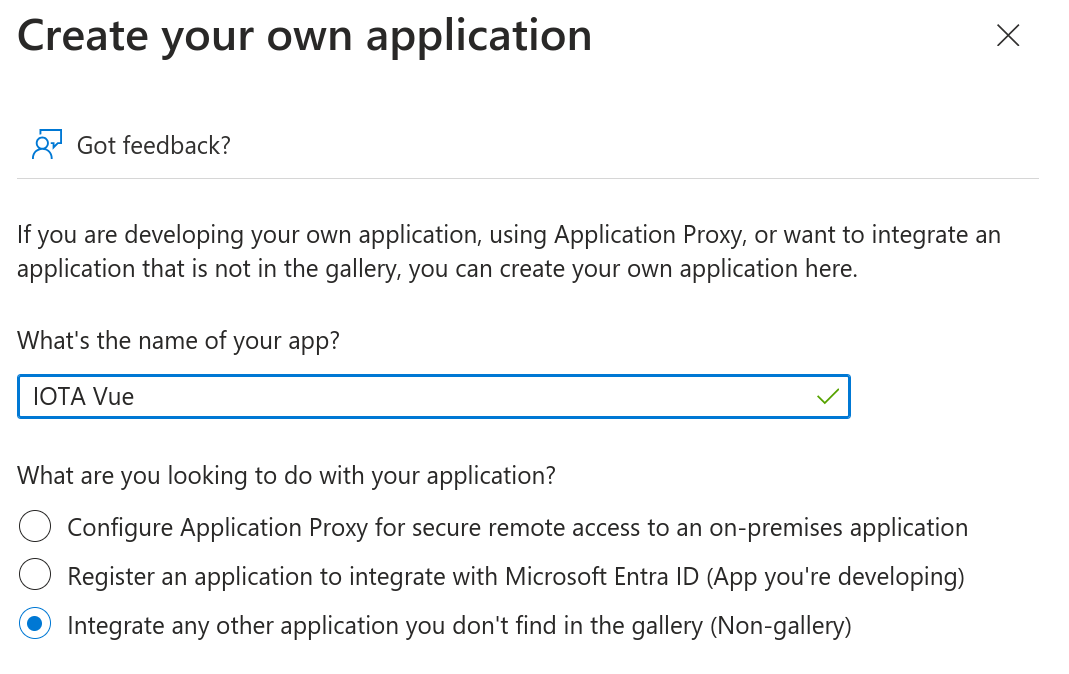
Create an Application After the application is created, go to Properties and follow the Application registration link.
In the Overview section, copy the following values:
- Application (client) ID
- Directory (tenant) ID
2. Configure Redirect URIs
Select Authentication in the left-hand menu.
Click + Add a platform and choose Web.
In the Redirect URI field, enter:
https://<your-instance-domain>/auth/idpresponseAfter saving, select Add URI and enter a second URI:
https://<your-instance-domain>/oauth2/idpresponseIf unsure, the IOTA team can provide the exact redirect URIs to use.
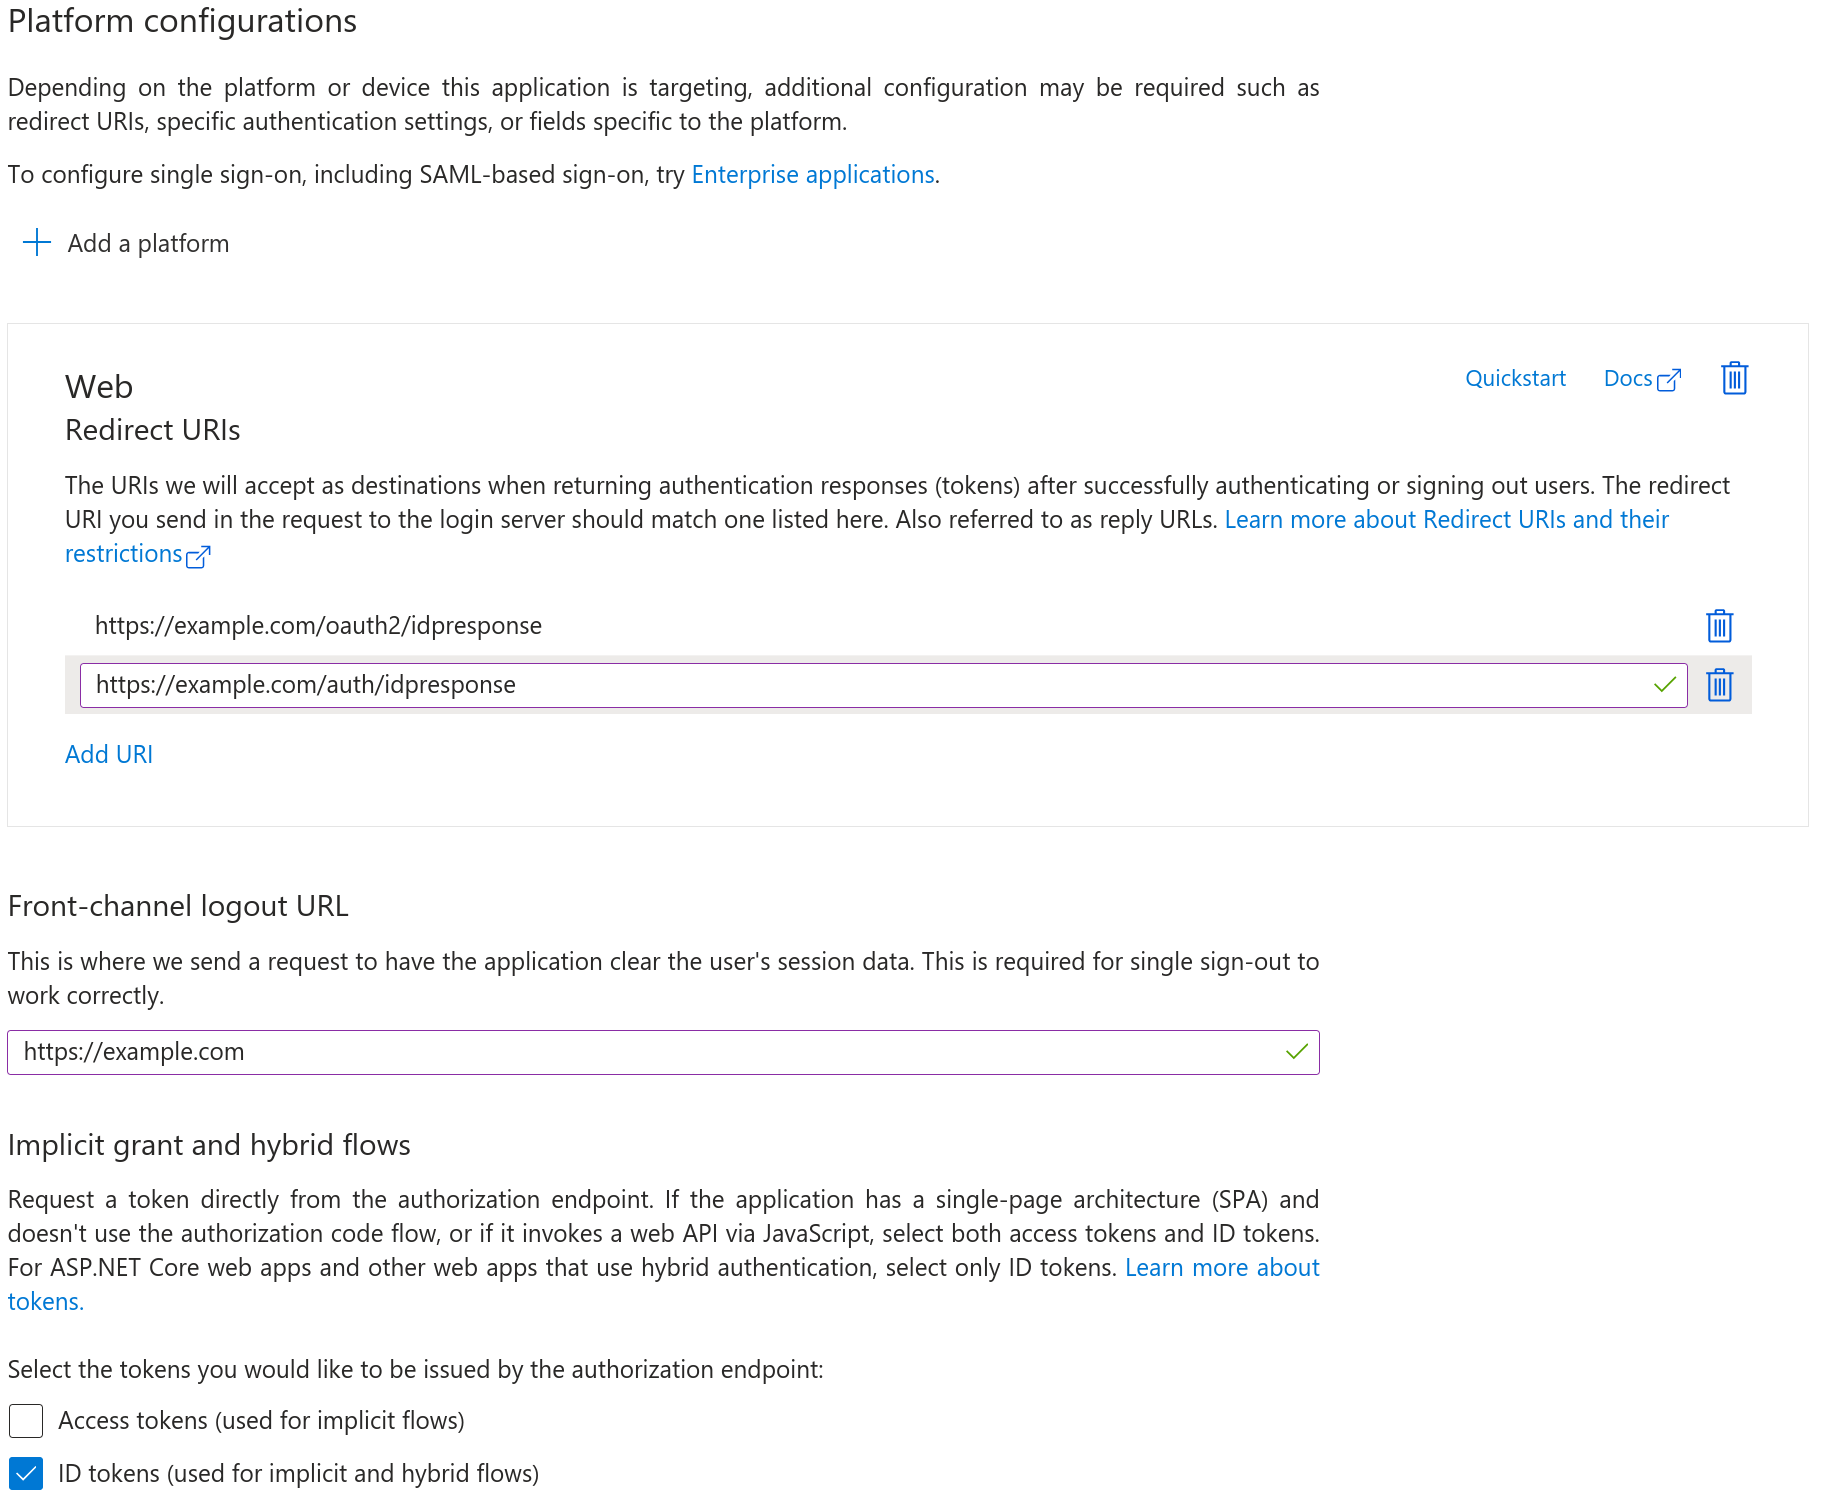
Configure Web Application
3. Configure API Permissions and Token Claims
- Navigate to API permissions and ensure the following scopes are granted:
openidemailprofile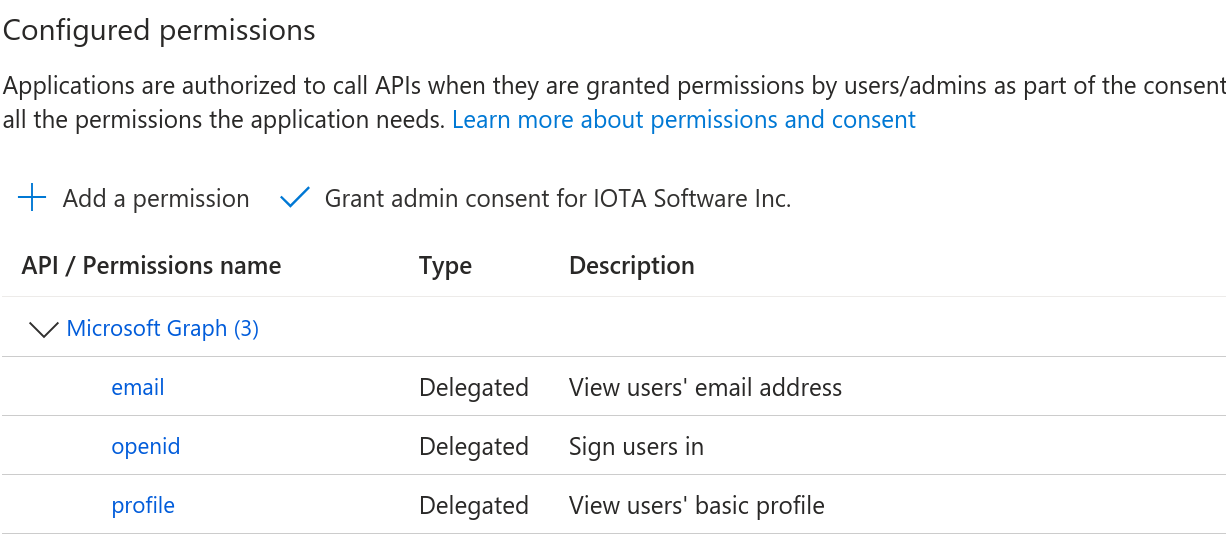
API Permission scopes
- (Optional) To include Azure group membership in the token:
Go to Token configuration and select + Add groups claim.
Under Select group types, choose Groups assigned to the application.
In the Customize token properties by type section, select sAMAccountName for both ID and Access tokens.
This ensures group names appear in a readable format across tokens.
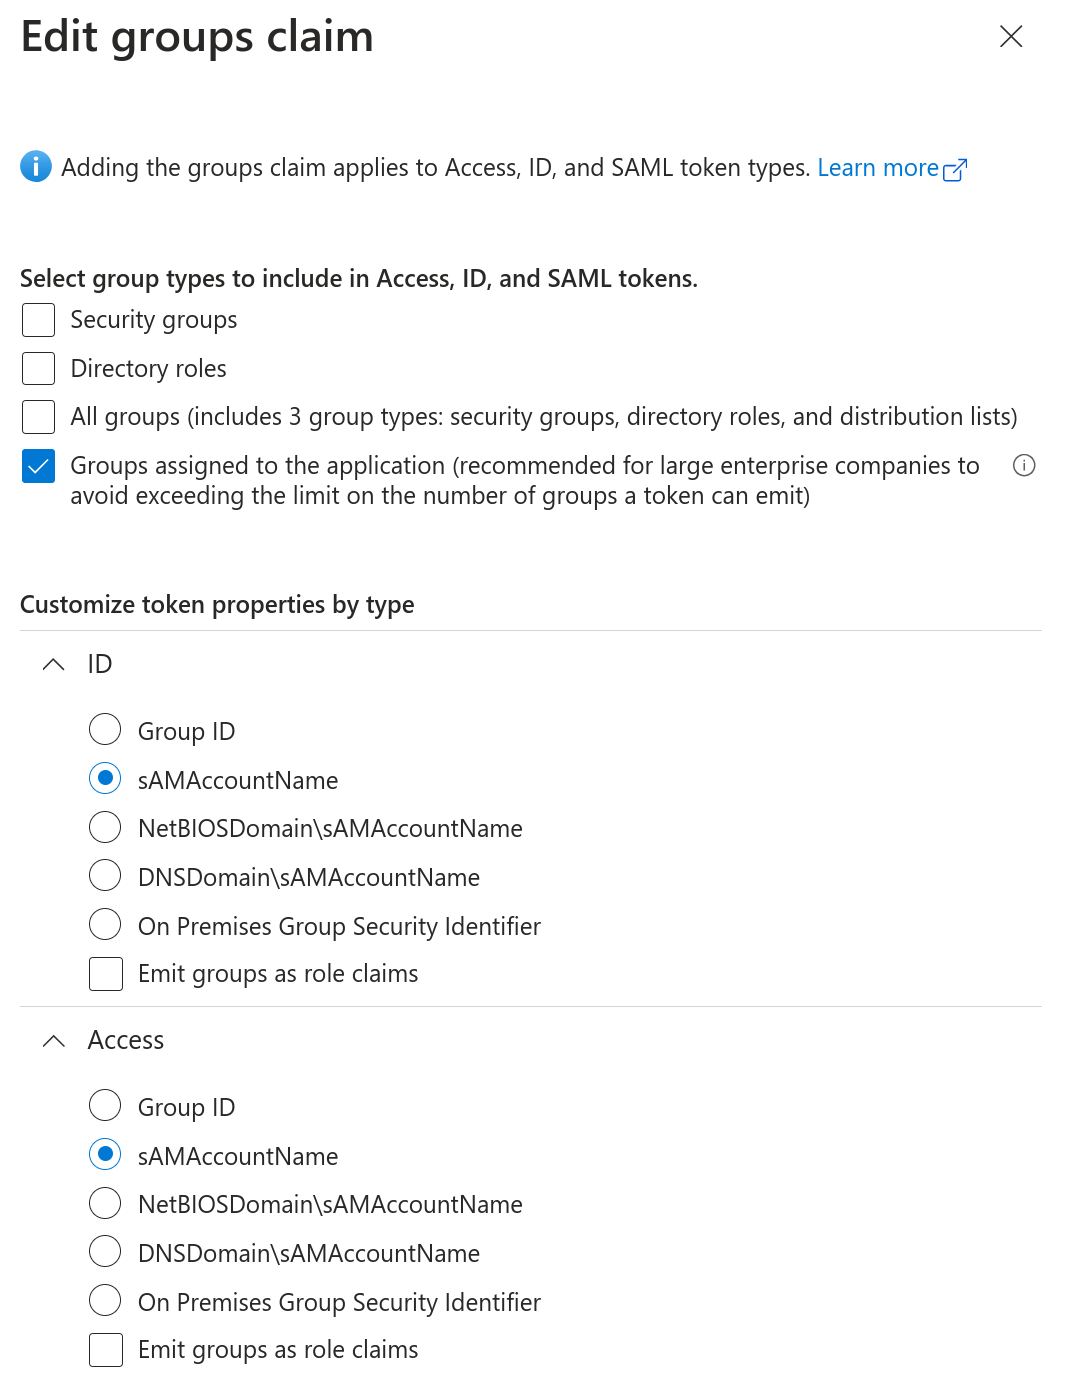
Add groups claim sAMAccountName is available only for groups synchronized from an on-premises Active Directory. Groups created in Entra ID have no such attribute, so their entries keep the default group object ID (GUID). For the available formats and their requirements, see Microsoft's Configure groups optional claims.
- Go to Certificates & secrets.
- Select + New client secret
- Save the generated value securely
These credentials will be used to complete the IdP connection during the switch-over process.
Okta
1. Create the App Integration
To enable Okta authentication:
- In the Okta Admin Console, go to Applications and select Create App Integration.
- Choose:
- OIDC - OpenID Connect
- Web Application
- Enter a name for the application.
- Use the default Grant type configuration.
- In the Sign-in redirect URIs section, enter the following:
https://<your-instance-domain>/auth/idpresponsehttps://<your-instance-domain>/oauth2/idpresponseIf unsure, the IOTA team can provide the exact redirect URIs to use.
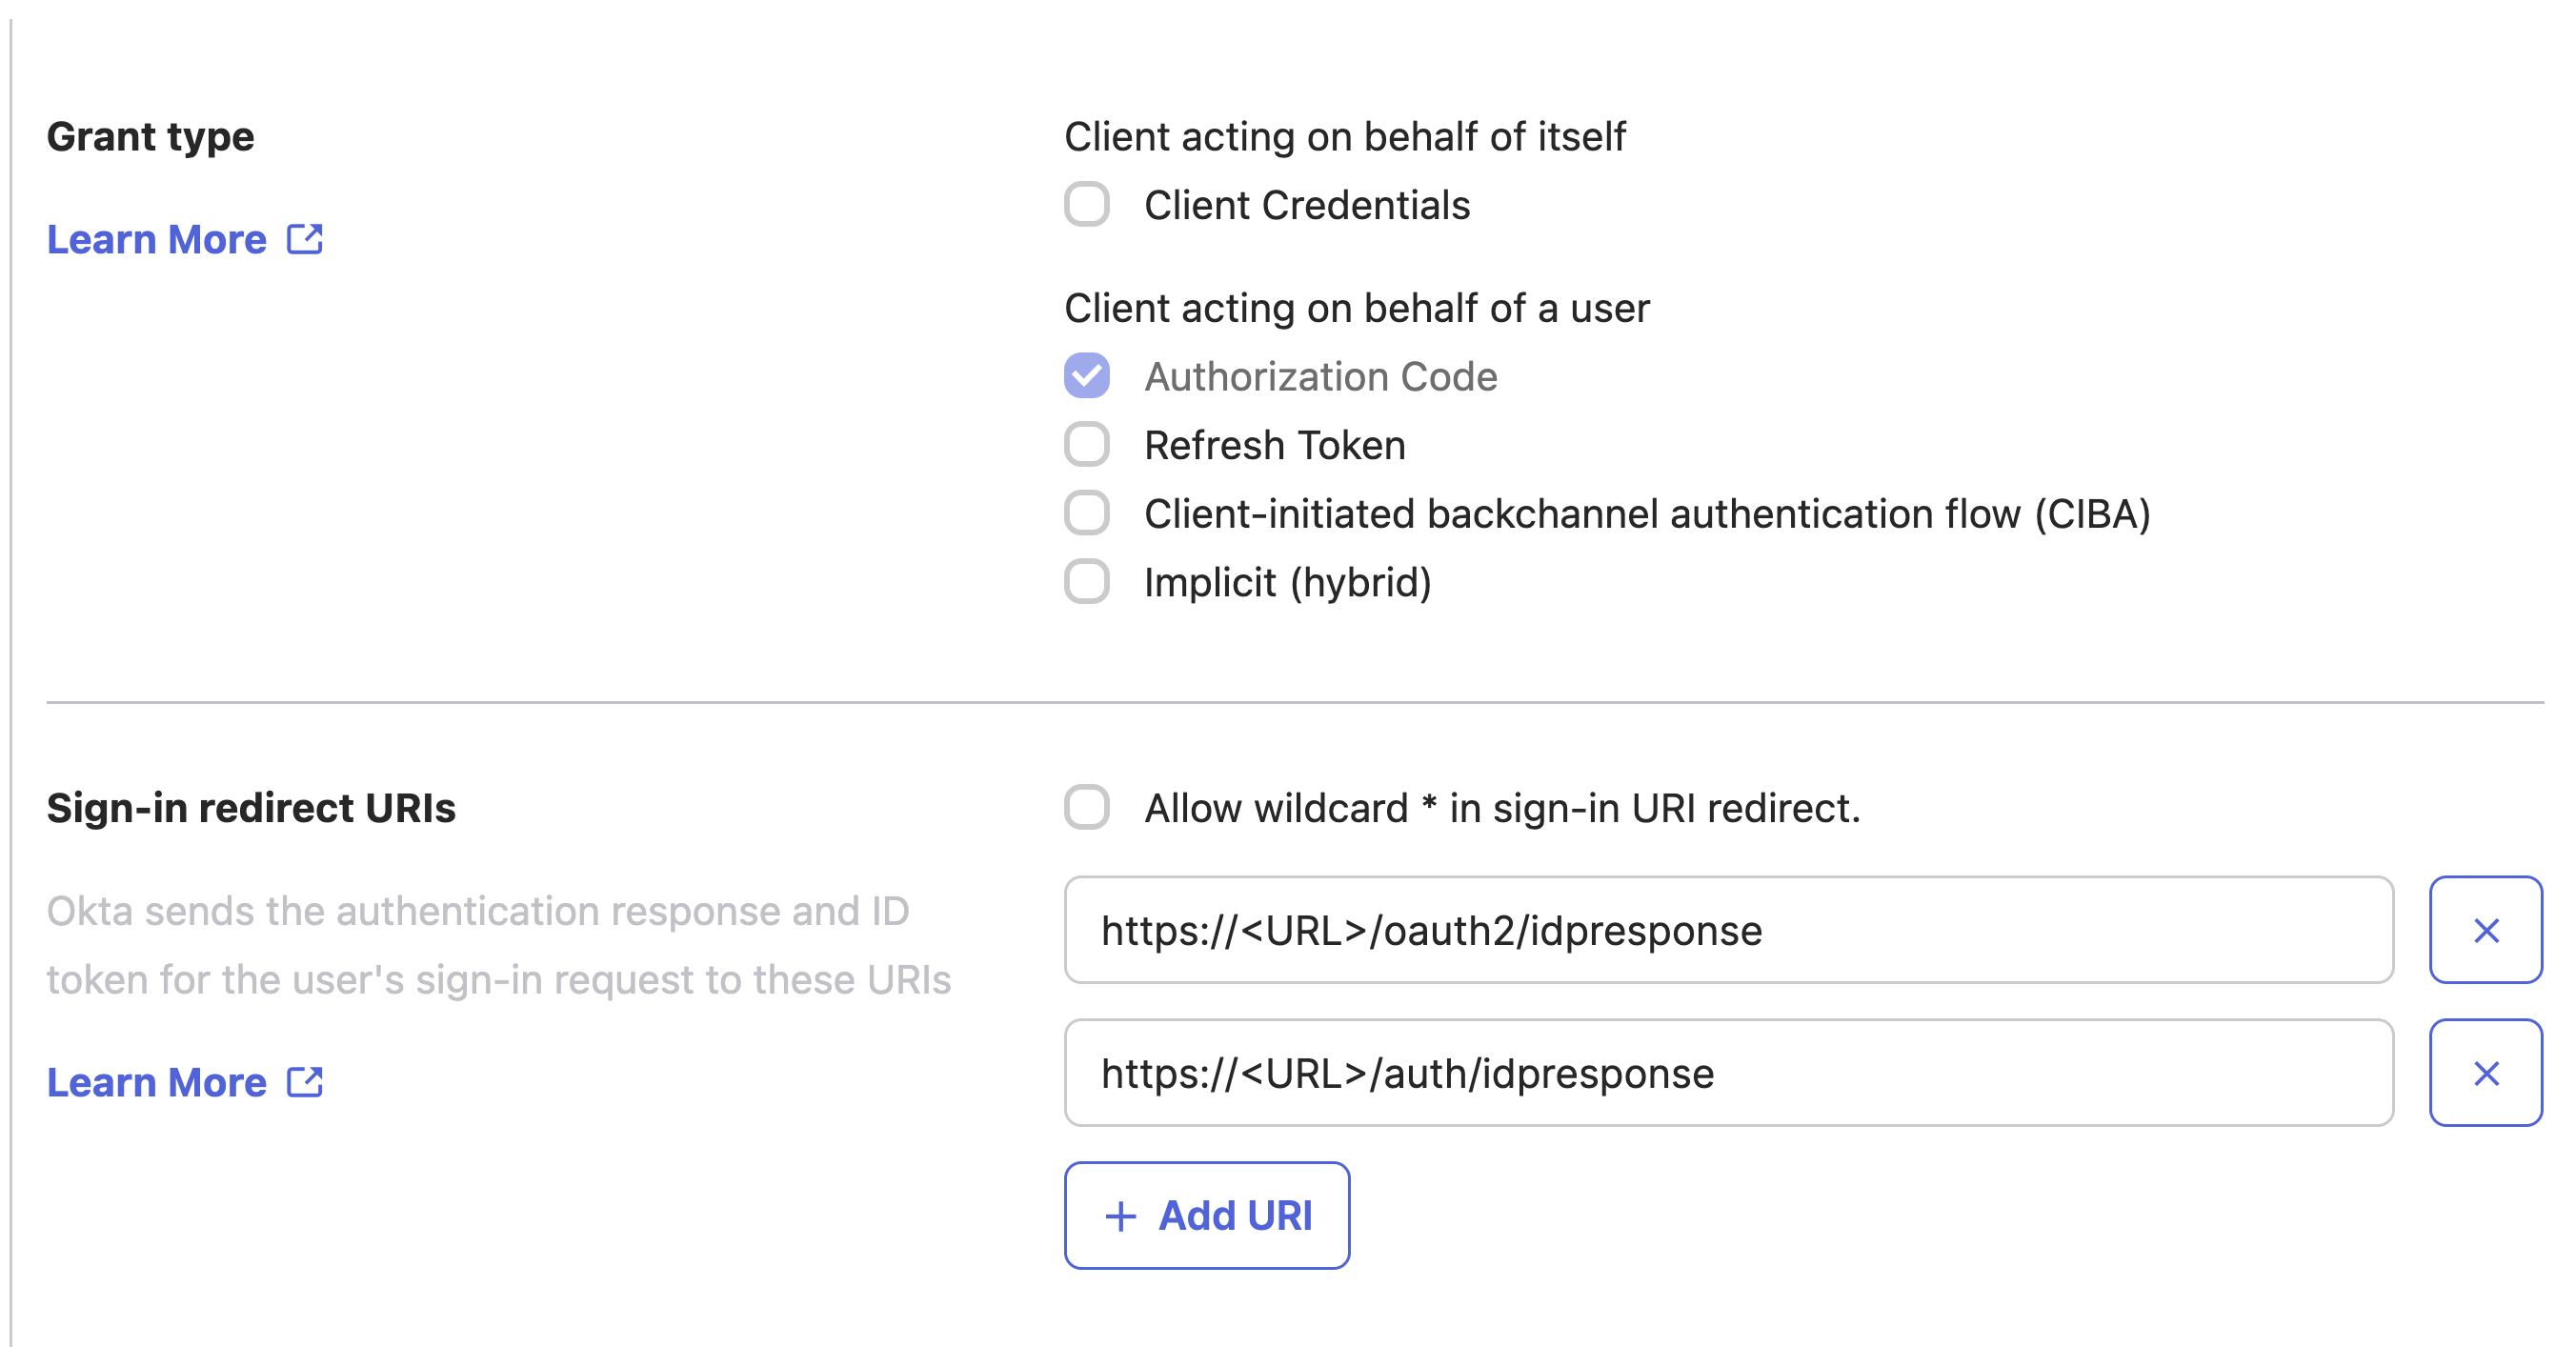
Grant Types 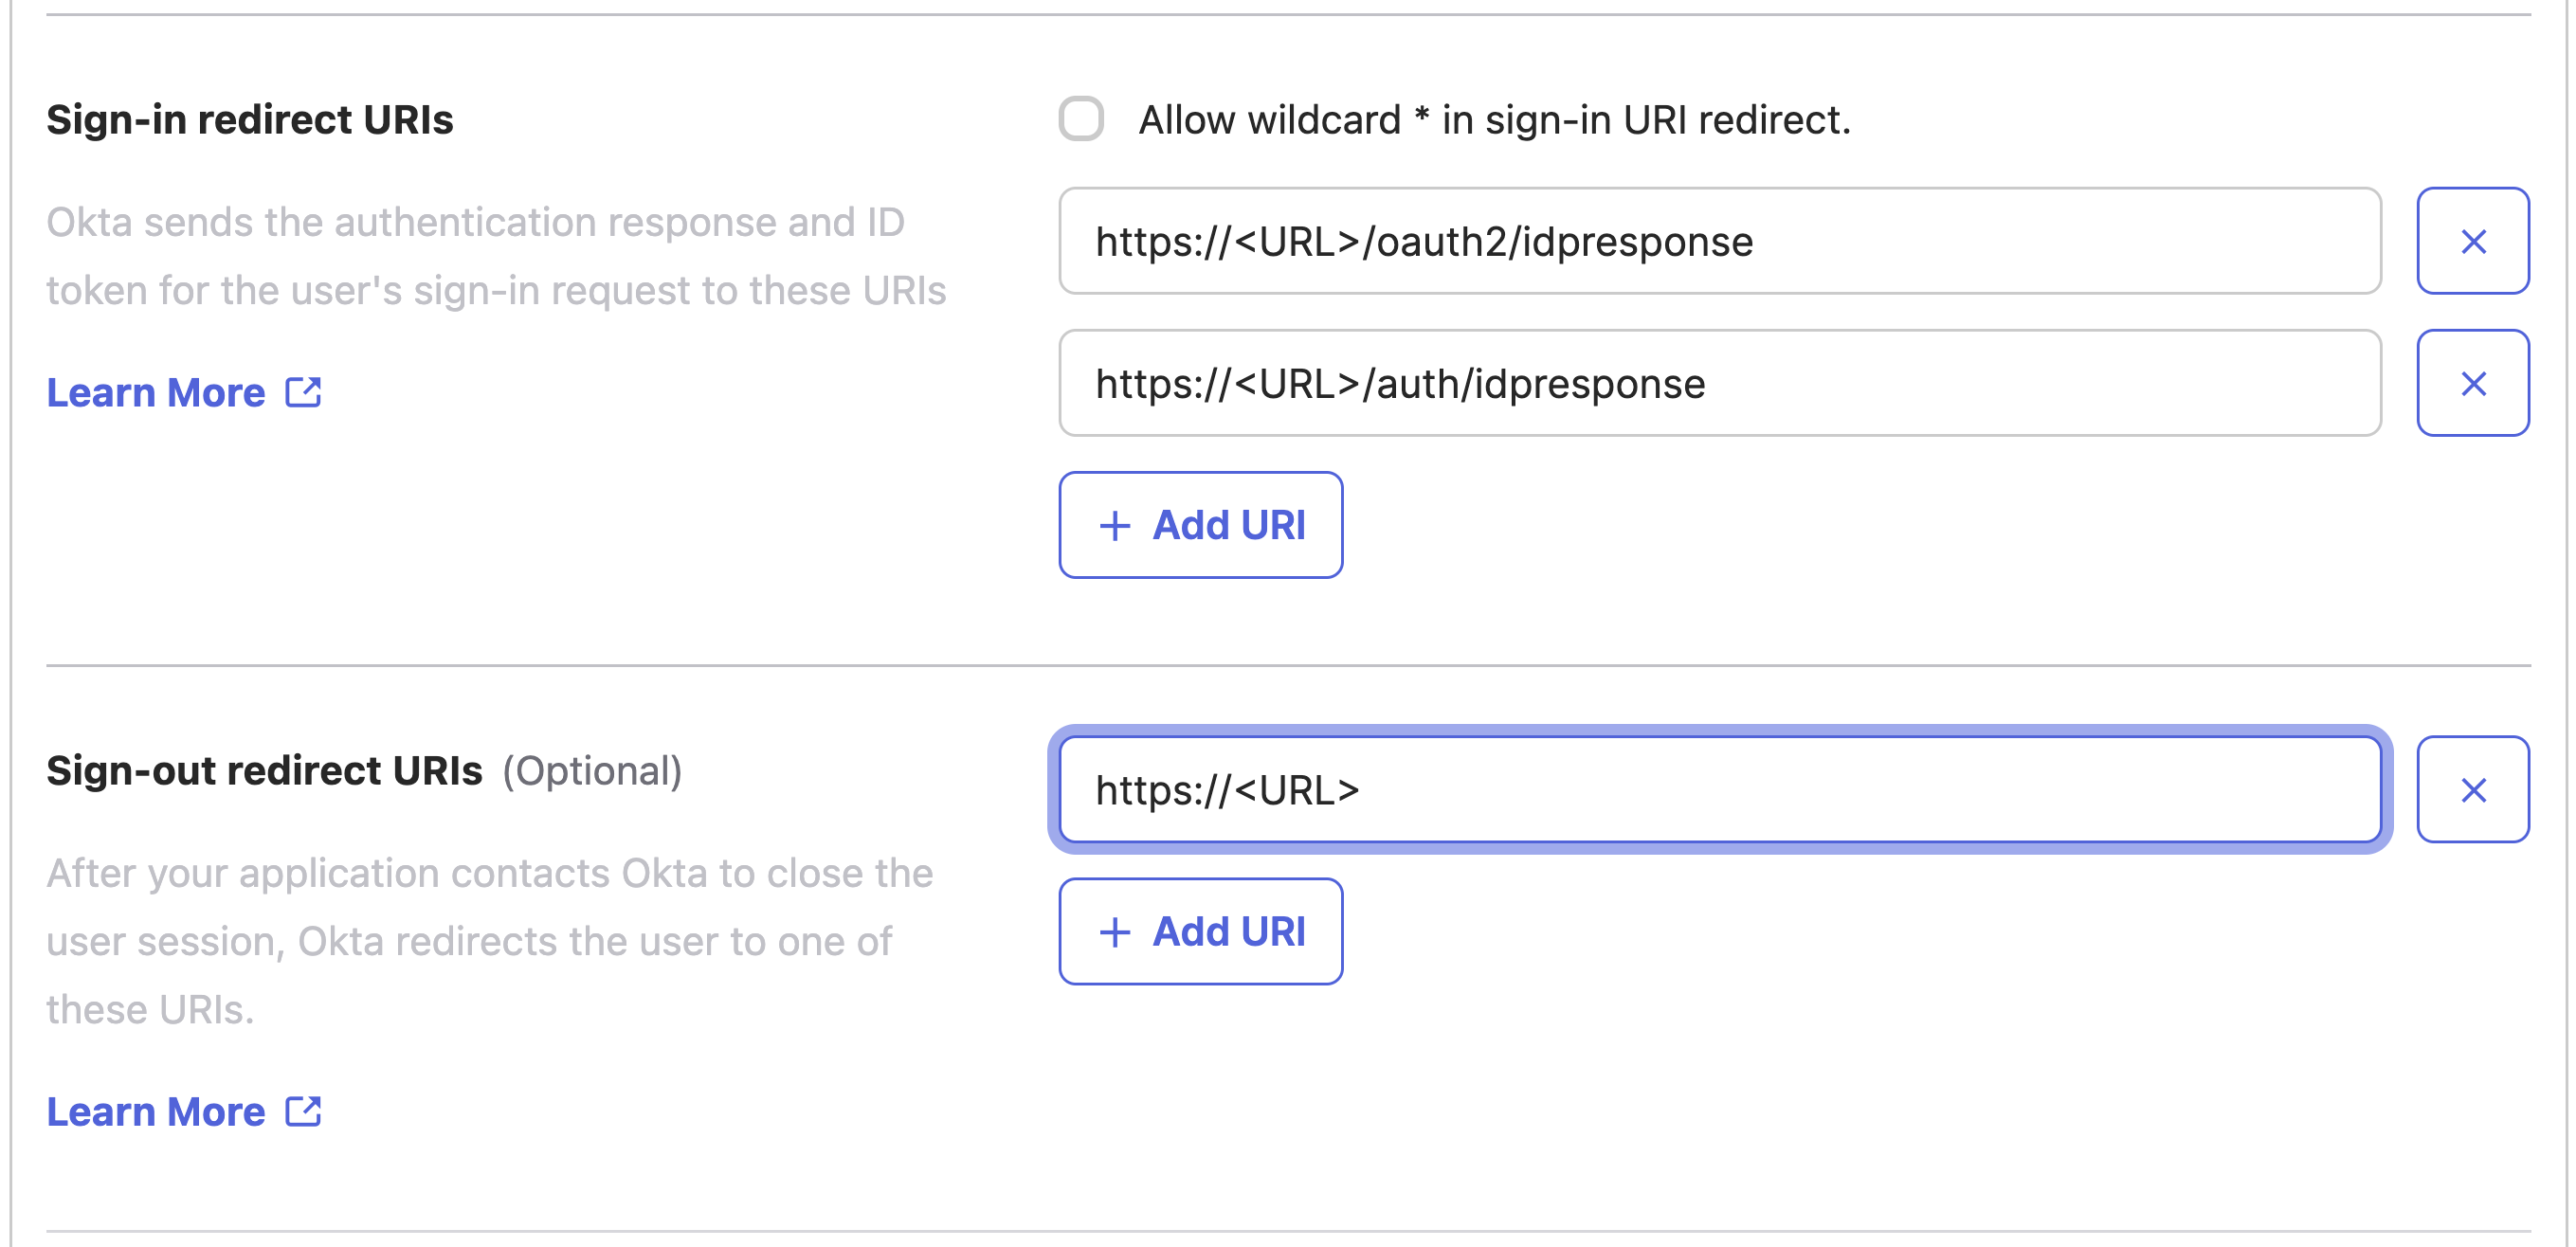
Redirect URIs
- Select Save to complete the application setup.
2. Retrieve Credentials
- After the integration is created, go to the General tab.
- Copy the following values:
Client ID
Client Secret
These credentials will be used to complete the IdP connection during the switch-over process.
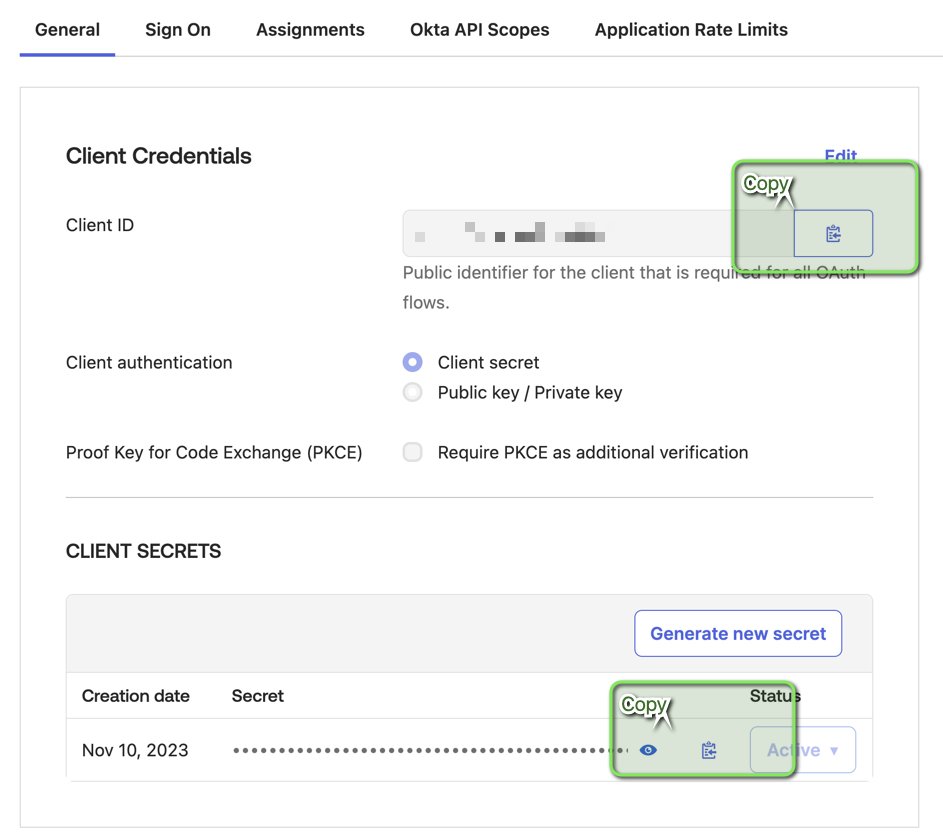
Client ID & Secret
Verifying the Groups Claim
The access token your IdP issues to IOTA carries a list of claims about the current user, optionally including their group memberships. A groups claim is required for any group-based authorization in IOTA, including per-user permissions on data sources, such as PI and AF write-back. Most IdPs do not return a groups claim by default, so confirm yours has been configured to do so.
To check what IOTA actually receives for a given user:
- Sign into IOTA as that user.
- Click the User Profile icon in the top-right corner of the page.
- Hover the mouse over the panel showing the name and email address.
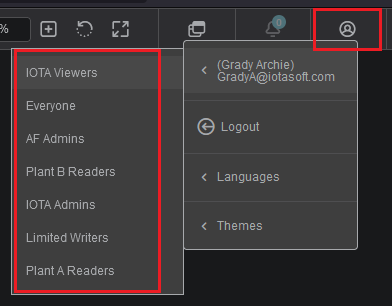
In this example, the token IOTA obtained contains a groups claim with seven groups. If you see your company's domain (for example iotasoft.com) instead of a list of groups, the IdP is most likely not including a groups claim in the access token.
Troubleshooting Azure Entra ID
- In Entra's left-hand menu, click App registrations → (registration for IOTA) → Token configuration and confirm the list of optional claims includes a claim named
groups. - Ensure the Token Type column for the groups claim includes Access.
- In the left-hand menu, click Manifest and check the
groupMembershipClaimsproperty. If it is set toApplicationGroup, only groups assigned to the IOTA application are included in tokens. - If that is the case, go to Enterprise applications → (application for IOTA) → Users and groups and make sure the groups you expect to use in IOTA are listed.
Troubleshooting Okta
- In the left-hand menu, click Security → API → (auth server for IOTA) → Token Preview, and fill in the form:
- OAuth/OIDC client: the Okta application you created for IOTA, found under Applications → Applications.
- Grant Type: Authorization Code
- User: any user with access to IOTA
- Scopes:
openid
- Click Preview Token, then open the token tab, not
id_token, in the Preview pane. Look for agroupsproperty in the Payload pane and confirm it lists the expected groups. - If it is missing, click the Claims tab, select Access in the left column, and look for a
groupsclaim in the right column.- If absent, add it: name it
groups, set the token type to Access Token, set Value Type to Groups, and choose a filter expression matching the groups assigned to IOTA. For example, if they all carry the prefixIOTA_, use the filter expressionIOTA\_.*. - If present, check its filter expression still matches the groups assigned to IOTA.
- If absent, add it: name it
For other IdPs, ask your IAM or IT team for help.
Group naming conventions
How groups appear in the claim depends on the IdP and its configuration, which matters because downstream authorization matches these strings exactly.
- Microsoft Entra ID allows multiple formats:
- Groups defined in Entra are always represented by ID, which is a GUID.
- Groups defined in on-prem Active Directory servers federated with Entra can be represented by ID, by name (with or without the AD domain as a prefix), or by SID. Check your configuration in the Azure Portal under Entra → App registrations → (your registration for IOTA) → Token configuration → the ellipsis in the groups claim row → Edit.
- Okta lists groups by name.
Completing the Connection
Once the application is created in your IdP and you have gathered the required values: Client ID, Client Secret, the redirect URIs, and (for Azure Entra ID) the tenant/issuer and any group-claim configuration: hand them to IOTA to finish wiring up authentication:
- IOTA-hosted (SaaS) instances: send these values to the IOTA Operations & Security team (through your Customer Success Manager or a support ticket). They complete the IdP connection on the platform and coordinate the switch-over with you. Treat the client secret as sensitive and share it through a secure channel.
- Self-managed deployments (your own cloud): the IOTA Operations & Security team will guide you through completing the connection in your instance's configuration.
What's Next
With SSO configured, set up who can access what in Roles, Users, and Groups.