
Roles, Users, and Groups
Roles, Users, and Groups
This page covers how access works on the Administration Page: how you control what people can do, assign roles, set defaults, and share specific displays.
Access in IOTA VUE comes in two kinds, and it helps to keep them separate:
- Capabilities: what a person can do in the application: build displays, manage data sources, view driver logs, administer users, and so on. Capabilities are the individual permissions carried by a role. Users and groups get capabilities by being assigned a role.
- View access: which displays a person can open and edit. This is set per display on the Views area (see Sharing views below).
Users, groups, and roles are the building blocks that both kinds of access attach to, and a role does double duty, which is worth spelling out:
- A role always carries a set of capability permissions (its main job).
- A role can also be a target for view access: you can share a display with a whole role, not just with individual users and groups.
So one role can define both what its holders can do and, if you share views with it, which displays they can reach.
Access is additive. A person's effective access is everything combined: the capabilities from all of their own roles and all of their groups' roles, plus every view right granted to them directly, to any of their groups, or to any role they hold. If any role or group grants a capability or opens a view, the user has it (the most permissive assignment wins). To take an ability away, you must remove it from every role and group that grants it.
One exception: a view right never substitutes for a capability. Capabilities decide whether a user can perform an action at all; view rights only decide which displays it applies to. If no role of theirs grants the underlying permission, sharing a display won't enable it: granting Write on a view does not let someone edit it when nothing gives them editing capability in the first place.
Users & Groups
The Users & Groups area has two tabs: Users and Groups.
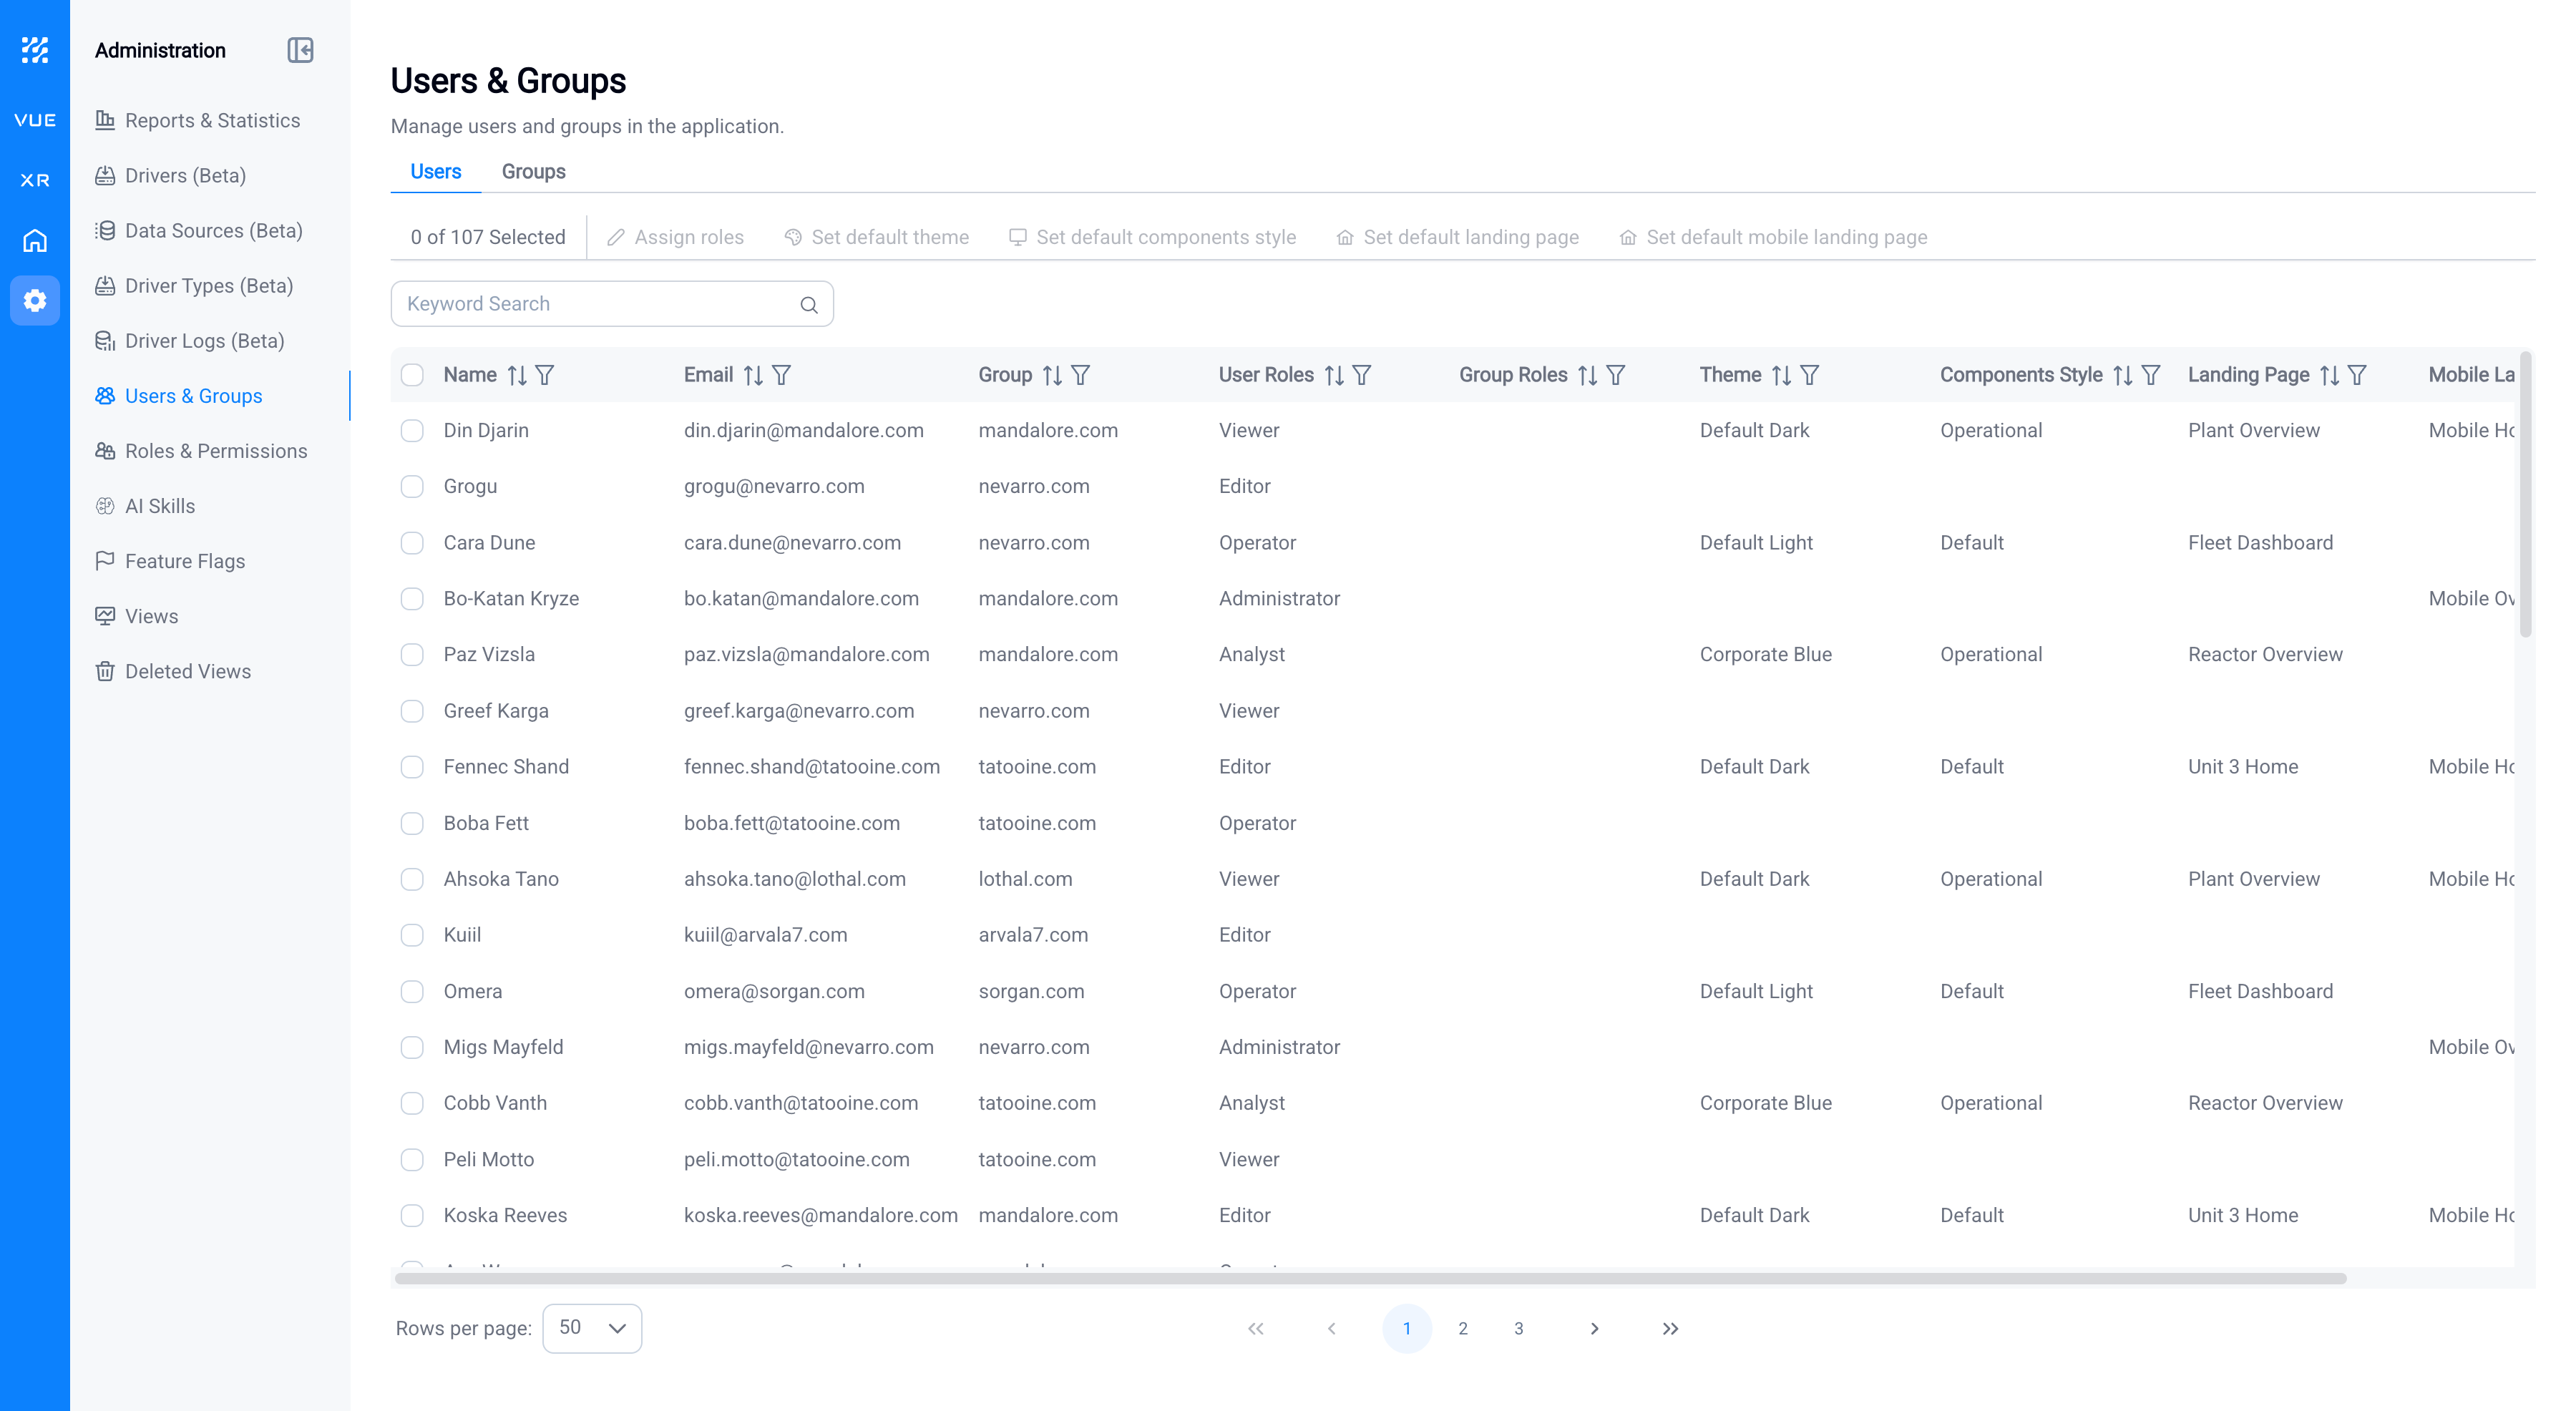
Users and groups are not created here. A user appears in the list automatically the first time they sign in. Groups come from your identity provider (IdP): they are the group claims your IdP sends when a user signs in, and a user's email domain is also listed as a group (for example, everyone signing in with an iotasoft.com address appears under an iotasoft.com group). This page has no option to create, invite, edit, enable, disable, or delete a user or group: provisioning and group membership are managed in your IdP, not in IOTA VUE.
What you do here is decide what those users and groups can do and see by default. If you want to control access on the IOTA side rather than depending on IdP groups, do it through roles: create roles with the permissions you need and assign them to individual users (or to groups) from this page.
Users tab: shows each user's Name, Email, the groups they belong to, their User Roles and inherited Group Roles, and their default Theme, Components Style, Landing Page, and Mobile Landing Page.
Groups tab: shows each group's Name, its number of Users, its Roles, and the same default Theme, Components Style, Landing Page, and Mobile Landing Page.
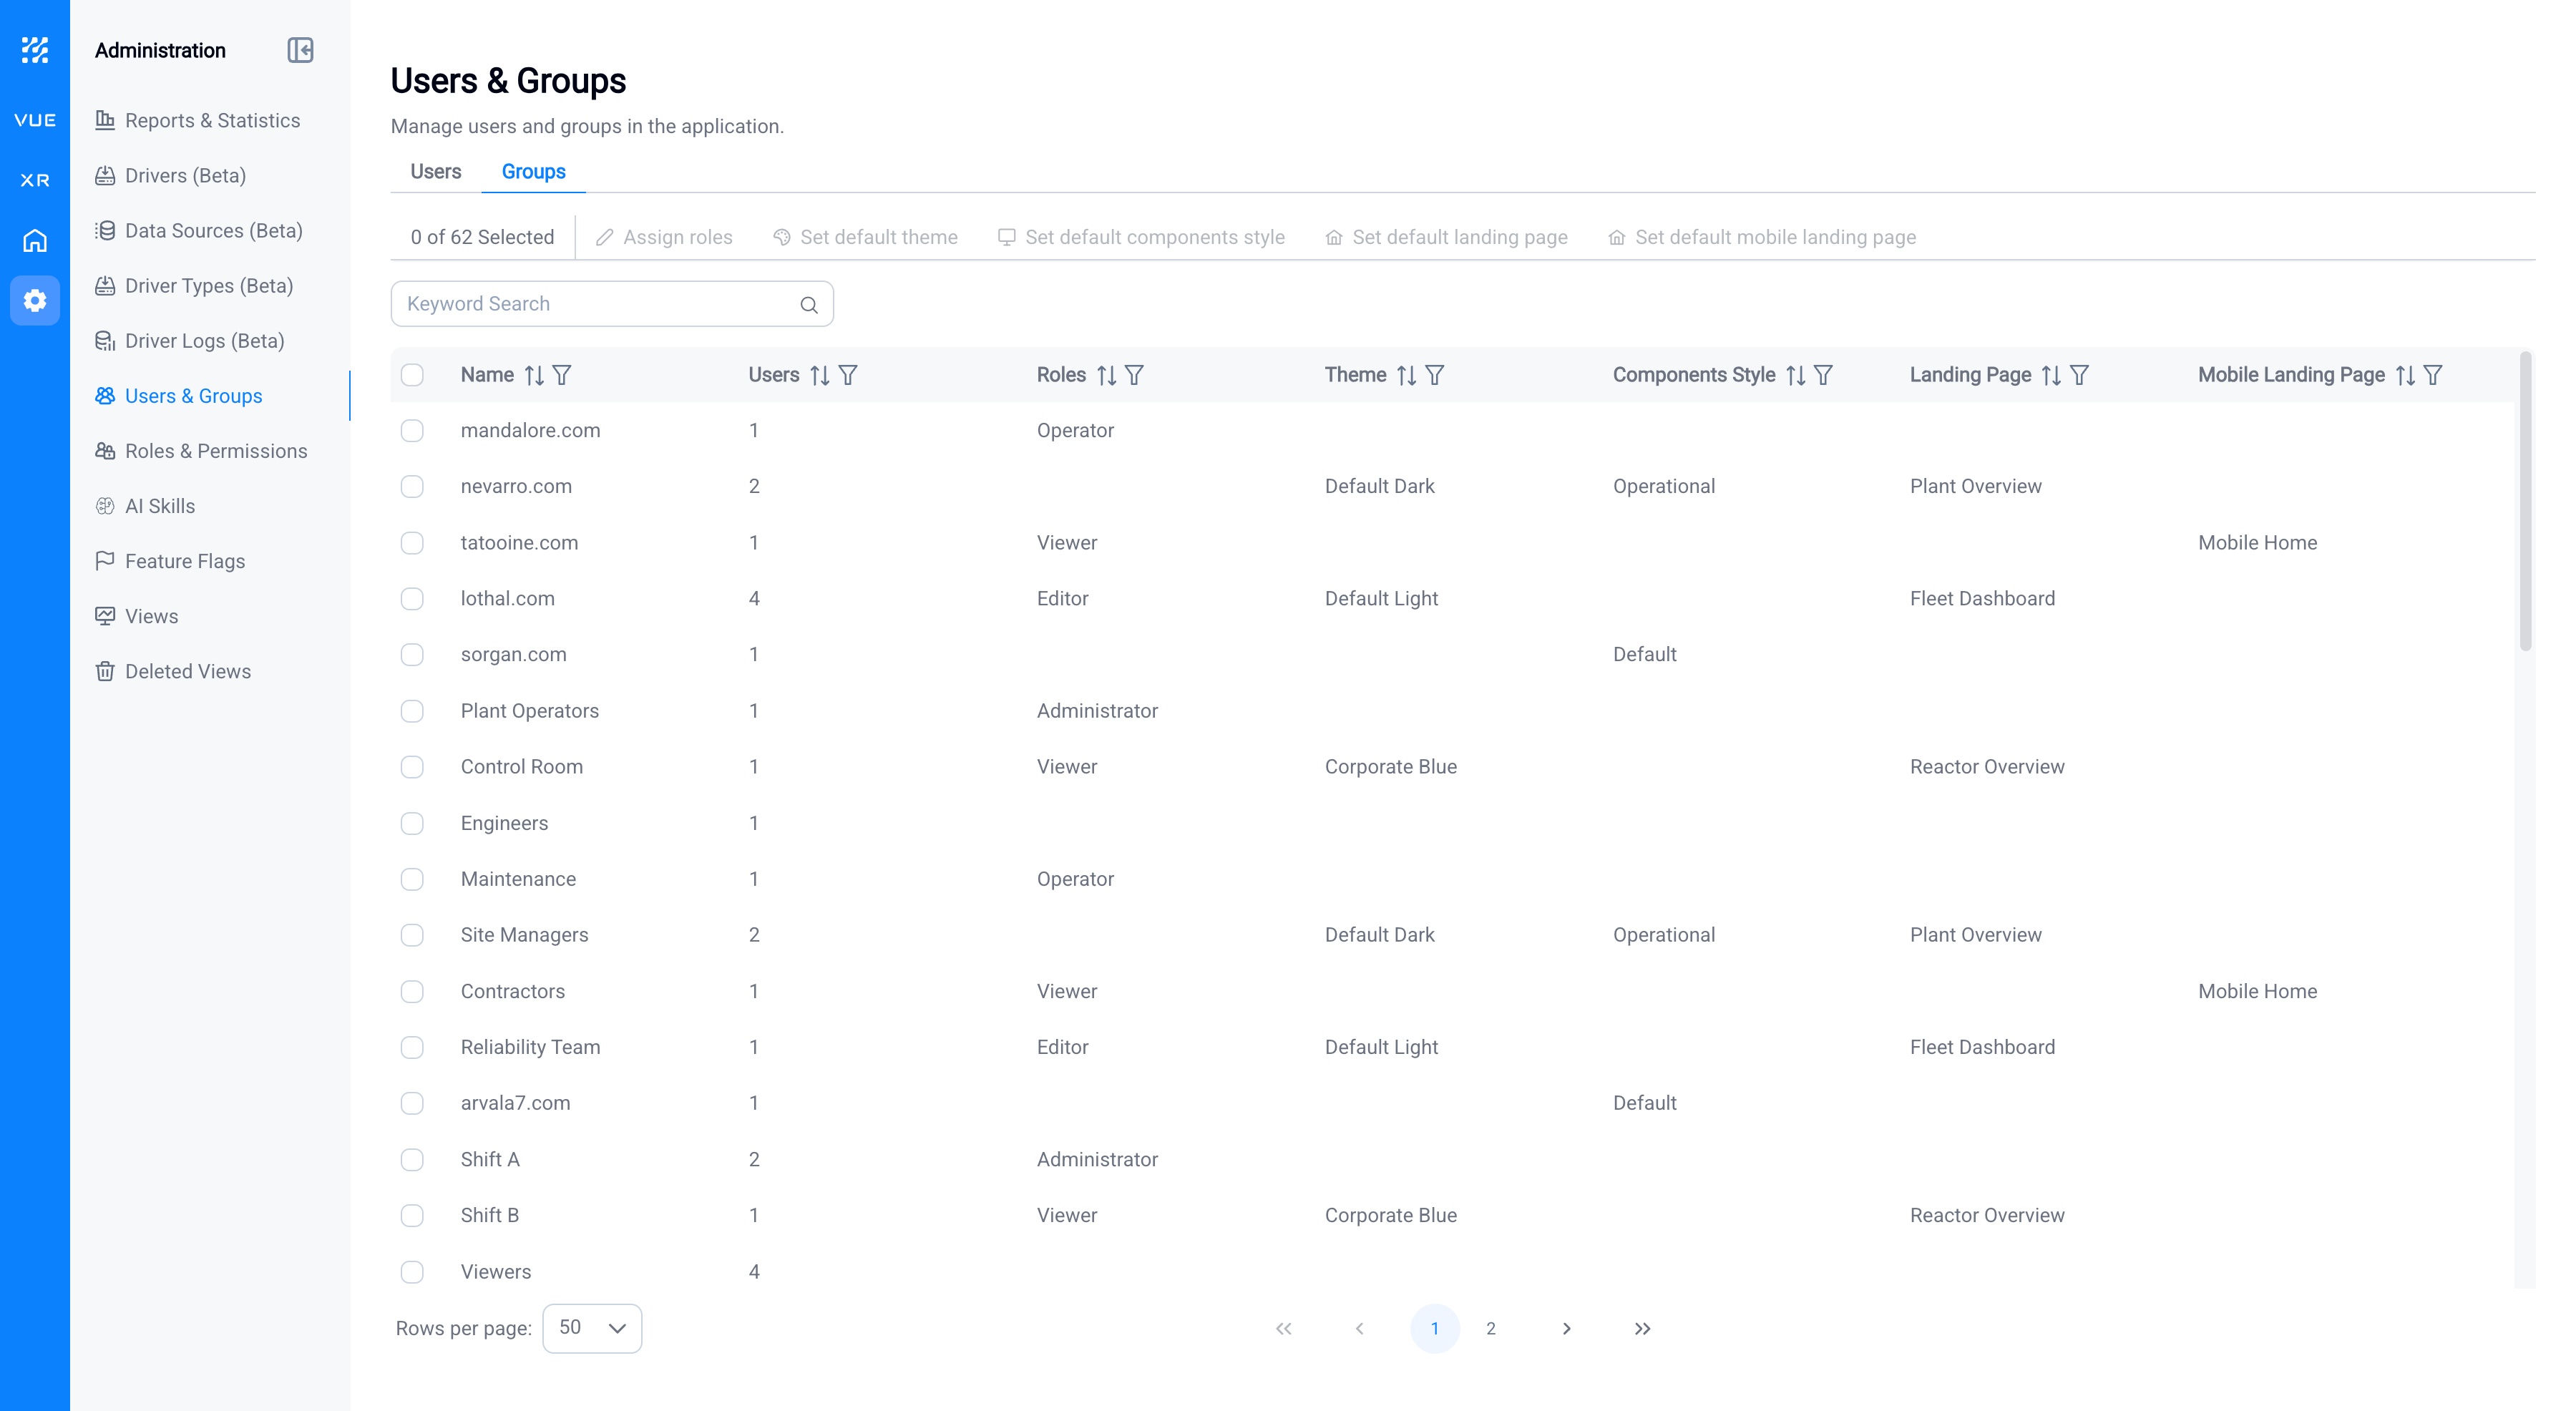
Select one or more rows to enable the toolbar actions at the top of the list:
- Assign roles: add or remove roles for the selected users or groups.
- Set default theme, components style, landing page, and mobile landing page: the visual defaults and the views a user starts on. These same defaults can also be set on a role; see Setting defaults.
When you assign roles to more than one user or group at once, you choose how the change is applied:
- Replace existing roles: clears the current roles first, then applies your selection.
- Add to existing roles: keeps the current roles and adds your selection on top.
Roles & Permissions
A role is a named bundle of permissions. The Roles & Permissions area lists every role with its Name, Description, whether it is the Default, how many Users and Groups hold it, and the role's default Theme, Components Style, Landing Page, and Mobile Landing Page.
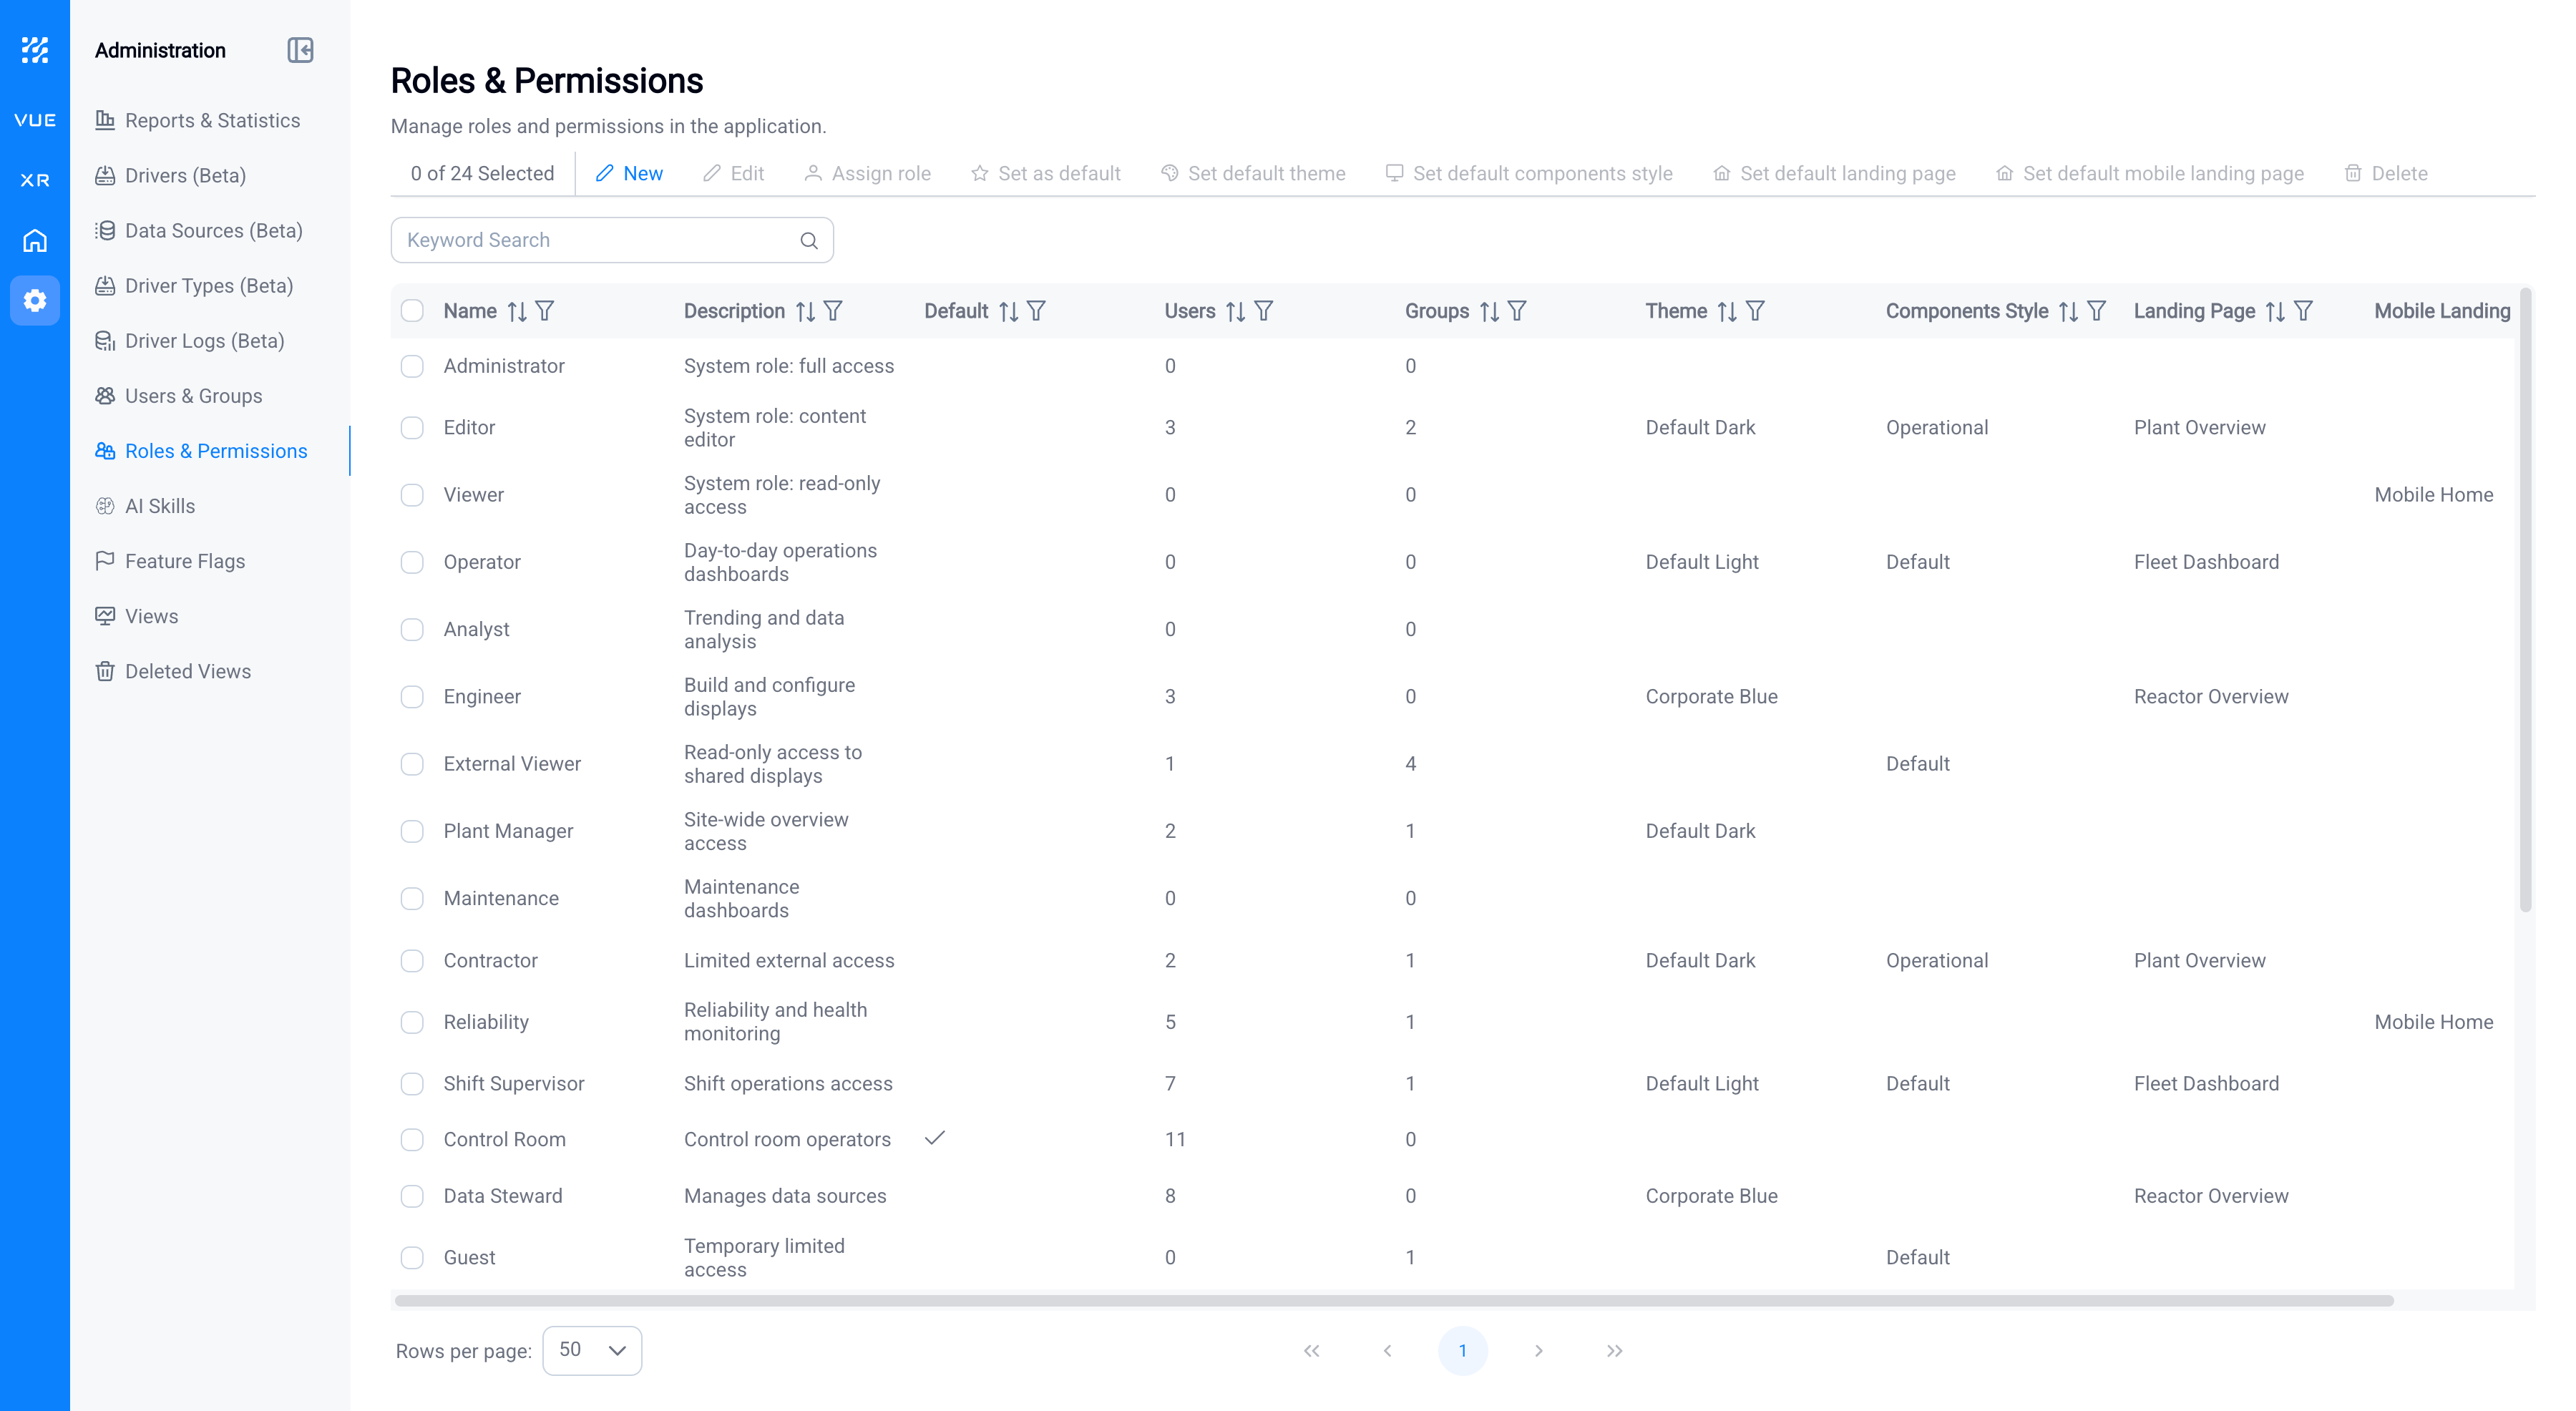
From the actions menu you can create a New role, Edit or Delete a role, Assign it to users and groups, and Set as default (as well as set the role's default theme, components style, and landing pages).
Roles are always in play: every user's access is decided by the roles they hold, and until you assign something more specific, a new user falls back to the default role. Two kinds of role matter here:
- System roles are built-in and protected: they cannot be edited or deleted, so their Edit and Delete actions are hidden. You create your own custom roles for everything specific to your organization.
- The default role decides what a brand-new user can do and see. It is applied to a user the first time they sign in, if they have no other roles yet. Exactly one role can be the default; if none is set, the page shows a reminder to choose one.
Set the default role before you add users
Because every new user inherits the default role, that role effectively decides what an unrecognized user can do the moment they first sign in. Set it to a suitably restricted role, typically view-only, before you onboard the wider user base. If the default is too permissive, or no default is configured at all, new users can arrive with far more access than you intend, up to administrator level.
Creating or editing a role
The role form has a Role name, a Description, a Set as default role checkbox, and a Permissions section. Permissions are grouped under four tabs; each individual permission is an on/off toggle, and each group has a header control to turn a whole group on or off at once.
| Tab | Controls permissions for |
|---|---|
| Administrative | Managing drivers and data sources; viewing and managing users and groups; viewing, adding, editing, and deleting roles; managing displays (view, manage, delete); viewing driver logs; viewing reports and statistics; the AI permissions (Manage AI Skills, View AI Sessions, View AI Statistics); Manage Knowledge Core; and managing feature flags. See Who can do what for what each AI permission opens. |
| IOTA Vue | Creating and editing displays; managing themes and component styles; custom SVG and component libraries; calculations; workspace and user-profile access; and which side-panel tabs (View, Tools, Data Sources, Style, Component Properties) a user sees. |
| Data Search | What a user can search for (tags, assets, timeframes, datasets, and calculations) and which data sources are blocked from that user's data search. |
| IOTA XR | Access to the IOTA XR editor and IOTA XR libraries. |
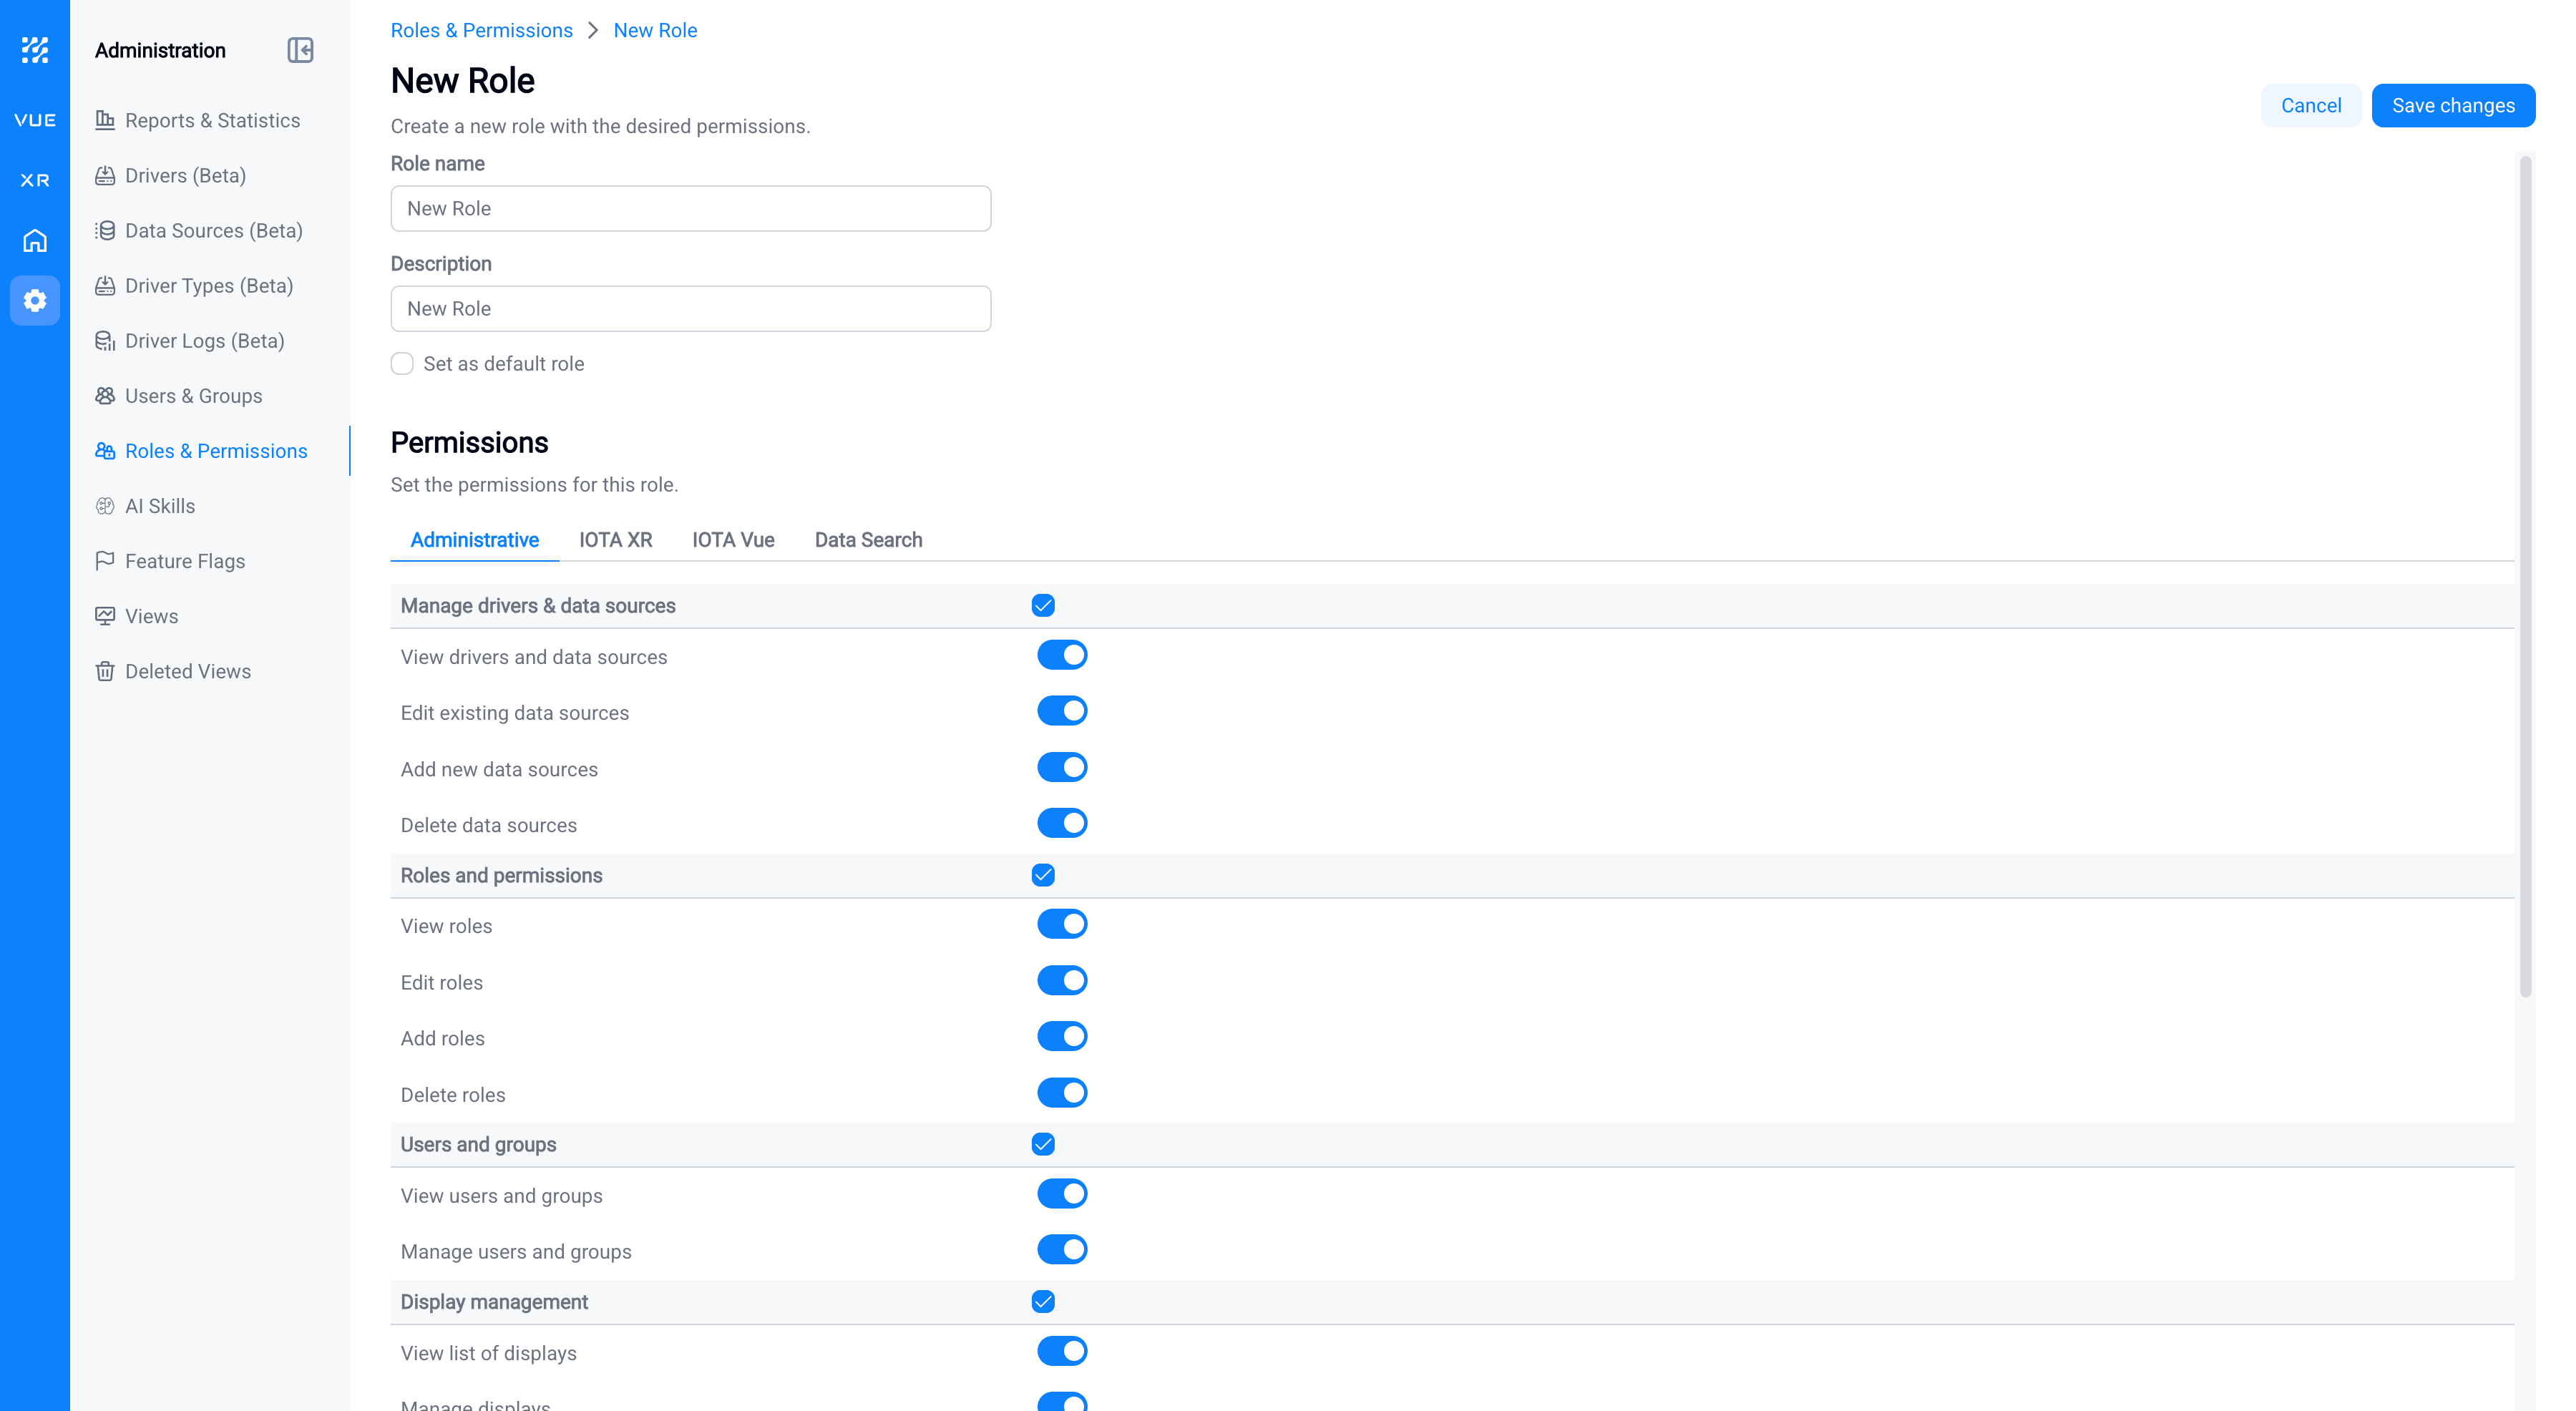
Example: a read-only role for shared displays
A common setup is a locked-down role for external or read-only users who should see only the specific displays you share with them, and nothing else. Create a role (for example, External Viewer) with these settings:
- Administrative tab: leave every permission off. The user gets no access to drivers, data sources, users, roles, logs, reports, or feature flags.
- IOTA Vue tab: turn everything off except, under Side panel tab visibility, enable only View. Leaving Tools, Data Sources, Style, and Component Properties off means the user can't browse or search for data, and can't edit anything.
- Data Search tab: leave the search options off as well; with only the View tab visible, the user has no data search to begin with.
- Save the role, then go to the Views area and use Share with to share only the displays these users should see with this role, granting Read access.
The result: anyone with this role opens exactly the displays you shared with them, in view-only form, with no way to search for tags or assets or reach any other part of the product. As you add external users, assign them this role (or make it a group's role) and they inherit the same restricted access automatically.
Setting defaults
Four defaults shape how a user's environment starts out:
- Theme: the color theme.
- Components Style: the default style applied to the components they build.
- Landing Page: the view they open to when they sign in.
- Mobile Landing Page: the view they open to when signing in on a mobile device.
Each of these can be set at three levels (on a role, on a group, or on an individual user), using the Set default… actions in the matching area (Roles & Permissions, or the Users and Groups tabs).
Recommended: set defaults on the role. A role is the easiest place to manage them; set them once and everyone who holds that role inherits them. Use a group default when a whole group needs something different, and a per-user default only for individual exceptions.
When the same default is set at more than one level, the most specific level wins. To work out which value a user actually gets, take the first of these that has one:
- User: a default set directly on that user.
- Group: otherwise, a default from one of their groups.
- Role: otherwise, a default from one of their roles.
So a landing page set on the user beats one set on their group, which in turn beats one set on their role.
Defaults resolve differently from permissions
"Most specific wins" applies only to the four defaults above. Capabilities and view rights work the opposite way: they are additive, and the most permissive assignment wins, as described at the top of this page (including the one exception, where a view right can't substitute for a missing capability). A narrower level never takes access away.
If a user belongs to several groups, or holds several roles, and no narrower default is set, the tie is not guaranteed to resolve any particular way: don't rely on one group's or role's value winning. When a specific outcome matters, set the default at a narrower level: on the group, or directly on the user.
Sharing views
Roles control application capabilities; view rights control access to individual displays. On the Views area you see every view across all owners, along with each view's Owner and the rights granted to users, groups, and roles.
Use Share with on a view to grant access. In the sharing panel you choose whether the target is a user, a group, or a role, and you set two independent rights:
- Read: the target can open the view.
- Write: the target can edit the view. Granting Write automatically grants Read.
Sharing a view also shares its child views, so granting access to a parent shares everything nested beneath it. As with role assignment, you choose Replace existing permissions or Add to existing permissions when you apply the change. Views are soft-deleted: a deleted view moves to Deleted Views, where it can be recovered rather than being permanently removed.
What's Next
Next, use Driver Logs to check data-source activity and diagnose connection issues.
Related
- Administration Page: the central admin console
- Driver Logs: data-source activity and diagnostics
- Feature Flags: turn platform features on or off